Learned Document
(1) Logon & Create Company
- Top
- October 2, 2019, Wednesday
:
(1)
(2)
(3)
(4)
(5)
- From Blake's FICO Module Document, (4) Company Basics,
- SAP FI – Create Company
- Login to SAP FICO
- drilled down to get to "Define Company"
- saw the screen with other companies listed
- clicked on "New Entries"
- saw the screen with the following text boxes to be filled:
- short and company name, address, language, and currency
- did not continue after "SAP FI – Create Company Code"
- Note: found out that you create a company before adding its company code
- assigning the company code to a company may need to be fixed in the spreadsheet
- Morris says never say the word "sap", say "S" - "A" - "P"
- and never say the word "fico", say "F" - "I" - "C" - "O"
Tasks
- Top
- Update the Excel Spreadsheet
- Edit the Videos
- Place their links on to the spreadsheet
- what version of Windows am I running on the lap top
- reserve
Screenshots
- Top
- Login
- Define Company
- New Entries
- Screen with company short and legal name, address, etc
(2) Logon
- Top
- Login
- Note: On my laptop, I can only successfully logon on by double clicking "functional".
- Note: I need that screenshot.
- Top
- Note: I do get this screen.
- Top
- Note: I do get this screen.

(3) Define Company
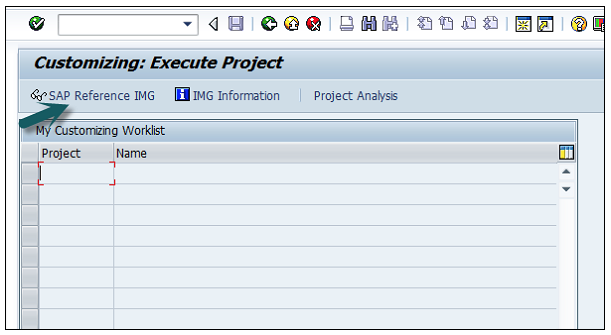
Use T-code SPRO → click on SAP Reference IMG → New window will open.
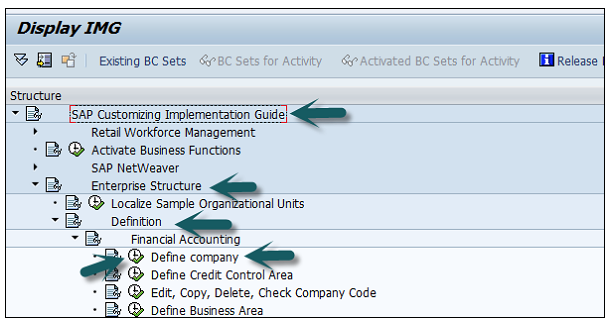
Expand SAP Customizing implementation guide → Enterprise Structure → Definition → Finance Accounting → Define Company → click on Execute (see the pointer in the screenshot).
A new window will open → click on New Entries → New Entries: Details of added entry
(4) New Entries
(5) Screen with name, address, etc
- Top
- Screen with name, address, etc
You need to provide the following details to create a new company −
- Enter the company code to represents group of company.
- Enter the company name.
- Enter the full address-street, PO Box, postal code, city.
- Enter the Country.
- Enter the Language key.
- Enter the currency
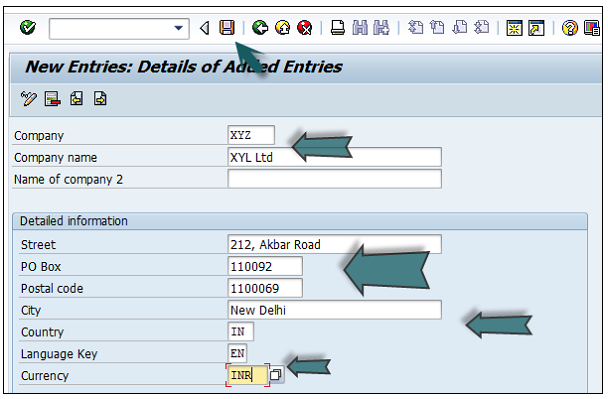
The next step is to save the company details → CTRL+S or as shown in the above screenshot.
(6) October 3, 2019 Thursday - Help Features
- Top
- I have been asking Morris if SAP has any Help screens
- today I noticed the help icon on their main toolbar
- I clicked it from the screen that lists previously entered companies
- another screen titled "Performance Assistant" is displayed with it's own toolbar
- the fourth button from the right has a tooltip titled "SAP Help Portal"
- clicking that button brings up the SAP Help Portal in your Browser
- Note: now I need to evaluate how helpful it really is
- The portal does display the following on their portal
- SAP Community
- Post questions and share your knowledge with other users and experts.
- SAP Support
- Find solutions and get answers from SAP.
- SAP Developer Center
- A different view on the SAP Community, customized for developers.
- SAP Training & Certification
- Research all training and certification programs at SAP.
- at the end of their web page on the portal are the following.
- Browse our Web shop to discover the latest course availability, find training locations nearest you, serach course codes, or focus on a specific training path.
- Discover the continuous learning framework, get guidance on new implementations, as well as ......
- Register for a training course, Browse our Web shop to discover the latest course availability, find training locations nearest you, serach course codes, or focus on a specific training path
- Explore the SAP Learning Hub, Gain insight, cloud-based access to a wide variety of SAP learning content and online learning rooms, with a range of options to fit your buisiness needs.
- Get SAP-certified, Validate your expertise using SAP solutions and ensure you meet the requirements for new roles and responsibilities by completing SAP certifications
- Take advantage of free SAP training, enjoy a flexible, fun, and engaging learning experience through gamification and train when, where, and how you want - free of charge - with openSAP.
- they all have a Learn more links to get to their details
(7) October 4, 2019 Friday - From the Video, How to Create a Company
(7) Logon
- Top
- 00:06:09 He points at the SAP Logon icon from his desktop, and double-clicks it.
- 00:06:17 the SAP NetWeaver splash screen is displayed on the desktop revealing:
- SAP GUI for Windows
- 740 Final Release | Version7400.1.0.1093
- Copyright SAP 1993-2014
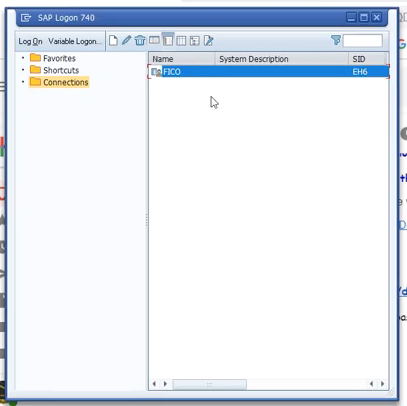
- 00:06:20 the SAP Logon 740 dialog box is displayed
- he double-clicks the only item in the list, that's where we see function and another item
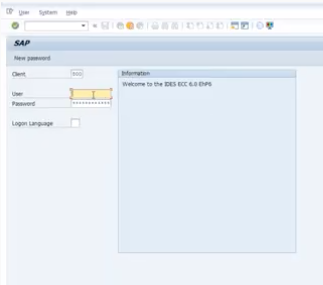
- 00:06:30 the SAP New password screen is displayed revealing Client, and the User field is awaiting our User ID
- he enters his User ID and password
(8) SAP Easy Access or the User Level screen
- Top
- 00:06:41 the SAP Easy Access screen is displayed with Favorites and SAP Menu drop down listing many "folders"
- he also calls it the User Level screen
- 00:07:03 he points out the T-code box
- spro - sap project runtime objects
- 00:07:21 he points out the Enter button,
- the green round icon with a white check mark in it.
- 00:07:25 the screen with the SAP Reference IMG button is displayed, he clicks it
- IMG stand for Implementation Guide
- 00:07:44 the Display IMG screen is displayed with the SAP Customizing Implementation Guide list displayed
- he calls the right arrow buttons, used for expanding, the Navigation Path
- 00:08:18 he selects Enterprise Structure
- then he selects Definition
- then he selects Financial Accounting
- then he selects Define company by clicking the round shaped button to the left of the text Define company
(9) Define Company - New Entries button
- Top
- 00:08:31 the screen that list previously created companies is displayed with the New Entries button in its toolbar
- 00:08:48 how to clear company, he clicks a round green button with 2 white left pointed arrows from the toolbar, called the Back button
- 00:10:36 he clicks the New Entries button
- on the New Entries: Details of Added Entries screen he adds the short name of the company
- he also adds Company name, Street, PO Box, Postal Code, City, Country, Language Key, and Currency
- 00:11:42 he clicks the Save button from the toolbar
- 00:11:46 the Prompt for Customizing request dialog box is displayed
- 00:12:49 he hits the Clear Request button, the button with the white page, which displays the Create Request dialog box
- 00:13:02 he enters Create Company in the Short Description text box
- 00:13:14 he clicks the Save button
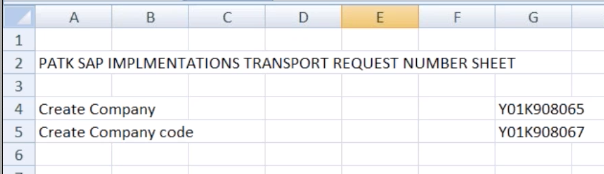
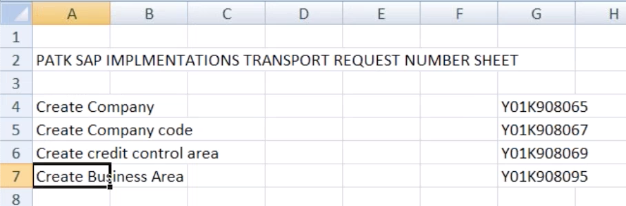
- 00:13:20 he copies the Request number into the clip board by selecting it and using Control C from his keyboard, Y01K908065
- 00:13:31 he opens Excel, he types PATK SAP IMPLENTATIONS TRANSPORT REQUEST NUMBER SHEET in row 2
- he also copies the Transport number, which displays as Request from the dialog box, to the Excel spreadsheet
- and he copies the Short Description text box, Create Company, from the dialog box to the Excel spreadsheet
- 00:14:48 he saves the Excel spreadsheet to the desktop as PATK SAP TRN SHEET
- 00:15:08 from the Prompt for Customizing request dialog box he clicks its Save button, the yellow button with the green check mark
- 00:15:12 the New Entries: Details of Added Entries screen is displayed
- 00:15:22 from the dialog box's toolbar, he clicks the Back button, the green round button with the two left pointing arrows
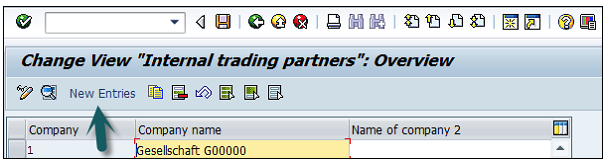
- this displays the Change View "Internal trading partners": Overview dialog box
- this is the dialog box that displays previously entered companies
- you can see the new company, PATK Corporation, displayed at the top of the list.
- 00:15:32 he double clicks PATK Corporation, and the Change View "Internal trading partners": Details screen is displayed with the company info he just entered
- 00:16:01 the meaning of the company he says is internal trading partneris, Morris says a legal entity
(10) Company Code
- Top
- 00:16:45 on the Display IMG page, he is focused on the item: Edit, Copy, Delete, Check Company Code
- he clicks on the small button to it's left
- 00:16:57 to 00:17:16 he points to Define Credit Control Area, we might want to remove this portion from the video
- 00:17:23 the Choose Activity screen is displayed with two sets of activities
- Copy, delete, check company code
- Edit Company Code Data - he double-clicks this one
- 00:17:36 Define Credit Control Area comes up again, we may want to delete that from the newer video
- 00:18:15 the Change View "Company Code": Overview screen is displayed with a list of previously created company names and their assigned company codes
- 00:18:19 he click the New Entries button
- the New Entries: Details of Added Entries screen is displayed
- with the Company Code text box having the focus, he enters PAT1, you can name it anything you want
- in Company Name he types PATK COMPANY CODE
- res
- 00:18:46 in the Additional data area, the City field finally comes into view
- he types NEWYORK
- Country he enters US
- Currency he enters USD
- Language he enters EN
- 00:19:09 he says, who will use this information, the end user
- 00:20:26 he clicks the Save button from the screen's toolbar
- the Edit address: PAT1 dialog box is displayed where you enter the following:
- Title: he enters Company from a drop down list for that field
- Name: he types COMPANY CODE
- Search term 1/2: he enters a P
- 00:20:46 he enters the Street Address information
- 00:21:06 he enters the PO Box Address information
- 00:21:09 he enters the Communication information
- 00:21:19 he clicks the Copy button, the yellow button with the green check mark, at the bottom of the screen
- the Prompt for Customizing request screen is displayed
- 00:21:34 the next step is to click the Create Request button, the button with the white page in it
- the Create Request dialog box is displayed
- in Short Description he types in Create Company code
- he than clicks the dialog box's Save button towards the bottom right hand corner of the screen
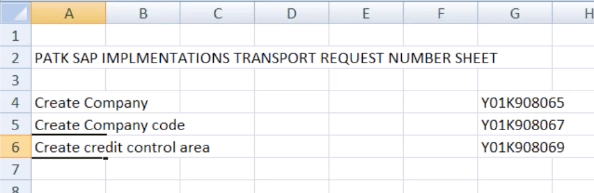
- 00:21:58 from the Prompt for Customizing request screen he copies the Request number Y01K908067 to the clip board
- 00:22:01 he brings up the PATK SAP TRN SHEET Excel spreadsheet ...
- he places that transport number under the first transport number
- then he copies the Short Description, Create Company code, from the Prompt for Customizing request screen
- and places it under the Create Company text in the spreadsheet
- then he saves the Excel spreadsheet
- 00:22:22 he than clicks the yellow button with the green check mark from the Prompt for Customizing request screen
- 00:22:34 the Prompt for Customizing request screen goes away and the New Entries: Details of Added Entries screen is displayed
- 00:23:31 to 00:27:05 Morris has to double click his GUI7.4.ZIP file from his Downloads folde, because his download is completed (can we remove from new video ?)
- the series of folders, BD_NW_7.0_Presentation .... to PRES1, GUI, WINDOWS, WIN32, SapGuiSetup.exe, Extract All button, Extract button
- 3 and a half minutes that can be removed from the new video
- 00:27:06 he is focused on the spreadsheet again
- he says two steps are completed
- company created
- comapny code created
- 00:27:44 Morris asks if a company can have multiple company codes, he says yes
- 00:28:17 he logs in again, I think we can remove this from the new video
- 00:28:46 using the SAP Easy Access screen he types spro
- this displays the Customizing: Execute Project screen
(11) Review
- Top
- spro - stand for: sap project runtime objects
- sap - stands for: system application product in data processing ???????
- erp - stands for: enterprise resource planning
- how many implementation steps / projects: 3 < - - - what is this ? (31:50)
- planning
- implementation
- roll over and support
- how many types of consultants: 3
- busness analysis - they get the requirements
- functional - for implementation
- technical - ABAP, roll over and support, testing
- implementation, how many methods: 5
- project preparation
- buisness blueprint
- configuration
- testing
- roll over and support
- ???? in project profresion methods: 2
- V R analysis
- to be analyzed ?????
(12) Third Step - Define Credit Control Area
- Top
- 00:36:10 take out slow connection discussion
- 00:36:39 the Customizing: Execute Project screen is displayed,
use the SAP Reference IMG button to get to the next screen (is this true ?)
- 00:36:44 company and company code are created, now for the third step
- 00:36:48 the Display IMG screen is displayed
- 00:36:52 Enterprise Structure, Definition, Financial Accounting, Define Credit Control Area
- 00:37:29 he presses the button on the left of Define Credit Control Area
- the Change View " "Credit Control Areas" ": Overview screen is displayed with a list of two columns
- 00:37:47 he presses the New Entries button
- the New Entries: Details of Added Entries screen is displayed
- with the focus on the Cred. contr.area text box, he enters pacc
- Currency: usd
- for the Update field, he clicks the little button
- this displays the Credit update for open order/delivery/billing document value ... screen
- he chooses 000018 from the Update column
- the New Entries: Details of Added Entries screen is displayed again with 000018 in the Update text box
- he than clicks the Save button from the toolbar
- 00:38:17 the Prompt for Customizing request screen is displayed
- with Request: Y01K908067
- and Short Description: Create Company code
- 00:38:25 He clicks the yellow button with the white page in it
- The Create Request screen is displayed with the focus on Short Description
- he enters Create credit control area
- he clicks the dialog box's Save button
- 00:38:37 the Prompt for Customizing request screen is displayed
- with Request: changed from Y01K908067 to Y01K908069
- and Short Description: changed from Create Company code to Create credit control area
- 00:38:38 he copies the Request: Y01K908069 and paste it to the PATK SAP TRN SHEET spreadsheet
- 00:38:45 he copies the Short Description: of Create credit control area to the spreadsheet
- 00:38:59 the Prompt for Customizing request screen is displayed
- he clicks on the yellow button with the green checkmark
- 00:39:02 the New Entries: Details of Added Entries screen is displayed
- he clicks the Back button from the toolbar
- 00:39:03 the Change View " "Credit Control Areas" ": Overview screen is displayed
- the Description for PACC is empty and in focus
- he types patk crdict control area
- he clicks the Save button from the toolbar
- 00:39:19 to 01:16:57 he is checking up on the downloading status on Morris' PC
- Morris double clicks SapGuiSetup.exe
- the Front-End Installer screens are displayed
- 00:50:16 SAP FICO.pdf is displayed on the desktop
- 00:56:37 the installation is complete
- 00:56:51 Morris uses his own SAP Logon
- 00:57:46 Morris enters System Connection Parameters
- 01:03:47 Morris attempts to logon
- 01:16:14 Morris is in !
- we can delete this from the video around 36 minutes
(13) End of Video 1 and beginning of Video 2
- Top
- 00:00:00 to 00:03:49 conversation
- how many kind of projects: there are 3, implementation, rollover, and support
- how many kind of people: there are 3, functional, technical, ABAP
- how many implementation methods: there are 5, implementation, project preparation, business for free, configuration, testing and finalization
- SAP stands for: system application, product, data processing
- ERP stands for: enterprise resource planning
- spro stands for: sap project runtime objects
- 00:03:49 the spreadsheet is displayed
- 00:03:49 to 00:06:33 Morris is being told to close other programs can be deleted from video
- 00:07:24 User Level screen is displayed titled as SAP Easy Access
- he points out the T-Code box from the toolbar
- he clicks the Enter button from the toolbar
- 00:08:31 the Customizing: Execute Project screen is displayed
- 00:08:50 he presses the SAP Reference IMG button
- 00:09:10 the Display IMG screen is displayed, he calls it a Functional Consultant Screen
- right arrow button is called Navigational Path
(14) Define Business Area
- Top
- 00:10:16 he clicks on Enterprise Structure, Definition, Financial Accounting, Define Business Area
- he clicks the button to its left
- the Change View "Business area": Overview screen is displayed
- 00:11:07 he clicks the New Entries button
- the New Entries: Overview of Added Entries screen is displayed
- he types PABA in the Business Area column
- he types PATK Business area in the Description column
- he clicks the Save button from the toolbar
- 00:12:24 to 00:15:58 Morris asks how to see yesterdays work
- he shows him the company, company code, and ...
- the system keeps all this work stored
- 00:15:58 he again selects Enterprise Structure, Definition, Financial Accounting, Define Business Area from the Display IMG screen
- he clicks the button to its left
- 00:16:25 he clicks the New Entries button
- the New Entries: Overview of Added Entries screen is displayed
- he types PABA in the Business Area column
- he types PATK Business area in the Description column
- he clicks the Save button from the toolbar
- 00:16:58 the Prompt for Customizing request screen is displayed
- with Request: Y01K908093
- and Short Description: Define parelle currencies
- 00:17:19 he clicks the Create Request button, the one with the white page in it
- the Create Request screen is displayed with the focus on the empty Short Description text box
- 00:17:28 he types in the Short Description text box: Create Business Area
- he clicks its Save (Enter) button
- the new Request number of Y01K908095 is displayed with the just entered Short Description of Create Business Area
- 00:18:27 he shows where the Y01 from the Request number comes from the System ID
- 00:18:54 he copies the Request number into the spreadsheet
- 00:18:59 he copies the Short Description into the spreadsheet
- 00:19:12 he clicks the yellow button with the green check from the Prompt for Customizing request screen
- he clicks the yellow button with the green checkmark
- 00:19:17 the New Entries: Overview of Added Entries screen is displayed
- with Business Area: PABA and Description: PTAK Business Area
- 00:19:18 he clicks the Back button from the toolbar
- the Change View "Business area": Overview screen is displayed
- Business Area and Description columns are full, and Business Area is in sequential order
- 00:19:25 he clicks the Back button from the toolbar
- the Display IMG screen is displayed
- the focus is on the Define Business Area line under Financial Accounting which is under Definition
- the Define Business Area line is highlighted in Yellow
(15) Define Functional Area
- Top
- 00:19:29 he focuses on Define Functional Area,just beneath Define Business Area in the list, which is also under Financial Accounting which is under Definition
- he clicks the button to its left
- 00:19:38 an error message is displayed on the bottom of his screen
- it says: This view is obsolete. Use transaction FM_FUNCTION instead
- 00:19:38 what is a functional area
- suppose your company has marketing, sales, finance, we'll call this different functions
- 00:19:55 he clicks the Back button twice
- the first time displays the Customizing: Execute Project screen which has 2 empty columns, Project and Name in the My Customizing Worklist panel
- the second time displays the SAP Easy Access screen with SAP Menu and just one level down
- however the focus is in the T-Code box from the toolbar
- 00:19:59 inside the T-Code box he types FM_FUNCTION, we saw this in the previous error message
- he clicks the Enter button, the first button in the toolbar
- he calls FM_FUNCTION a transaction code
- 00:20:20 the Process Functional Area screen is displayed, all its fields are empty
- 00:20:29 to 00:21:04 Morris noticed that to Define a Functional Area is different from the previous 4 things we did:
- Create Company, Create Company Code, Create Credit Control Area and Define Business Area
- we got to these functions thru the list, now we have to type the transaction code of FM_FUNCTION in the T-Code box
- 00:21:04 in the Process Functional Area screen he types inside the Functional Area text box: PAFA
- 00:21:21 he clicks the Create Functional Area button, a yellow button with a white page in it, which is located to the right of the text box Functional Area
- The fields in the first three panels are now ready to take in typed data
- the focus is on the first text box titled Functional area text
- 00:21:25 he types PATK FUNCTIONAL AREA
- 00:21:30 in the Valid from text box he enters a date as 08.09.2017
- 00:21:38 in the Valid to text box he types 20.12.2018
- note the format of the date: day, month, and 4 digit year seperated by periods ( . )
- 00:21:49 he clicks the Save button from the toolbar
- at the bottom of the screen is a message: Finctional area PAFA has been saved
- focus goes back to the Functional Area text box near the top of the screen
- 00:21:55 he brings up the spreadsheet and types: Functional area created
- and in the transaction request number column of the spreadsheet he types: created
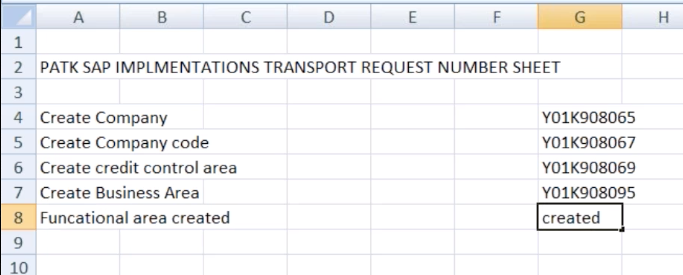
- 00:22:54 Morris notices that there is no transport request number
- he says that when you are creating a Functional Area, that there is no transport request number generated
- 00:23:20 he types spro in the T_Code box of the user level screen titled SAP Easy Access
- the blank Customizing: Execute Project screen is displayed with the SAP Reference IMG button
- he ask what is IMG, its the implementation guide
- he clicks the SAP Reference IMG button
- 00:25:28 the Display IMG screen is displayed
- he selects Enterprise Structure, Definition, Financial Accounting, Maintain FM Area
- he points out that Maintain consolidation business area is not required
- 00:26:06 he clicks the button to the left of Maintain FM Area
- FM stands for Financial Management so Maintain FM Area is Maintain Financial Management Area
- use of this is: Cash Management, financial construction ?, I couldn't understand the rest of the sentence
- 00:26:17 the Change View "Create FM area": Overview screen is displayed
- he clicks the New Entries button
- 00:26:22 the New Entries: Overview of Added Entries screen is displayed
- with the focus on the first cell of the three column panel
- three columns are: FM Area, FM area text, and FM area currency
- 00:26:46 in the FM Area column he types: pafa
- 00:27:00 in the FM area text he types: patk fm area
- 00:27:04 in the FM area currency he types: usd
- 00:27:12 he clicks the Save button from the toolbar
- 00:27:15 the Prompt for Customizing request screen is displayed with
- Request: Y01K908095
- Short Description: Create Business Area
- 00:27:25 he clicks the Create Request button, the one with the white page in it
- the Create Request screen is displayed
- with the focus on an emptied Short Description text box
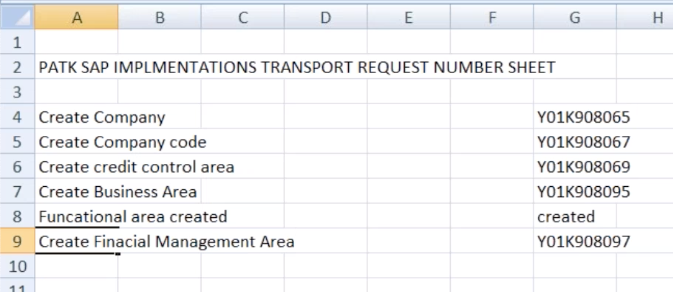
- 00:27:31 he types: Create Finacial Management Area (he forgot an N in Financial)
- 00:27:42 he clicks the Save button
- 00:27:46 Create Finacial Management Area is now in the Short Description of the Prompt for Customizing request
screen
- he now copies the Request of Y01K908097 into the spreadsheet, under the word created
- 00:27:55 He now copies the Short Description of Create Finacial Management Area from the Prompt for Customizing request screen into the spreadsheet
- Top
- 00:28:01 he saves the spreadsheet
- 00:28:07 he clicks the green checkmark button in the Prompt for Customizing request screen
- 00:28:13 the Prompt for Customizing request screen disappears
- and the New Entries: Overview of Added Entries screen is displayed
- with the first row as FM Area: PAFA, FM area text: patk fm area, and FM area currency: USD
- the focus is on the cell under PAFA
- there is a status message at the bottom of the screen: Data was saved
- 00:28:29 he clicks the Back button from the toolbar
- the Change View "Create FM areas": Overview screen is displayed
- 00:28:32 he clicks the Back button again
- the Display IMG screen is displayed
- the Maintain FM Area line is highlighted in yellow
- 00:28:41 he says the two lines will be discussed when learning about the Controlling Module
- Define Segment
- Define Profit Center
- 00:29:46 he will close the Financial Accounting line by clicking the arrow button
(16) Assigning Company Code to Company
- Top
- 00:29:50 he wants to go into Assignment
- 00:29:57 he wants to go into Financial Accounting
- 00:30:01 he wants to go into Assign company code to company
- 00:30:11 he clicks the button to the left of Assigning company code to company
- the Change View "Assign Company Code - > Company": Overview screen is displayed with a list of Control Codes, City, and Company
- 00:30:19 he clicks the Position... button, which displays the Another entry screen, with a field to enter a new Company Code
- he enters patk and clicks the yellow button with the green checkmark
- the Change View "Assign Company Code - > Company": Overview screen is displayed
- with PAT1 in Control Code, NEWYORK in City, and Company is blank
- 00:30:36 the focus is on the empty Company field and the Match For button (Search) is exposed
- he clicks the Match For button
- a screen titled Company (1) 249 Entries found is displayed
- 00:31:28 PATK Corporation is in the list as:
- Co. is PATK
- Company Name is PATK Corporation
- Ctr is US
- Curr. is USD
- 00:31:29 he selects PATK Corporation and the Change View "Assign Company Code - > Company": Overview screen now displays PATK in the Company column
- 00:31:56 he clicks the Save button from the toolbar
- 00: 32:00 the Prompt for Customizing request screen is displayed
- with a Transport Request Number of Y01K908097
- and Text in the Short Description: Create Finacial Management Area
- Financial is spelled wrong
- More importantly, this does not describe what we are doing !
- 00:32:02 he clicks the Create Request button, the yellow button with the white page
- the Create Request dialog box is displayed with the focus on Short Description
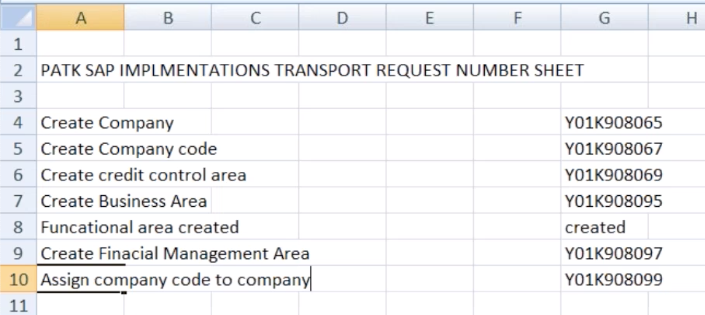
- he types Assign company code to company
- 00:33:27 he clicks the Save button from the lower right side of the dialog box
- the Request changed from Y01K908097 to Y01K908099
- and the Short Description changed from Create Finacial Management Area to the text just previously entered: Assign company code to company
- 00:33:32 he selects the Transport Request Number and copies it into the clipboard
- 00:33:34 he brings up the PATK SAP IMPLENTATIONS TRANSPORT REQUEST NUMBER SHEET spreadsheet
- he than paste the Transport Request Number to the spreadsheet in the column with the other Transport Request Numbers
- 00:33:38 he copies the Short Description of Assign company code to company from the Prompt for Customizing request screen
- and paste that into the spreadsheet
- 00:33:45 he saves the spreadsheet again as PATK SAP TRN SHEET onto his desktop
- 00:33:54 he clicks the Continue button, the yellow button with the green checkmark, it acts like a Save button
- 00:33:56 the Change View "Assign Company Code - > Company": Overview screen is displayed
- 00:33:57 to 00:38:22 conversation about company code might get deleted
- 00:38:23 to 00:39:35 SAP timed out, he is logging back in, can be deleted
- 00:39:36 from the Display IMG screen, he selects Enterprise Structure, Assignment, Financial Accounting, Assign company code to credit control area
- he clicks the button before the text
(17) Unlocking a Table
- Top | SM12 and Lock Screen
- 00:39:00 he logs on
- 00:39:11 the License Information for Multiple Logon screen is displayed
- in the You can: section he selects the middle option:
- Continue with this logon, without ending other logons in system
- If you continue with this logon without ending any existing logons to
- system, this will be logged in the system. SAP reserves the right to
- view this information.
- then he clicks the Enter button on the screen, green checkmarked button
- 00:39:19 the SAP Easy Access screen is displayed with SAP Menu item displaying one level down
- 00:39:20 he wants to enter spro in the T-Code box
- 00:39:21 he clicks the button to its left
- 00:39:23 the Customizing: Execute Project screen is displayed
- 00:39:24 he clicks the SAP Reference IMG button
- 00:39:34 the Display IMG screen is displayed
- 00:39:40 from the Display IMG screen, he selects Enterprise Structure, Assignment, Financial Accounting, Assign company code to credit control area
- 00:39:58 he selects the button to the left of Assign company code to credit control area
- 00:40:03 the Locked Data message box is displayed with three buttons,
- with a question, Do you want to display locked data?
- and three buttons,Yes, No, Info
- 00:40:04 he selects Yes
- 00:40:08 the Display View "Assign company code - > credit control area": Overview screen is displayed with the following columns
- Control Code, Company Name, City, CCAr, Overwrite CC....
- all the other times we've seen this screen the header displayed Change, not Display
- he clicks the Back button
- 00:40:09 it looks like the screen is displayed again
- it looks like he clicks the back button again
- the Customizing: Execute Project screen is displayed
- it looks like he clicks the Back button
- 00:40:11 the SAP Easy Access screen is displayed
T-Code SM12 and "Start of application: Display and Delete Locks" screen
- Top | Back to Unlocking a Table
- 00:40:13 he types sm12 into the T-Code box
- then he clicks the Enter button to the left on the toolbar
- 00:40:16 a message at the bottom of the screen is now displayed: Start of application: Display and Delete Locks
- 00:40:19 the Select Lock Entries screen is displayed
- with the focus on the Table name field
- 00:40:48 he clicks the List button where the toolbar should be
- 00:40:56 the Lock Entry List screen is displayed with one row of data
- 00:41:00 he selects the line by clicking all the way to its left
- a message at the bottom of the screen says: Selected Lick Entries: 1
- 00:41:05 from the Menu bar he clicks the first option: Lock Entry
- which displays a submenu where he clicks Delete
- 00:41:08 the Delete lock entry screen is displayed with the question: Delete lock entry?
- 00:41:11 the Performance Assistant screen is displayed
- 00:41:14 he clicks its Windows Close button
- the Lock Entry List screen is displayed with one row of data
- and a message on the bottom saying: No lock entries found
- 00:41:43 he clicks the Back button twice
- the SAP Easy Access screen is displayed
- 00:41:57 he enters spro in the T-Code box
- he clicks the Enter button to its left
- the Customizing: Execute Project screen is displayed
- 00:41:49 he clicks the SAP Reference IMG button
- 00:41:53 the Display IMG screen is displayed
- Top
- 00:42:04 from the Display IMG screen, he selects Enterprise Structure, Assignment, Financial Accounting, Assign company code to credit control area
- he clicks the button before the text
- 00:42:19 the Locked Data screen is displayed with the question: Do you want to display locked data?
- 00:42:21 the Display View "Assign company code - > credit control area": Overview screen is displayed
- he clicks the Back button
- 00:42:25 the Customizing: Execute Project screen is displayed
- 00:42:26 he clicks the Back button again
- the SAP Easy Access screen is displayed
- he agains needs to unlock an entry
- 00:42:28 he types sm12 in the T-Code box
- 00:42:31 he clicks the Enter button to its left
- the Select Lock Entries screen is displayed
- 00:42:32 the Lock Entry List screen is displayed
- he clicks the Back button twice
- he back to the SAP Easy Access screen
- 00:42:40 he types sm12 in the T-Code box
- he clicks the Enter button to its left
- 00:42:42 the Select Lock Entries screen is displayed
- he clicks the Back button
- 00:42:45 the SAP Easy Access screen is displayed
- reserve
- 00:43:29 he is asking Morris for his ID because something is still locked
- he seems to get it fixed this time
(18) Assign Company Code to Credit Control Area
- Top
- 00:44:20 from the Display IMG screen, he selects Enterprise Structure, Assignment, Financial Accounting, Assign company code to credit control area
- he clicks the button before the text
- 00:44:38 the Change View "Assign company code - > credit control area": Overview screen is displayed with the following columns
- Control Code, Company Name, City, CCAr, Overwrite CC....
- he clicks the Position... button
- 00:44:40 the Another entry box is displayed with the focus in the Company Code text box
- he types pat1
- then he clicks the Continue button
- 00:44:46 the Control Code: PAT1, Company Name: PATK COMPANY CODE (oh oh), City: NEWYORK
- there is another column named CCAr, the focus is in that field, and a little button is also displayed next to that empty field
- he clicks that little button and the Credit control area (1) 53 Entries found screen is displayed with two columns
- CCAr and Description
- 00:45:31 he scrolls down and points to Morris' record, CCAr: PACC and its Description: patk crdict control area
- he double clicks its Description
- 00:45:36 the Change View "Assign company code - > credit control area": Overview screen is displayed with PACC in the CCAr field
- then he clicks the Save button from the toolbar
- Reserve
Reserve