| Module | Module Name | Links | Links | Blake's Links |
| PM | Plant Mantenance | tutorials point | Blake | |
| MM | Material Management | tutorials point Overview | Guru99 | Blake: 1-10 | 11-20 | 21-25 |
| SD | Sales and Distribution | tutorials point Tutorial | Guru99 | Blake |
| PP | Production Planning | tutorials point Tutorial | Guru99 | Blake | 1-7 |
| External Links | ||||
| NewLanguage.html | FICO Module: Blake's : Tutorials Point | |||
| 1 | Home | MM_Doc Tutorials Point | 11 | Source Determination/List | MM_Doc Tutorials Point | 21 | Service Management | MM_Doc Tutorials Point | ||
| 2 | Overview | MM_Doc Tutorials Point | 12 | Procurement Cycle | MM_Doc Tutorials Point | 22 | Valuation | MM_Doc Tutorials Point | ||
| 3 | Screen Navigation | MM_Doc Tutorials Point | 13 | Purchase Requisition | MM_Doc Tutorials Point | 23 | Account Determination | MM_Doc Tutorials Point | ||
| 4 | Procurement Process | MM_Doc Tutorials Point | 14 | Request for Quotation | MM_Doc Tutorials Point | 24 | Configuration | MM_Doc Tutorials Point | ||
| 5 | Organization Structure | MM_Doc Tutorials Point | 15 | Outline Agreement | MM_Doc Tutorials Point | 25 | Transaction Codes | MM_Doc Tutorials Point | ||
| 6 | Enterprise Structure | MM_Doc Tutorials Point | 16 | Quota Arrangement | MM_Doc Tutorials Point | |||||
| 7 | Defining Organizational Structure | MM_Doc Tutorials Point | 17 | Posting Period | MM_Doc Tutorials Point | |||||
| 8 | Organizational Units | MM_Doc Tutorials Point | 18 | Purchase Order Types | MM_Doc Tutorials Point | |||||
| 9 | Master Data | MM_Doc Tutorials Point | 19 | Inventory Management | MM_Doc Tutorials Point | |||||
| 10 | Purchase Info Record | MM_Doc Tutorials Point | 20 | Invoice Verification | MM_Doc Tutorials Point |
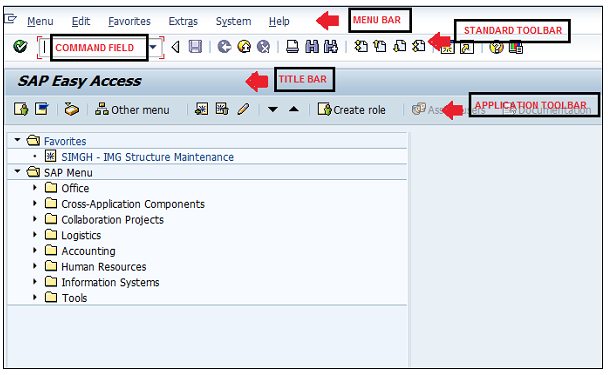
Given below is a brief description of the available toolbars −
Menu Bar − Menu bar is the topline of the dialog window in the SAP system.
Standard Toolbar − This toolbar includes standard functions such as save, top of page, end of page, page up, page down, print, etc.
Title Bar − Title bar displays the name of the application/business process you are currently in.
Application Toolbar − Application-specific menu options are available on this toolbar.
Command Field − To start a business application without navigating through menu transactions, some logical codes are assigned to the business processes.
Transaction codes are entered in the command field to start an application directly.

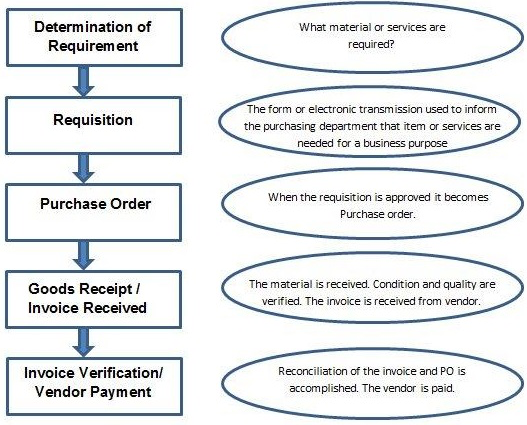
A brief introduction of the procurement activities is given below −
| Sr.No. | Procurement Activities & Description |
|---|---|
| 1 | Determination of requirement It is the logical subdivision where it is determined what material or services are required, and which supplier can fulfill the requirements. |
| 2 | Creating Purchase Requisition It is the phase in which the purchasing department is informed about the requirement of items or services. A requisition is an internal document. |
| 3 | Creating Purchase Order It is the phase when an order is created from requisition and it is approved and assigned to a supplier. |
| 4 | Goods receipt/ Invoice Received It is the phase in which the material is received by the company and its condition and quality are being inspected. In this phase, an invoice is received from the vendor (seller). |
| 5 | Invoice verification/ Vendor Payment It is the phase in which the vendor (seller) is paid from the company and reconciliation of the invoice and PO is accomplished. |
There are two types of basic procurement −
Procurement for Stock vs Consumption
External vs Internal Procurement
The following points show the difference of Procurement for Stock vs. Consumption −
The following points show the difference of External vs Internal Procurement −
External procurement − It is the process of procuring goods or services from external vendors. There are three basic forms of external procurement generally supported by the purchasing component of the IT system.
One-time orders are generally used for material and services that are ordered irregularly.
Longer-term contracts with the subsequent issue of release orders − For materials that are being ordered regularly and in large quantities, we can negotiate deal with the vendor (seller) for pricing or conditions & record then in a contract. In a contract you also specify the validity date.
Longer-term scheduling agreements and delivery schedules− If a material is ordered on an everyday basis and is to be delivered according to an exact time schedule, then you set up a scheduling agreement.
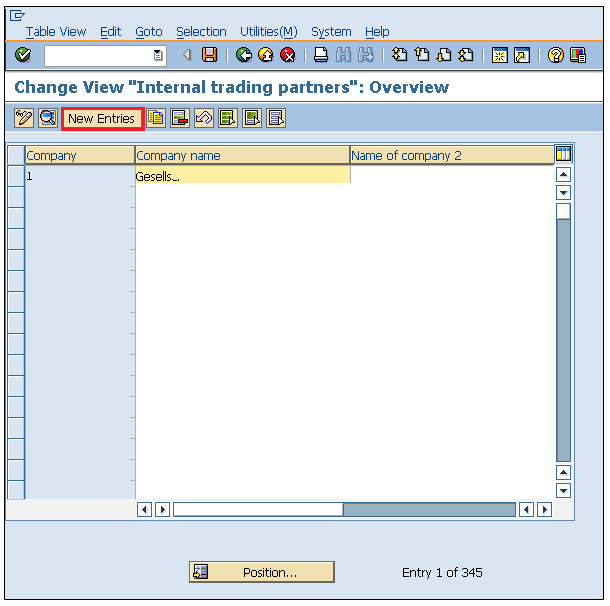
Internal Procurement − Large corporate organizations may own multiple separate businesses or companies. Internal Procurement is process of getting material and services from among identical company. So, each of these companies maintains a complete bookkeeping system with separate Balance, Profit & Loss Statements so that when trade occurs between them it will be recorded.
When a client purchases SAP, it comes in a CD in the form of a software. When SAP is first installed, it has its standard setup that needs to be configured according to the needs of the client, i.e., organization.
Configuration of SAP is done with the help of an implementation guide, known as IMG. It is used to add fields, to change field names, to modify dropdown lists, etc. to adjust according to the functionality of an organization. IMG is where we define the enterprise structure and other settings that are required for the functioning of SAP according to the requirements of an organization.
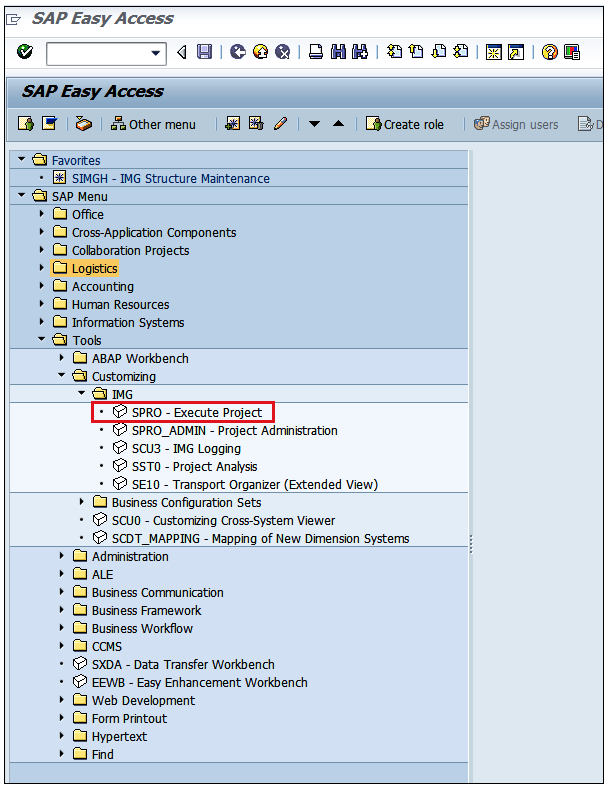
To perform any type of configuration according to the requirements of an organization, the first step is to reach the implementation guide (IMG) screen. We can reach the implementation guide in two ways −
We can navigate through the following path to reach out to IMG −
SAP Easy Access ⇒ Tools ⇒ Customizing ⇒ IMG ⇒ Execute Project
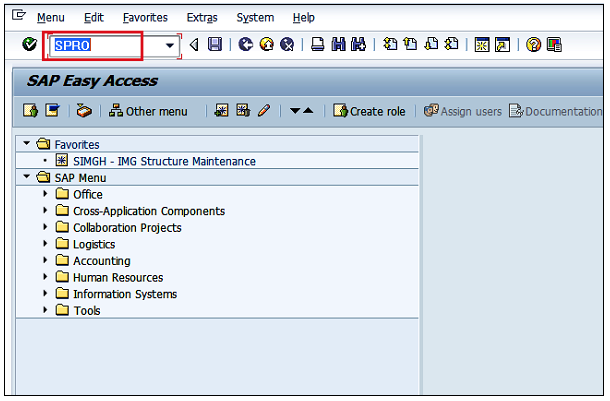
IMG screen can be reached out just by following the steps given below −
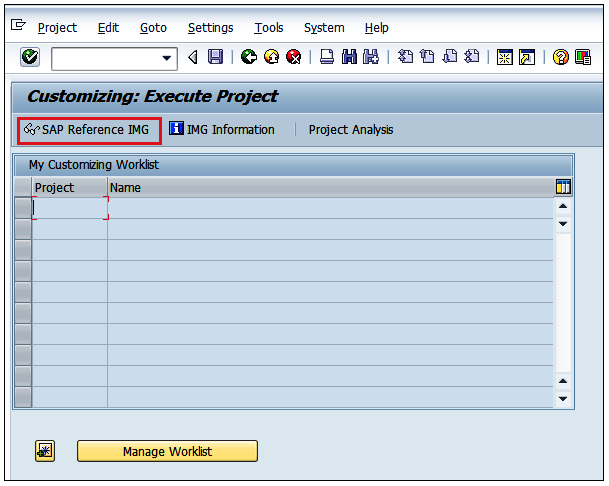
After SPRO, on the next screen, click on SAP Reference IMG.
The main menu paths for MM area are as follows −
SAP Customizing Implementation Guide (IMG) ⇒ Enterprise Structure ⇒ Definition
SAP Customizing Implementation Guide (IMG) ⇒ Enterprise Structure ⇒ Assignment
SAP Customizing Implementation Guide (IMG) ⇒ General ⇒ Material Master
SAP Customizing Implementation Guide (IMG) ⇒ Materials Management
An enterprise structure defines various levels in an organization. These levels are placed according to some hierarchy. Each level has some specific functionality associated with it, which in a combined way describes the working of an organization. In addition, an enterprise structure defines various organizational units that are present in an enterprise. The organizational structure in MM consists of the following organizational levels −
The following diagram depicts one such organizational structure that describes the levels incorporated in an organization. It puts the client at the topmost, followed by multiple company code, followed by multiple plants, plants having multiple storage location with their own or centralized purchasing organizations.
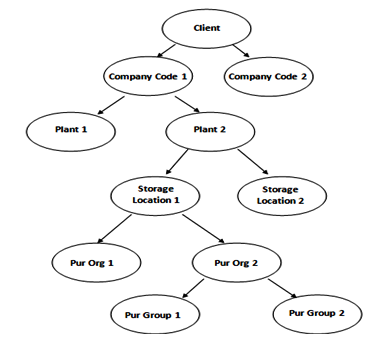
A client has the following attributes −
Client is a commercial organizational unit in R/3 system.
It has its own set of master data with independent table sets.
According to hierarchy, a client occupies the highest level in a SAP system.
Data that is maintained at the client level is valid for all organizational levels.
A company code has the following attributes −
Within client, a company code is an independent accounting unit.
It is a legal entity that has its own profit, loss and balance statement.
It is the smallest unit in an organization for which a complete independent account set can be replicated.
The basic points to be noted about a plant are as follows −
Plant is an organizational unit within a company where activities take place. A plant will produce goods and make goods available for the company.
It is a unit having manufacturing facility, warehouse distribution center, or a regional sales office within logistic. It subdivides an enterprise in different aspects.
A storage location has the following attributes −
Storage location is an organizational unit, which actually differentiates between different material stocks in a plant.
Storage location is a place where stock is kept physically.
A plant can consist of multiple storage locations. All data is stored at storage location level for a particular storage location.
The points to be noted about a Purchasing Organization are as follows −
Different forms of purchasing can be described as follows −
Purchasing organization is not assigned to any company code. It procures for all company codes belonging to different client.
Purchasing organization is assigned to a company code only. The plant belonging to the company code can purchase through this purchasing organization.
Purchasing organization is assigned to a plant. Only this specific plant can purchase through this purchasing organization.
The attributes of a purchasing group are as follows −
Purchasing group is an organizational unit responsible for the everyday procurement activities within an organization.
It is a buyer or a group of buyers responsible for the procurement activities in a purchasing organization.
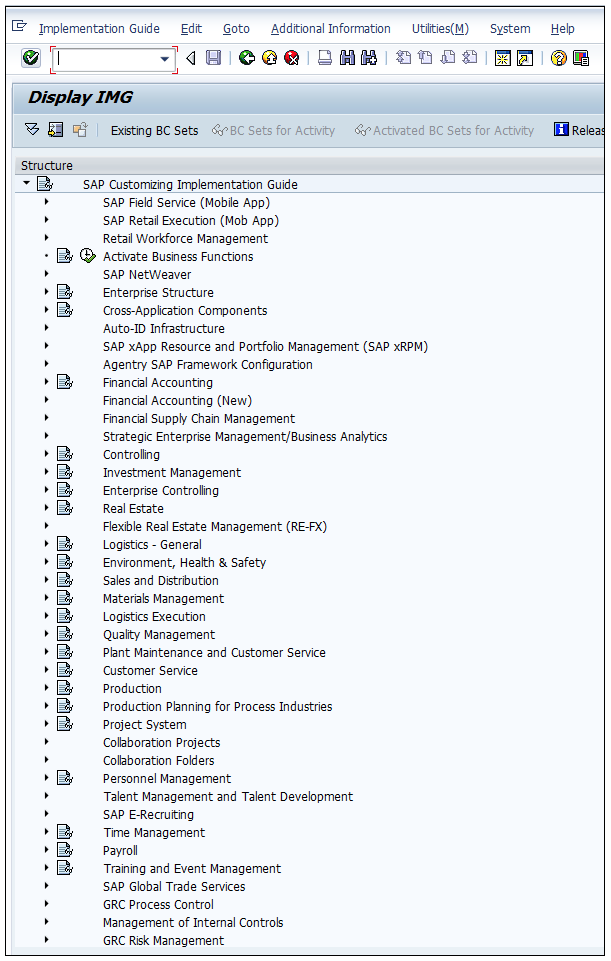
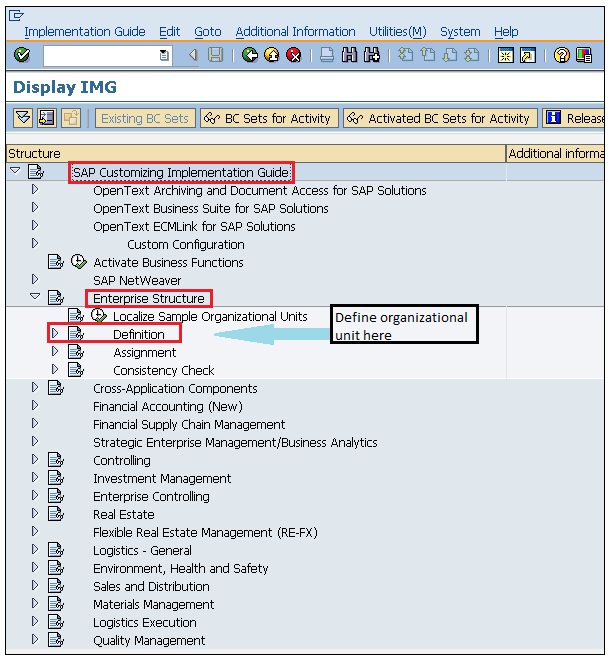
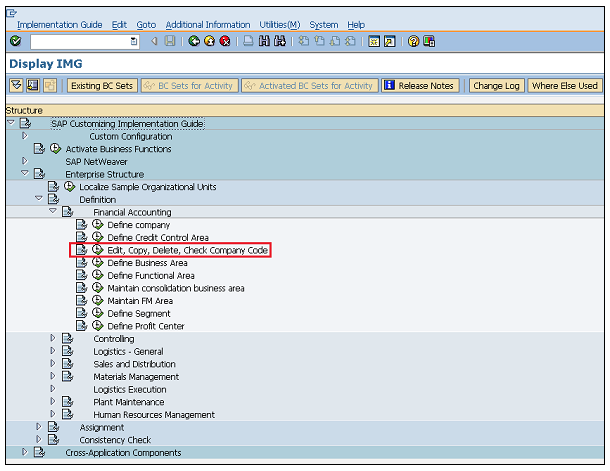
All the Definitions in SAP are given through the Display IMG screen as shown below −
IMG ⇒ Enterprise Structure ⇒ Definition
IMG ⇒ Enterprise Structure ⇒ Definition ⇒ Financial Accounting ⇒ Define Company
TCode: OX15
Step 1 − On the Display IMG screen, select Define Company execute icon by following the above path.
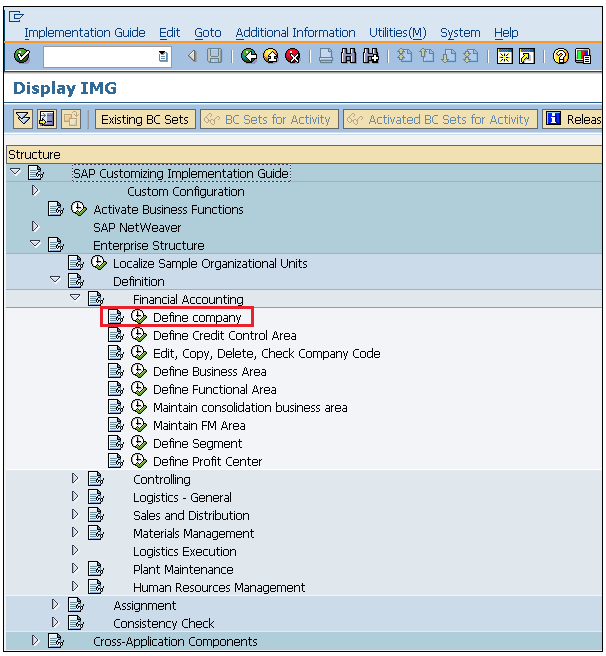
Step 2 − Click the New Entries icon.
Step 3 − Fill in all the necessary details such as name of the company, address of the company with street number, city, country, and postal code.
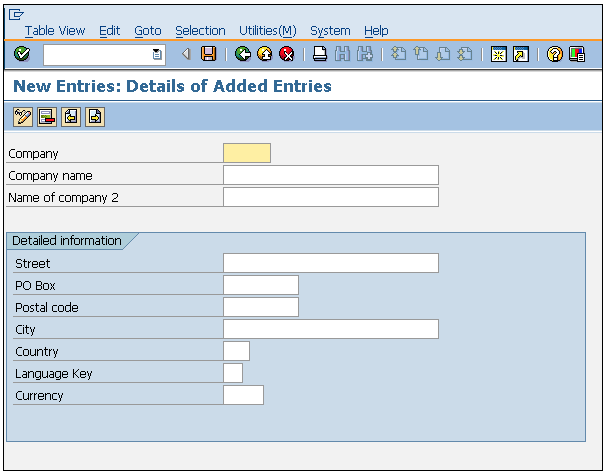
Step 4 − Click the Save icon after filling the required information. A new company will be created.
A Company Code is the smallest organizational unit after company, for which the standalone financial accounting's profit and loss statements can be withdrawn. Many company codes can be assigned to one company. The following steps depict how to create a company code.
IMG ⇒ Enterprise Structure ⇒ Definition ⇒ Financial Accounting ⇒ Edit, Copy, Delete, Check Company Code
TCode: OX02
Step 1 − On the Display IMG screen, select Edit, Copy, Delete, Check Company Code execute icon, by following the above path.
Step 2 − Click the New Entries button.

Step 3 − Fill in all the necessary details like Company code, company name along with city, country, currency, language.
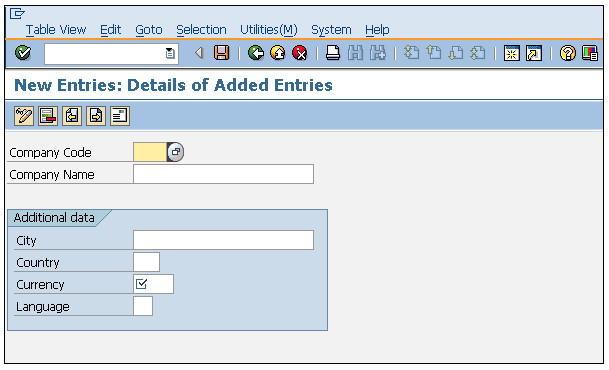
Step 4 − Click the Save icon after filling the required information. A new company code will be created.
A Plant is an organizational unit within a company where activities take place. A plant will produce goods and make goods available for the company. The following steps will take you through the procedure of creating a plant −
IMG ⇒ Enterprise Structure ⇒ Definition ⇒ Logistic General ⇒ Define, Copy, Delete check plant
TCode: OX10
Step 1 − On the Display IMG screen, select Define, Copy, Delete check plant execute icon, by following the above path.
Select Define Plant icon to create a new plant.
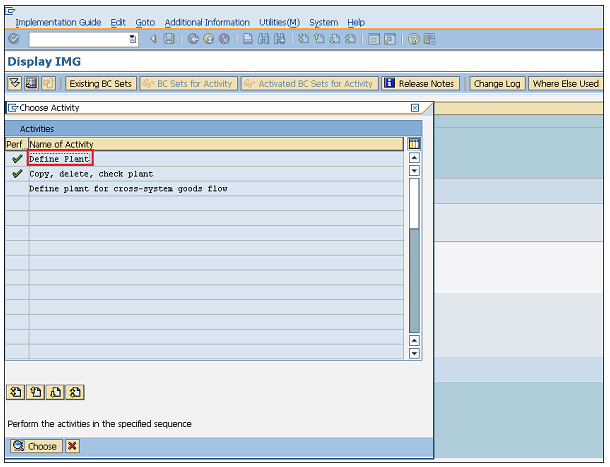
Step 2 − Click the New Entries button.
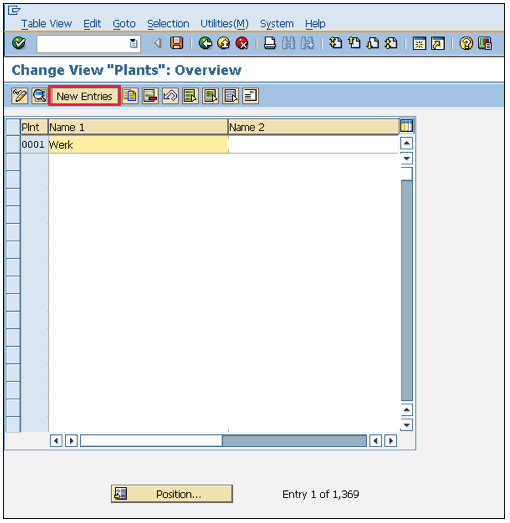
Step 3 − Fill in all necessary details like plant name along with detailed information like Language, House no., city, country, region, postal code.
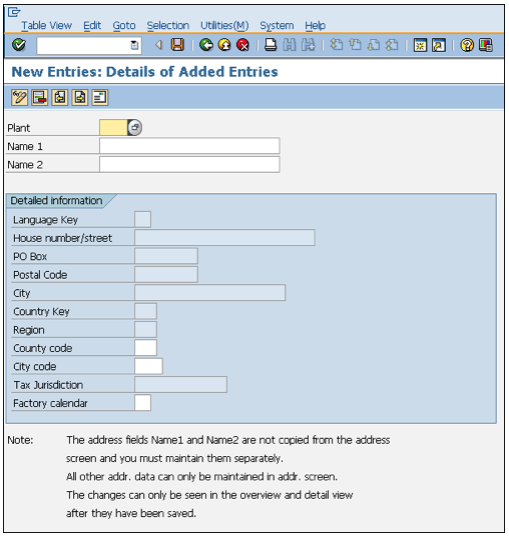
Step 4 − Click the Save icon after filling the required information. A new plant will be created.
IMG ⇒ Enterprise Structure ⇒ Definition ⇒ Materials Management ⇒ Maintain Storage Location
TCode: OX09
Step 1 − On the Display IMG screen, select Maintain Storage Location execute icon, by following the above path.
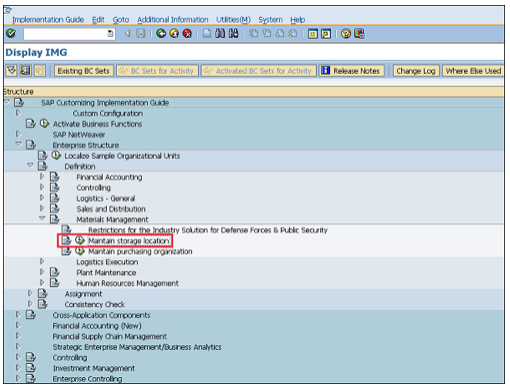
Step 2 − Enter the name of the plant for which you want to create the storage location.
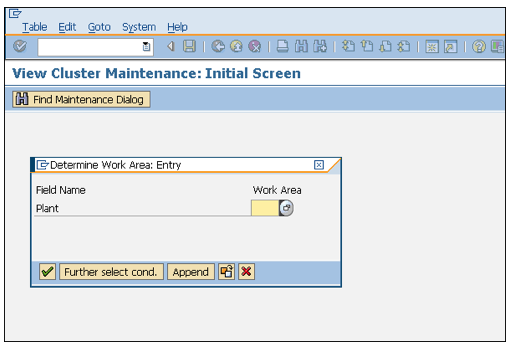
Step 3 − Click the New Entries icon.
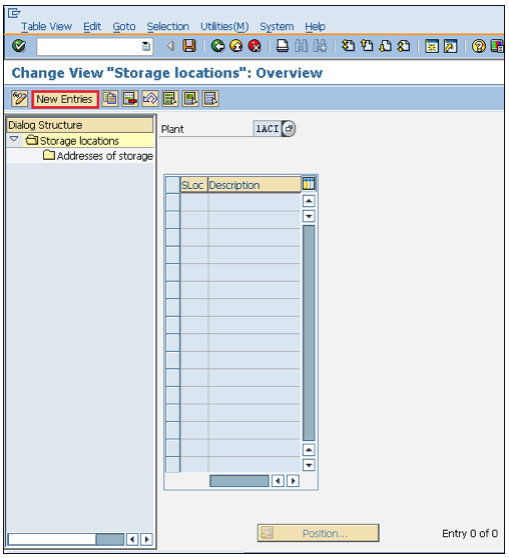
Step 4 − Enter the name of the storage location along with its description.
Click the Save icon after filling the required information.
A new Storage Location will be created.
IMG ⇒ Enterprise Structure ⇒ Definition ⇒ Materials Management ⇒ Maintain Purchasing Organization
TCode: OX08
Step 1 − On the Display IMG screen, select Maintain Purchasing Organization execute icon, by following the above path.
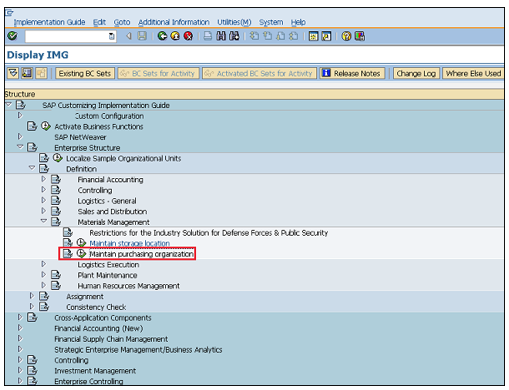
Step 2 − Click the New Entries icon.
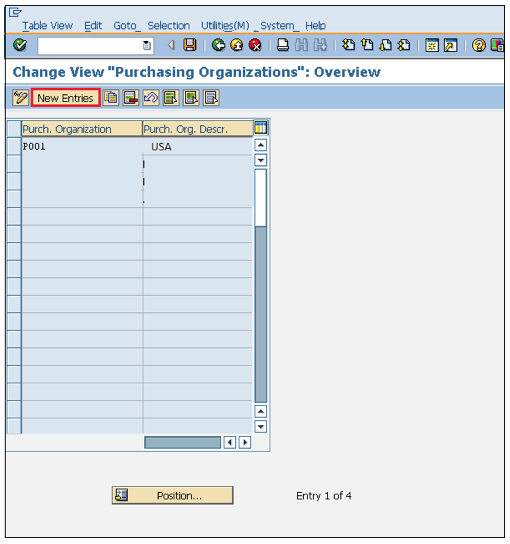
Step 3 − Enter the name of the purchasing organization along with its description.
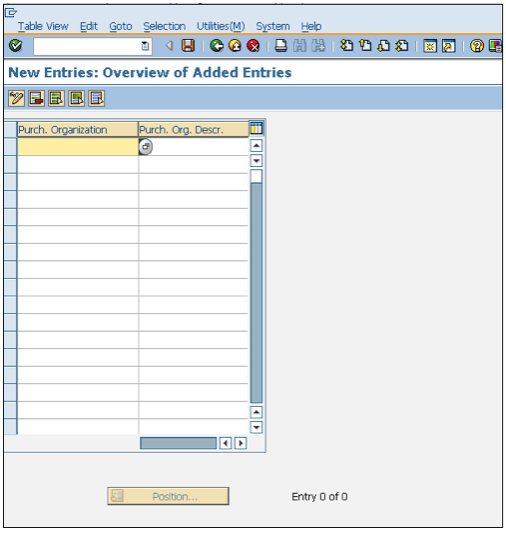
Step 4 − Click the Save icon after filling the required information.
A new Purchasing Organization will be created.
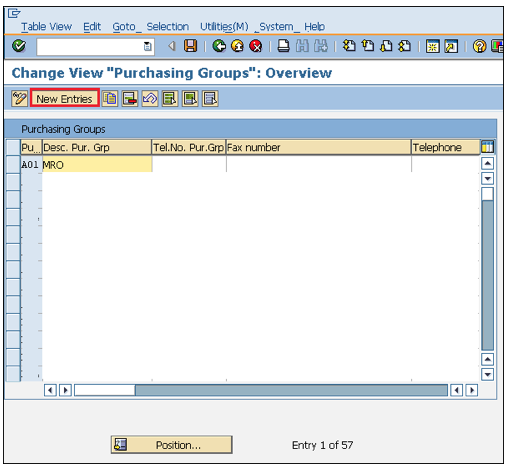
A Purchasing Group is an organizational unit that is responsible for the everyday procurement activities within an organization.
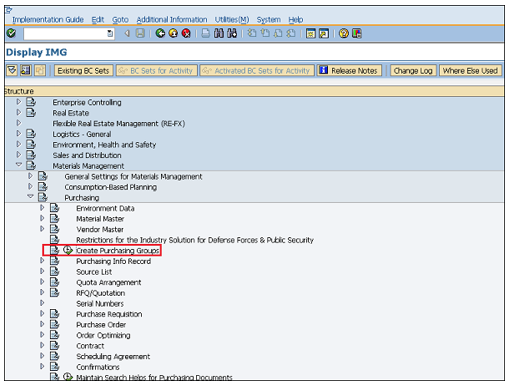
The steps given below depict how to create a Purchasing Group −
IMG ⇒ Materials Management ⇒ Purchasing ⇒ Create Purchasing Group
TCode: OME4
Step 1 − On the Display IMG screen, select Maintain Purchasing Group execute icon, by following the above path.
Step 2 − Click the New Entries icon.
Step 3 − Enter the name of the purchasing group along with its description.
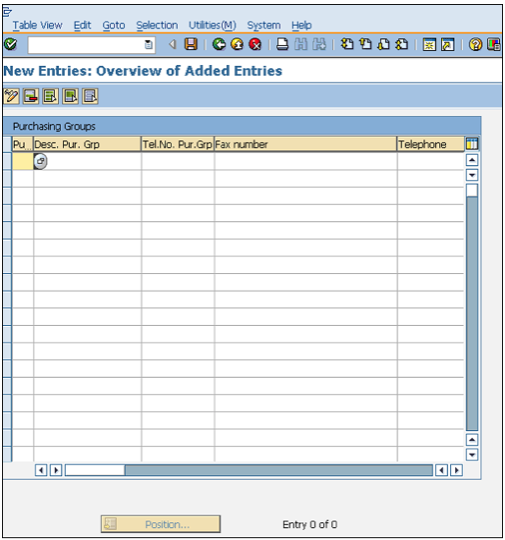
Step 4 − Click the Save icon after filling the required information.
A new Purchasing Group will be created.
All the organizational units combined together form the framework of a company. These organizational units can be considered as different levels that describe the structure of an enterprise. Every level has a particular functionality associated with it. Also, every level in one or the other way is related to each other. These levels are placed according to some hierarchy, Company being at the top.
To establish a relationship between these levels, we have to assign them to one or other in such a way that they still lie in the same hierarchy. For example: As Company is at the top level and plant is below it, it is necessary that the plant has some relation with the company. As the plant is a sub-part or a smaller division of the company, it will be assigned to the company. A standard SAP has the following four basic and essential assignments −
All the assignments in SAP are done through the Display IMG screen, as shown in the following screenshot.
Path to Reach Assignment − IMG ⇒ Enterprise Structure ⇒ Assignment
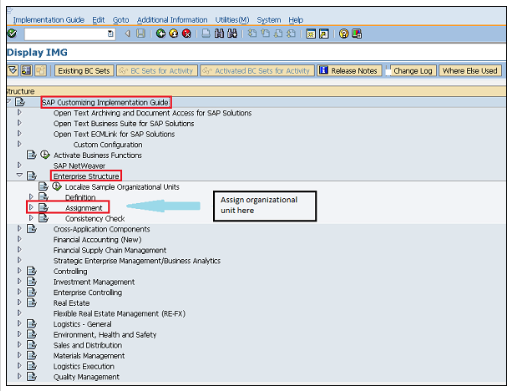
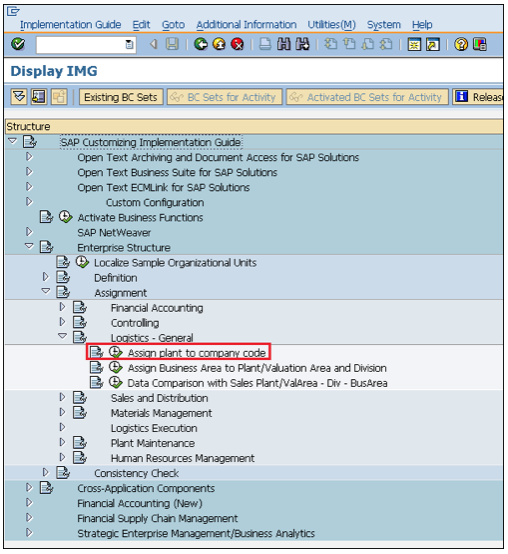
IMG ⇒ Enterprise Structure ⇒ Assignment ⇒ Assign Plant to Company Code
TCode: OX18
Step 1 − On the Display IMG screen, select Assign plant to company code execute icon, by following the above path.
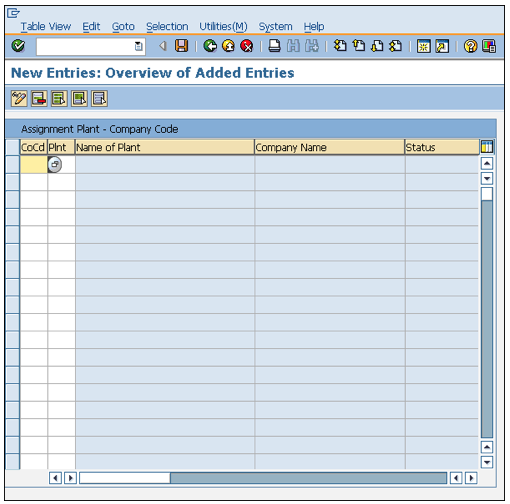
Step 2 − Click the New Entries icon.
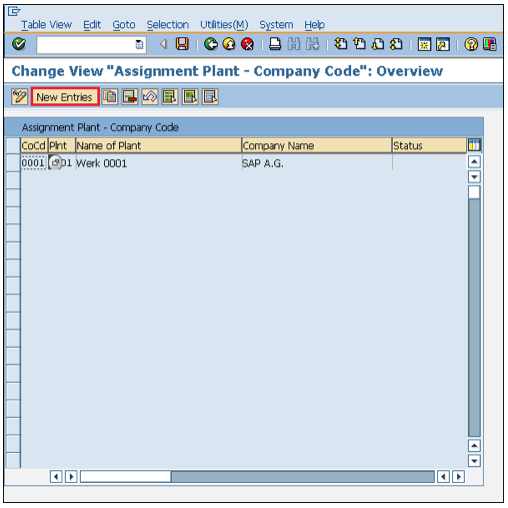
Step 3 − Enter the name of the plant and company code. Click the Save button. Plant is now assigned to company code.
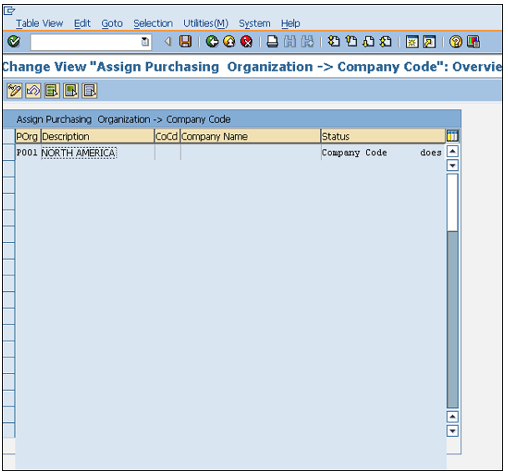
A purchasing organization can be set at company code level; it is called a centralized purchasing organization. So we need to assign this purchasing organization to the company code. The following steps take you through the procedure of assigning a purchasing organization to a company code −
IMG ⇒ Enterprise Structure ⇒ Assignment ⇒ Materials Management ⇒ Assign Purchasing Organization to Company Code
TCode: OX01
Step 1 − On the Display IMG screen, select Assign Purchasing Organization to Company Code execute icon, by following the above path.
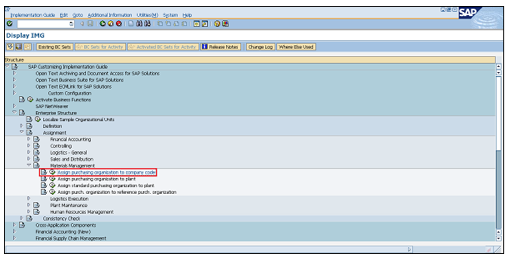
Step 2 − We can view an existing assignment and can change it accordingly.
Click the Save button after making changes.
Purchasing organization is now assigned to the company code.
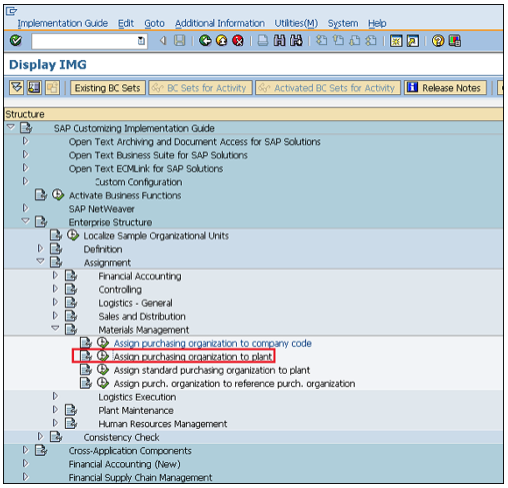
A purchasing organization can be plant specific, i.e., it can be set at the plant level. In such cases, we need to assign the purchasing organization to a plant. Follow the steps given below to assign a purchasing organization to a plant −
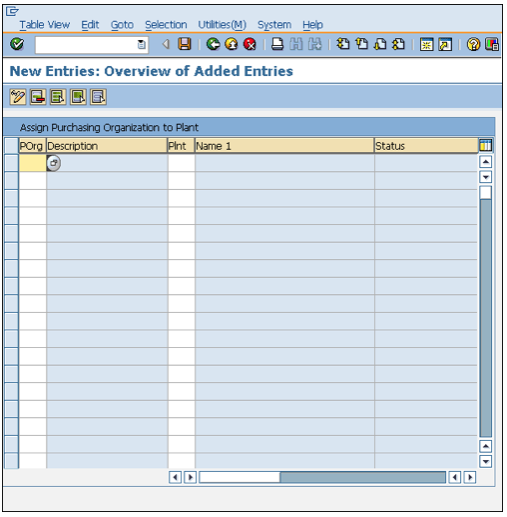
IMG ⇒ Enterprise Structure ⇒ Assignment ⇒ Materials Management ⇒ Assign Purchasing organization to Plant
TCode: OX17
Step 1 − On the Display IMG screen, select Assign Purchasing Organization to Plant, by following the above path.
Step 2 − Click the New Entries button.
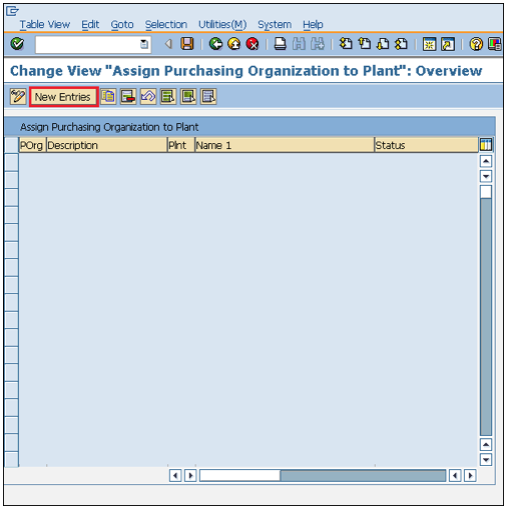
Step 3 − Enter the name of the plant and the purchasing organization.
Click the Save button.
Purchasing organization is now assigned to plant.
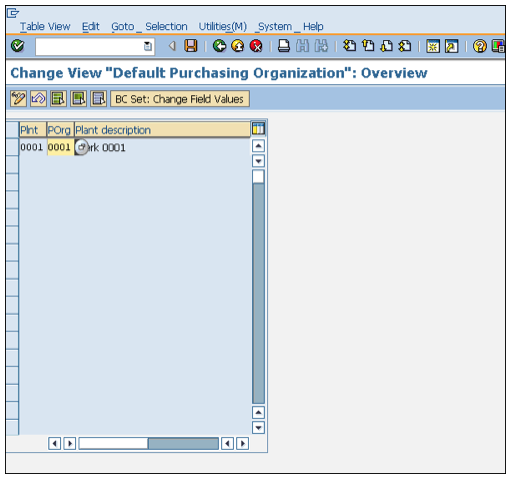
Standard purchasing organization is the default purchasing organization. We can sometimes assign the standard purchasing organization to some specific plant if we want to have the default purchasing organization for that plant. Follow the steps given below to assign the standard purchasing organization to a plant −
IMG ⇒ Enterprise Structure ⇒ Assignment ⇒ Materials Management ⇒ Assign Standard Purchasing Organization to Plant
TCode: SPRO
Step 1 − On the Display IMG screen, select Assign Standard Purchasing Organization to Plant, by following the above path.
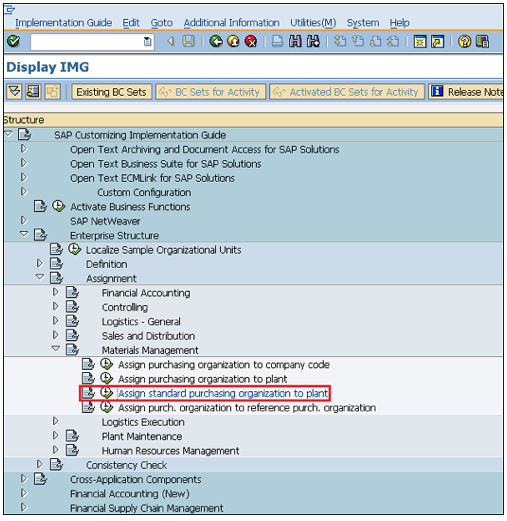
Step 2 − We can view the existing assignment and can change it accordingly.
Click the Save button after making changes.
Standard purchasing organization is now assigned to plant.
SAP R/3 works on real-time data, i.e., there is no time lag between data entry and data availability. The important thing while creating any data is to maintain data integrity. SAP R/3 data is categorized into two −
Master data − Data that is created centrally, and is valid for all applications. It remains constant over time but we need to update it on a regular basis. For example: Vendor is a type of master data that is used for creating purchase orders or contracts.
Transactional data − Data that is associated with processing of business transaction is transactional data.
SAP Master Data is of the following two types −
Material Master Data
Vendor Master Data
The key points to note about material master data are as follows −
This is the enterprise main source of material-specific data. This data will include information on the materials that a company can procure, produce, store, or sell.
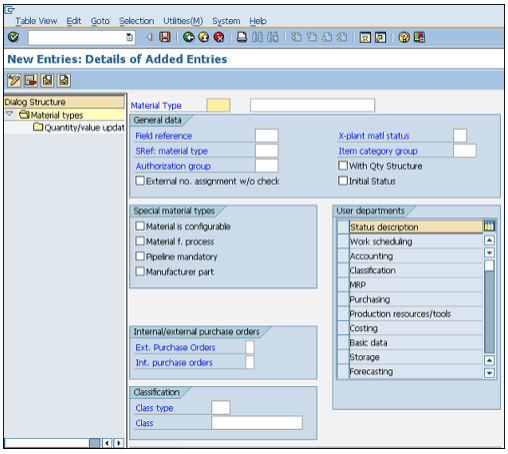
Since there are different departments in an enterprise and each department works on some specific material, they will enter different information regarding their material. So, each user department has its own view of the material master record. The data screens that are used to create material master can be divided into two categories −
Main Data − This will include basic data (base unit of measure, weight), purchasing data (over tolerance and under tolerance), accounting data (standard price, moving price).
Additional Data − This will include additional information like short description about material, currency etc.
Material master has four characteristics, which we will discuss one by one in the following sections.
Materials with some common attributes are grouped together and they are assigned to a material type. It differentiates the materials and allows organizations to manage different materials in a systematic manner in accordance to a company’s requirement. For example, raw material and finished products are some of the material types. Material type can be created by following the steps given below.
IMG ⇒ Logistics General ⇒ Material Master ⇒ Basic Settings ⇒ Material Types ⇒ Define Attributes of Material Types
TCode: OMS2
Step 1 − On the Display IMG screen, select Define Attributes of Material Types, by following the above path.
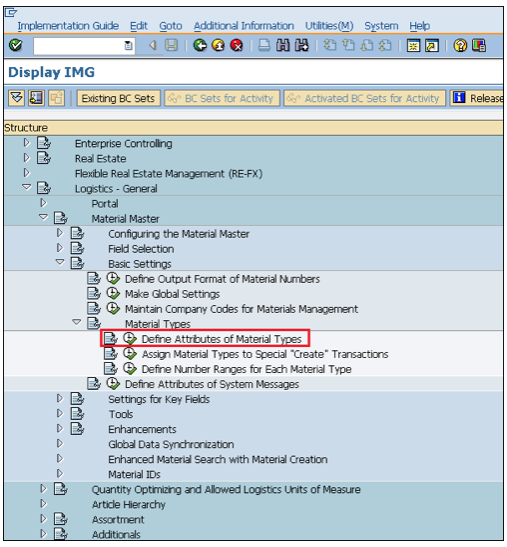
Step 2 − Click the New Entries button.
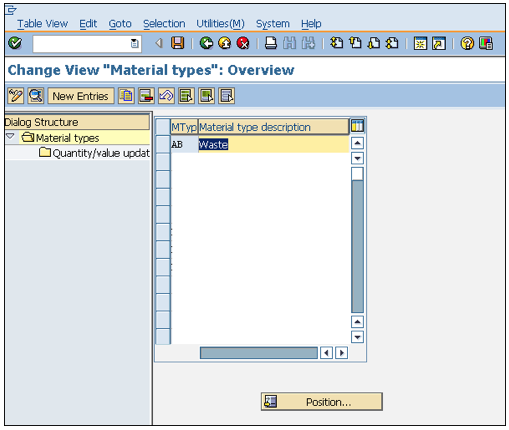
Step 3 − Fill in the required information such as name of material type and description.
Click on Save.
A new material type will be created.
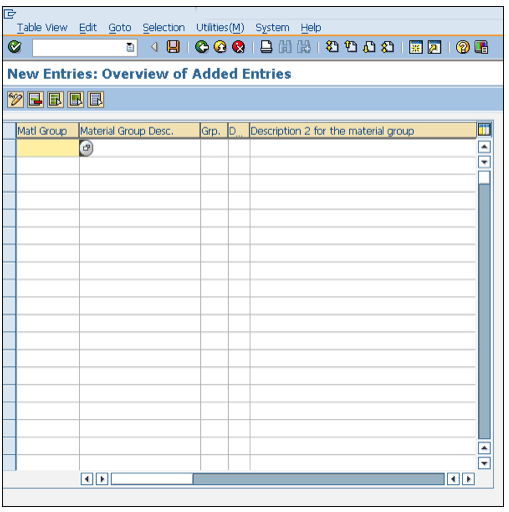
Material group is a wider range of material type. Materials with some common attributes are taken together and they are assigned to a material group. For example: We have some materials that are to be packaged, so the material type can be electrical or food products, but we can group these material types and put them in the packaged material group. Follow the steps given below to create a Material Group.
IMG ⇒ Logistic General ⇒ Material Master ⇒ Settings for Key Fields ⇒ Define Material Groups
TCode: OMSF
Step 1 − On the Display IMG screen, select Define Material Groups, by following the above path.
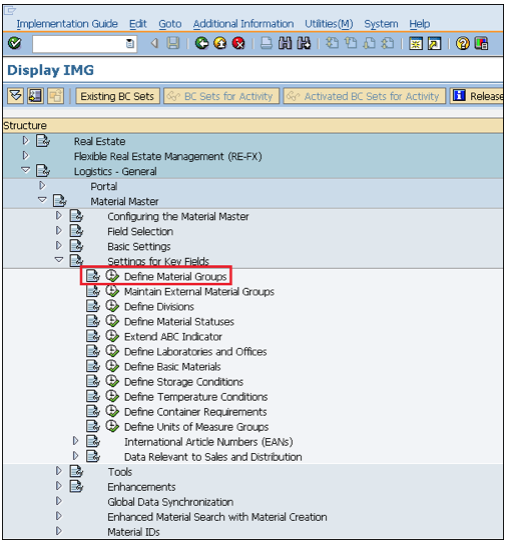
Step 2 − Click the New Entries button.

Step 3 − Enter the name of the material group along with its description.
Click the Save button.
A new material group will be created.
When we create a material master record, every material is recognized by a unique number that is known as the material number. We can assign a number to a material through two ways −
External number assignment − While creating a material, you have to enter your own number (containing alphabets or digits), and that should be unique.
Internal number assignment − While creating a material, you need not enter any number. The system automatically generates a unique number to that material.
Define Number Range −
Internal number range can be defined by following the steps given below −
IMG ⇒ Logistic General ⇒ Material Master ⇒ Basic Settings ⇒ Material Types ⇒ Define Number Range for Each material Type
TCode: MMNR
Step 1 − On the Display IMG screen, select Define Number Range for Each Material Type, by following the above path.
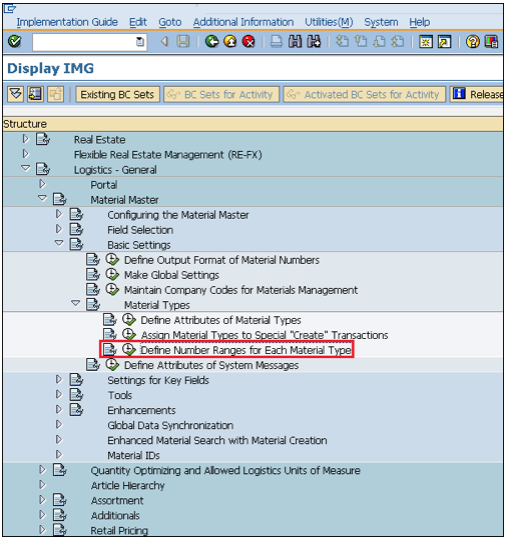
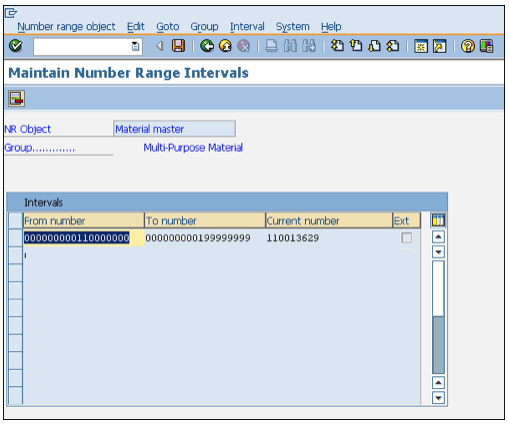
Step 2 − Click the Intervals button.
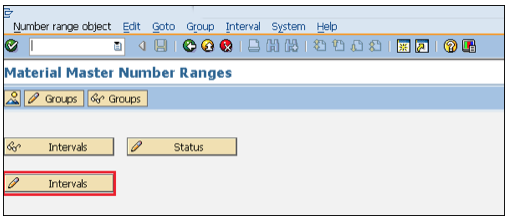
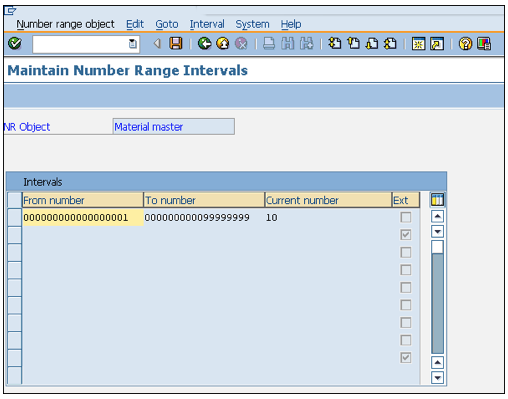
Step 3 − We can define a number range here and EXT (external tab, if it is checked, then an external number can be assigned in that material).
Click the Save button.
Number Range is now defined for the material.
After defining, we need to assign it to a material group. Follow the steps given below to assign a number range.
Step 1 − On the same screen, select the Groups tab.
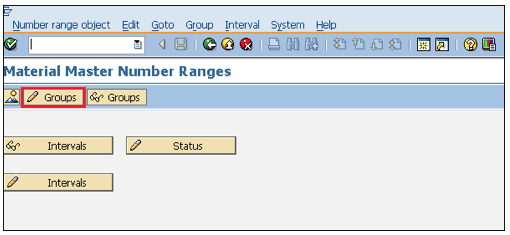
Step 2 − For a particular material group, we can assign a number range here.
Click on Save.
The number range is now assigned to the material group.
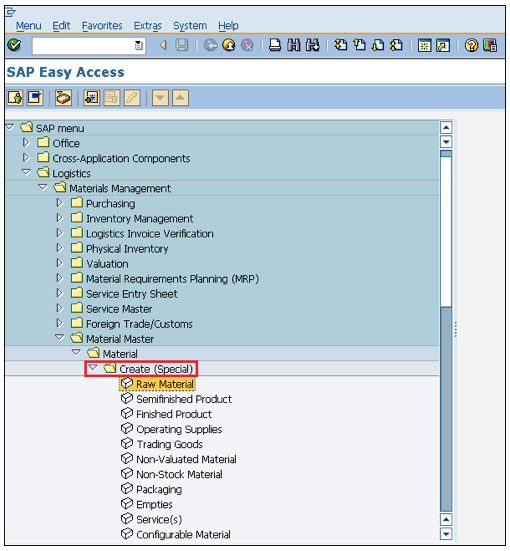
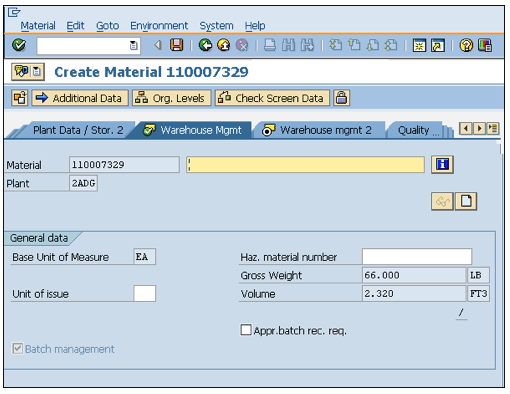
Logistics ⇒ Materials Management ⇒ Material Master ⇒ Material ⇒ Create Material
TCode: MM01
Note − For any create transaction, we use 01, for edit 02, for display 03 as suffix.
Step 1 − On the SAP Menu screen, click the create button by following the above path.
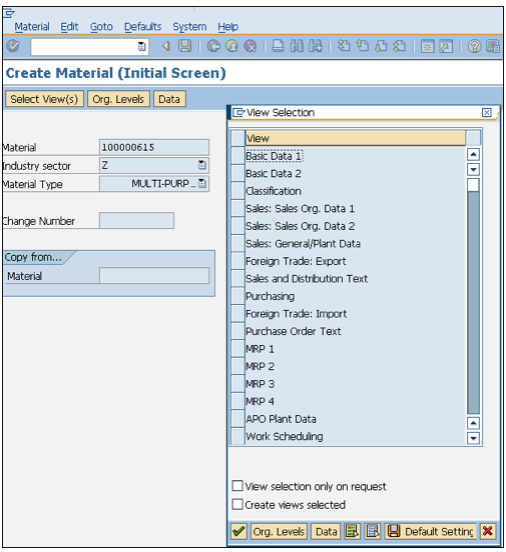
Step 2 − Fill in all the required details such as material number (if external number assignment), material type, industry sector, etc.

Step 3 − Select the views you want to maintain for your material.
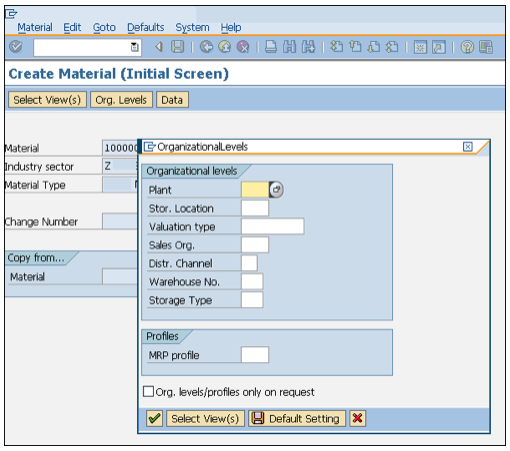
Step 4 − Enter the name of the plant and the storage location.
Step 5 − Enter the required information in your material views such as unit of measure, currency, standard price, moving price, etc.
Click on Save.
A new material will be created.
The key points about vendor master are as follows −
Vendor Master Data is the enterprise main source of vendor-specific data. It includes information on vendors from which a company can procure, or can sell.
A vendor master record contains information such as vendor's name, address, etc.
Data in a vendor master record is divided into three categories −
General Data − General data is maintained at client level and it is valid for all organizational levels.
Accounting Data − Accounting data is maintained at company level and it is valid for all plants belonging to that company.
Purchasing Data − Purchasing data is maintained at purchasing organization level.
Vendor master has three characteristics, which we will discuss one by one in the following sections.
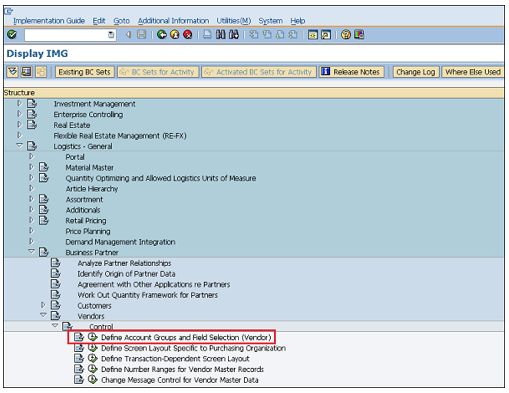
IMG ⇒ Logistic General ⇒ Business Partner ⇒ Vendors ⇒ Control ⇒ Define Account group and field selection(vendor)
TCode: OBD3
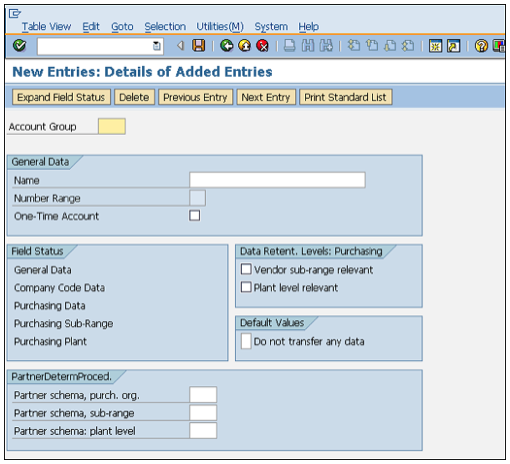
Step 1 − On the Display IMG screen, select Define Account Groups and Field Selection (Vendor), by following the above path.
Step 2 − Click the New Entries button.

Step 3 − Fill in all necessary details such as name of account group, general data, and field status.
Click the Save button.
A new Vendor Account Group will be created.
When we create a vendor master record, every vendor is recognized by a unique number known as the vendor number. As in the case of material master, we have external as well as internal number assignments for vendor master.
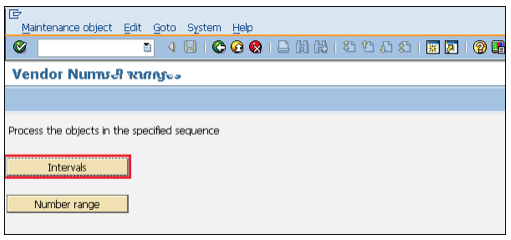
Define Number Range:
Number range can be defined by following the steps given below −
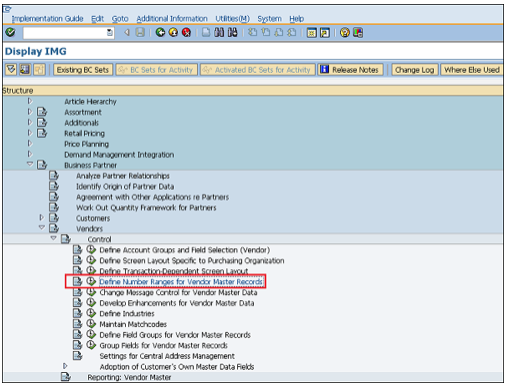
IMG ⇒ Logistic General ⇒ Business Partner ⇒ Vendors ⇒ Control ⇒ Define Number Range for Vendor master record
TCode: XDN1
Step 1 − On the Display IMG screen, select Define Number Range for Vendor Master Record, by following the above path.
Step 2 − Click the Intervals button.
It will create a number range for the customer account.
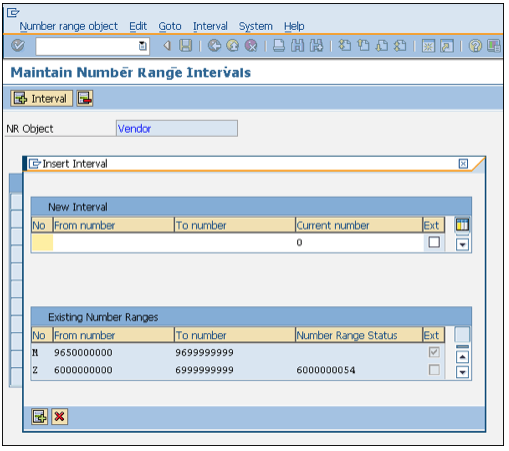
Step 3 − Click the Insert button.
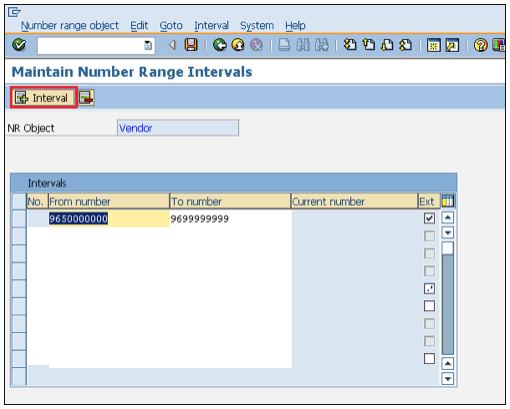
Step 4 − We can define a number range here and EXT (external tab, if it is checked, then external number assignment can be done in that vendor).
Click on Save.
A new Number Range will be created.
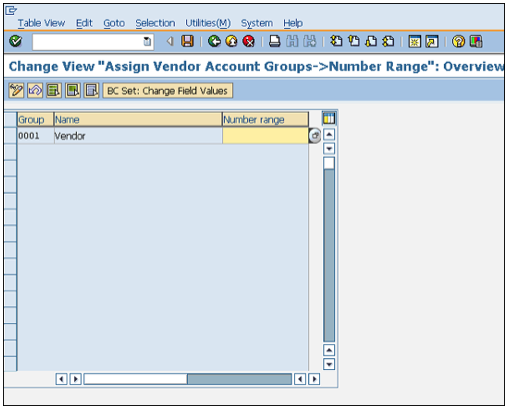
After defining a number range, we need to assign it to a vendor group. Follow the steps given below to assign the number range.
Step 1 − On the same screen as shown above, select the Number Range tab.
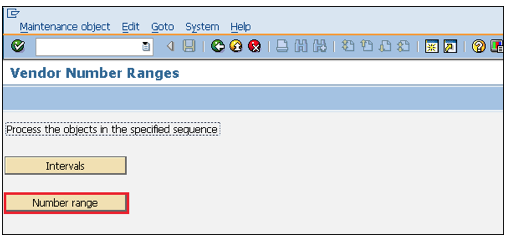
Step 2 − For a particular vendor group, assign a number range here.
Click on Save
Number range is now assigned to the vendor group.
Vendor Master contains a list of vendors from where a company can procure or sell goods. A Vendor Master can be created by following the steps given below −
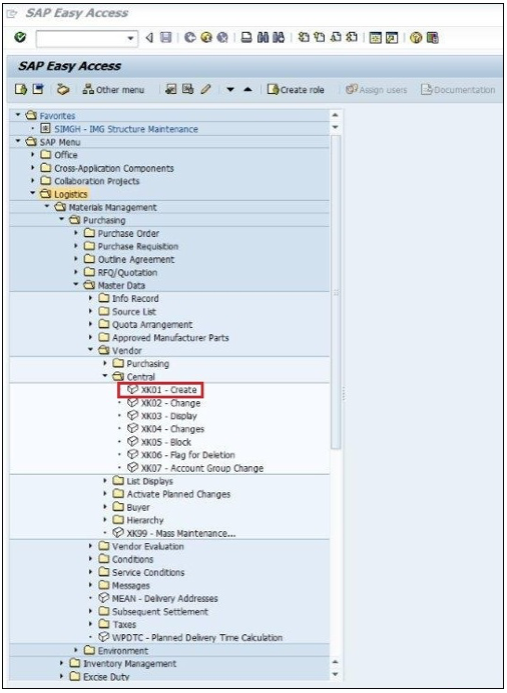
SAP Menu ⇒ Logistics ⇒ Material Management ⇒ Purchasing ⇒ Master Data ⇒ Vendor ⇒ Central ⇒ Create
TCode: XK01
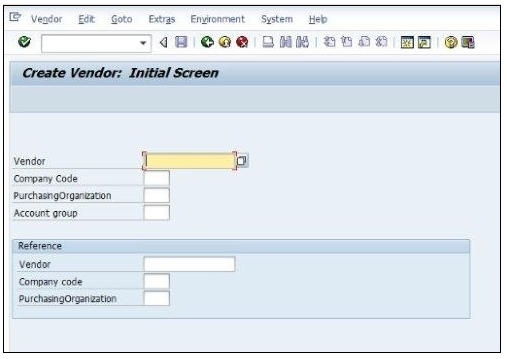
Step 1 − On the SAP Menu screen, select Create for Central Vendor Data, by following the above path.
Step 2 − Fill in all the required details such as company code, purchasing org, and vendor number (if external number assignment).
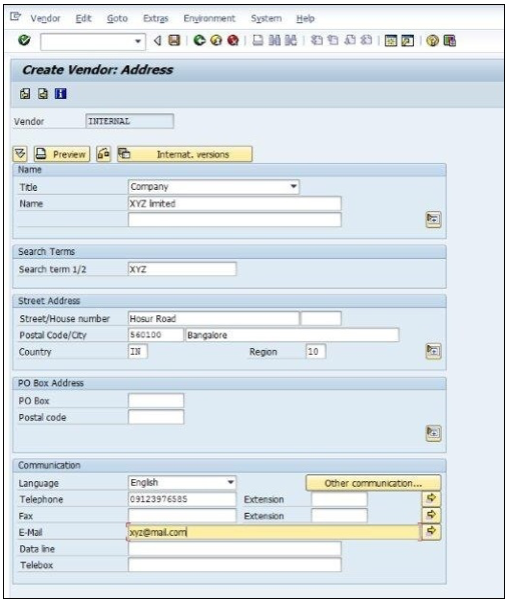
Step 3 − Fill in all the details of vendor’s address such as street name, postal code, country.
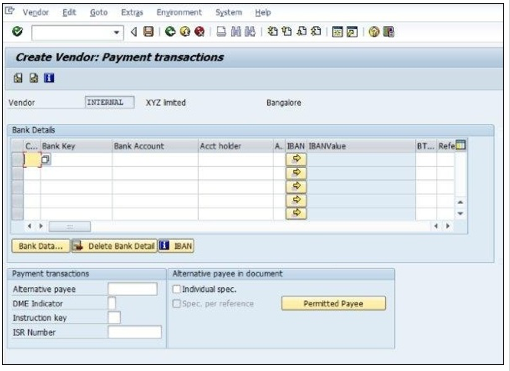
Step 4 − Fill in the necessary bank details of the vendor.
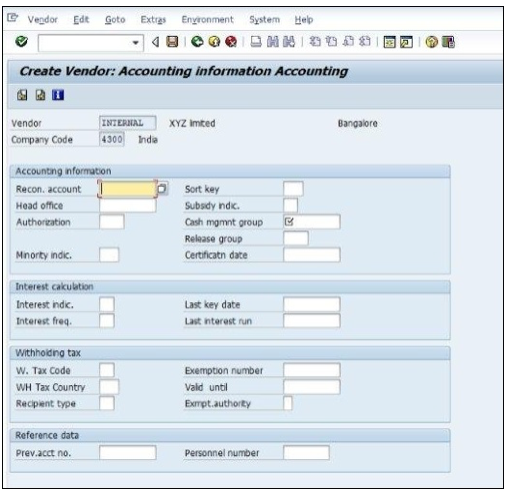
Step 5 − Fill in the necessary accounting information of the vendor.
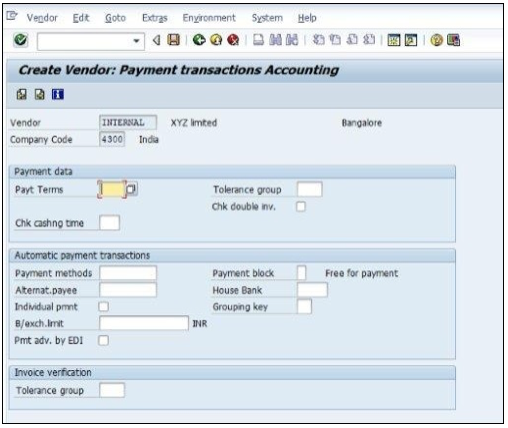
Step 6 − Fill in the terms of payment that are defined between the company and the vendor.
Click on Save.
A new vendor master will be created.
SAP R/3 works on all real-time data that includes material master and vendor master.
Material and vendor master are separate data records for keeping information of materials and vendors from where material is procured.
The combined information of material and vendor altogether is kept in a record that we call as purchase info record.
The key points about purchase info record are as follows −
Purchasing info record stores information on material and vendor, supplying that material. For example, a vendor’s current price of a particular material is stored in info record.
Purchase info record can be maintained at the plant level or at the purchasing organization level.
Info record can be maintained for four procurement types, which are as follows −
Standard − Standard info record has information on standard orders (orders include details of vendor and material). This info record will include vendors price for supplying the particular material.
Subcontracting − Subcontracting info record has information on subcontract orders. This info record will include price for assembling the raw material that is supplied by the ordering party.
Pipeline − Pipeline info record has information on material that is provided by vendor through pipes. For Example: like water,electricity.
Consignment − Consignment info record has information on material that is kept at ordering party premises. This info record contains vendors price that is to be paid for withdrawing material from consignment stock.
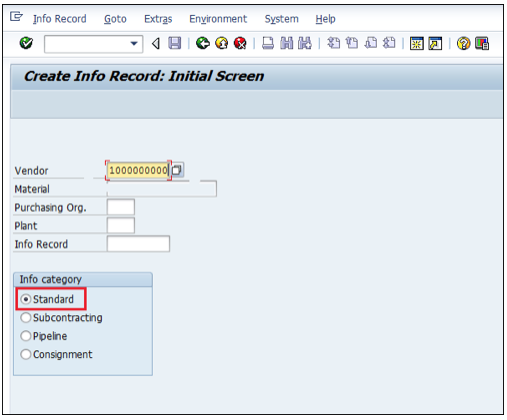
Follow the steps given below to create a Purchase Info Record.
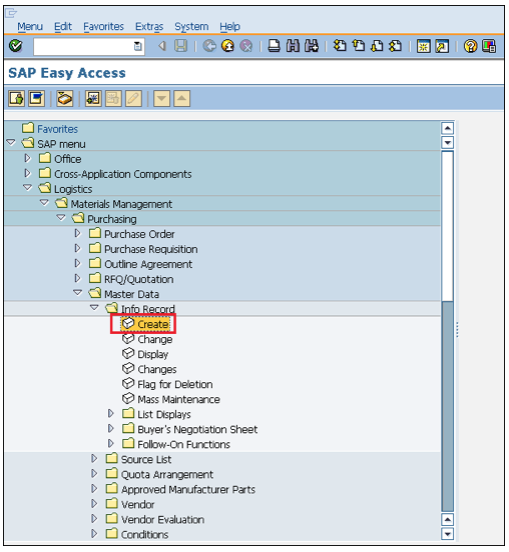
Logistics ⇒ Material Management ⇒ Purchasing ⇒ Master Data ⇒ Info Record ⇒ Create
TCode: ME11
Step 1 − On the SAP Menu screen, select the Create icon, by following the above path.
Step 2 − Enter the vendor number.
In the info category, select standard or subcontracting, or pipeline or consignment, according to the requirement.
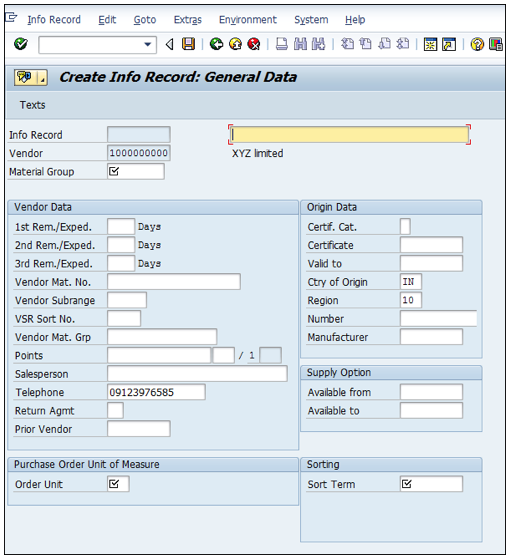
Step 3 − Fill in the required details such as material group, 1st/2nd/3rd reminder, vendor material number, personal details, order unit, origin data, and sort term.
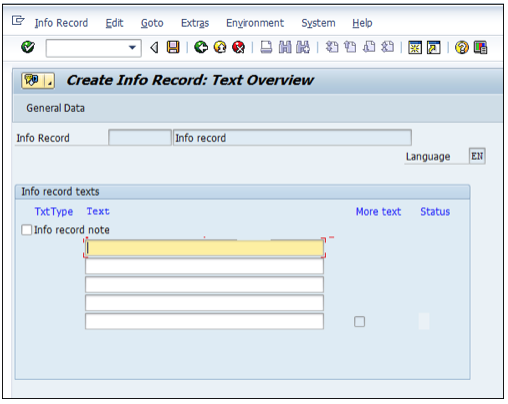
Step 4 − Provide the info record note that can be called as info record description.
Click on Save.
A new info record will be created.
paragraph