Select the account group for which one-time customer property is checked → click the tick mark

| Module | Module Name | Links | Links | Blake's Links |
| PM | Plant Mantenance | tutorials point | Blake | |
| MM | Material Management | tutorials point Overview | Guru99 | Blake: 1-10 | 11-20 | 21-25 |
| SD | Sales and Distribution | tutorials point Tutorial | Guru99 | Blake |
| PP | Production Planning | tutorials point Tutorial | Guru99 | Blake | 1-7 |
| External Links | ||||
| NewLanguage.html | FICO Module: Blake's 1-28 29-56 57-66 67-83 : Tutorials Point | |||
| Download Info | ABAP Module: Blake's 1-18 19-36 37-52 : Tutorials Point | |||
| 1 | Home | FICO_Doc Tutorials Point | 29 | Block a Customer | FICO_Doc Tutorials Point | 57 | Month End Closing | FICO_Doc Tutorials Point | ||
| 2 | Overview | FICO_Doc Tutorials Point | 30 | Delete a Customer | FICO_Doc Tutorials Point | 58 | Dunning | FICO_Doc Tutorials Point | ||
| 3 | Submodules | FICO_Doc Tutorials Point | 31 | Customer Account Group | FICO_Doc Tutorials Point | 59 | Exchange Rates | FICO_Doc Tutorials Point | ||
| 4 | Company Basics | FICO_Doc Tutorials Point | 32 | One-Time Customer Master | FICO_Doc Tutorials Point | 60 | Tables in Module | FICO_Doc Tutorials Point | ||
| 5 | Define Business Area | FICO_Doc Tutorials Point | 33 | Post a Sales Invoice | FICO_Doc Tutorials Point | 61 | AR Invoice Processes | FICO_Doc Tutorials Point | ||
| 6 | Define Functional Area | FICO_Doc Tutorials Point | 34 | Document Reversal | FICO_Doc Tutorials Point | 62 | AR Account Analysis | FICO_Doc Tutorials Point | ||
| 7 | Define Credit Control | FICO_Doc Tutorials Point | 35 | Sales Returns | FICO_Doc Tutorials Point | 63 | AR Reporting | FICO_Doc Tutorials Point | ||
| 8 | General Ledger | FICO_Doc Tutorials Point | 36 | Post Incoming Payment | FICO_Doc Tutorials Point | 64 | AA Overview | FICO_Doc Tutorials Point | ||
| 9 | COA Group (Chart of Accts) | FICO_Doc Tutorials Point | 37 | Foreign Currency Invoice | FICO_Doc Tutorials Point | 65 | AA Asset Explorer | FICO_Doc Tutorials Point | ||
| 10 | Retained Earnings Account | FICO_Doc Tutorials Point | 38 | Incoming Partial Payments | FICO_Doc Tutorials Point | 66 | Cash Management | FICO_Doc Tutorials Point | ||
| 11 | G/L Account | FICO_Doc Tutorials Point | 39 | Reset AR Cleared Items | FICO_Doc Tutorials Point | |||||
| 12 | Block G/L Account | FICO_Doc Tutorials Point | 40 | Credit Control | FICO_Doc Tutorials Point | 67 | CO Overview | FICO_Doc Tutorials Point | ||
| 13 | Deleting G/L Accounts | FICO_Doc Tutorials Point | 41 | Accounts Payable | FICO_Doc Tutorials Point | 68 | CO Submodules | FICO_Doc Tutorials Point | ||
| 14 | Financial Statement Version | FICO_Doc Tutorials Point | 42 | Create a Vendor | FICO_Doc Tutorials Point | 69 | CO Cost Center | FICO_Doc Tutorials Point | ||
| 15 | Journal Entry Posting | FICO_Doc Tutorials Point | 43 | Create Vendor Account Group | FICO_Doc Tutorials Point | 70 | CO Create Cost Center | FICO_Doc Tutorials Point | ||
| 16 | Fiscal Year Variant | FICO_Doc Tutorials Point | 44 | Display Changed Fields | FICO_Doc Tutorials Point | 71 | CO Post to a Cost Center | FICO_Doc Tutorials Point | ||
| 17 | Posting Period Variant | FICO_Doc Tutorials Point | 45 | Block a Vendor | FICO_Doc Tutorials Point | 72 | CO Internal Orders | FICO_Doc Tutorials Point | ||
| 18 | Field Status Variant | FICO_Doc Tutorials Point | 46 | Delete a Vendor | FICO_Doc Tutorials Point | 73 | CO Settlement of IO | FICO_Doc Tutorials Point | ||
| 19 | Field Status Group | FICO_Doc Tutorials Point | 47 | One-Time Vendor | FICO_Doc Tutorials Point | 74 | CO Profit Center | FICO_Doc Tutorials Point | ||
| 20 | Define Posting Keys | FICO_Doc Tutorials Point | 48 | Post Purchase Invoice | FICO_Doc Tutorials Point | 75 | CO Posting to Profit Center | FICO_Doc Tutorials Point | ||
| 21 | Define Document Type | FICO_Doc Tutorials Point | 49 | Purchase Returns | FICO_Doc Tutorials Point | 76 | CO Profit Center Standard Heirarchy | FICO_Doc Tutorials Point | ||
| 22 | Document Number Ranges | FICO_Doc Tutorials Point | 50 | Post Outgoing Vendor Payment | FICO_Doc Tutorials Point | 77 | CO Assigning Cost to Profit Centers | FICO_Doc Tutorials Point | ||
| 23 | Post with Reference | FICO_Doc Tutorials Point | 51 | Foreign Currency Invoice | FICO_Doc Tutorials Point | 78 | CO Assigning Materials to Profit Centers | FICO_Doc Tutorials Point | ||
| 24 | Hold a G/L Document Posting | FICO_Doc Tutorials Point | 52 | Withholding Tax in vendor invoice | FICO_Doc Tutorials Point | 79 | CO Tables in Module | FICO_Doc Tutorials Point | ||
| 25 | Park a G/L Document Posting | FICO_Doc Tutorials Point | 53 | Outgoing Partial Payments | FICO_Doc Tutorials Point | 80 | CO Product Costing | FICO_Doc Tutorials Point | ||
| 26 | G/L Reporting | FICO_Doc Tutorials Point | 54 | Reset AP Cleared Items | FICO_Doc Tutorials Point | 81 | CO Profitability Analysis | FICO_Doc Tutorials Point | ||
| 27 | Accounts Receivable | FICO_Doc Tutorials Point | 55 | Automatic Payment Run | FICO_Doc Tutorials Point | 82 | CO Planning Methods | FICO_Doc Tutorials Point | ||
| 28 | Customer Master Data | FICO_Doc Tutorials Point | 56 | Posting Rounding Differences | FICO_Doc Tutorials Point | 83 | FI - Integration | FICO_Doc Tutorials Point |
You have to block a customer account before marking a customer master record for deletion.
You would also block a customer that you use only as an alternative dunning recipient, so that nobody can post to that customer by mistake.
In Sales and Distribution (SD) application component, you can set the following blocks for a customer −
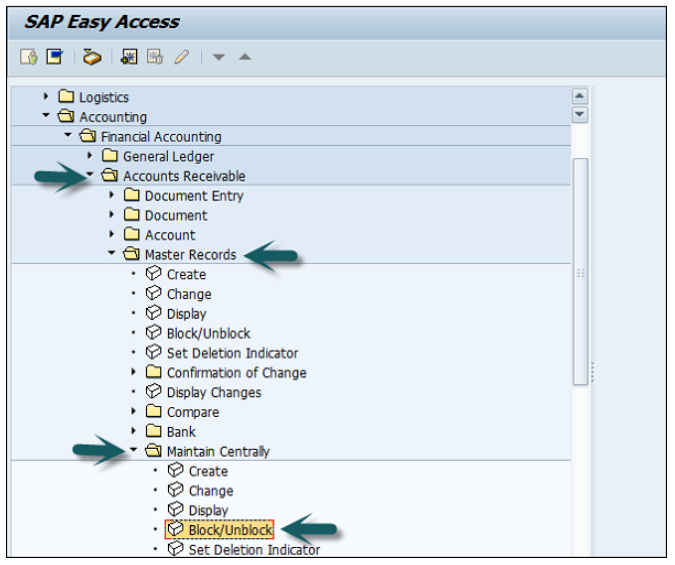
Go to Accounting → Finance Accounting → Accounts Receivable → Master Records → Maintain Centrally → Block/Unblock.
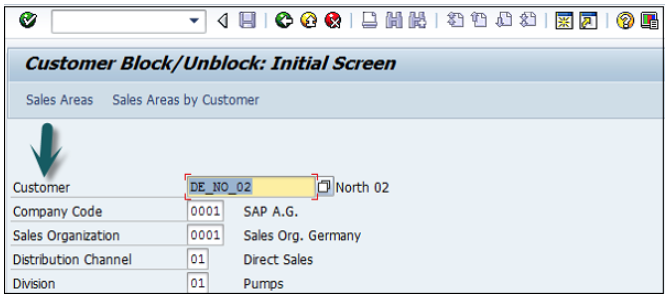
Enter the customer's account number and the company code. If you wish, you can also enter the sales organization, distribution channel, and division.
The Block/Unblock Customer: Details screen appears.
To block posting, select the company code of the displayed customer master record, or select all the company codes by selecting the corresponding field.
To block orders, deliveries, and invoices, select either the displayed sales area or all the sales areas. Save your entries.
Press Enter and a new window will open. Select the checkbox Posting Block.
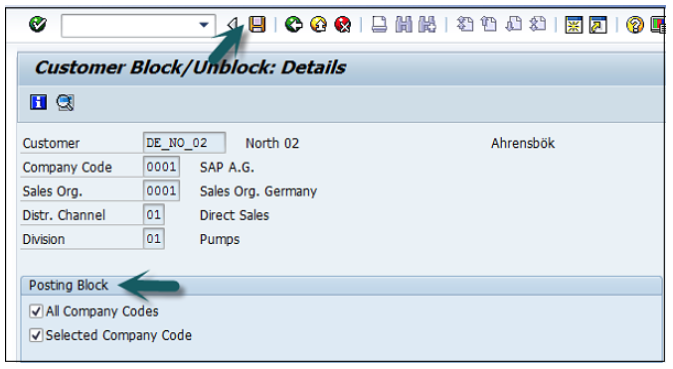
Once the selection is done, click the Save button at the top.
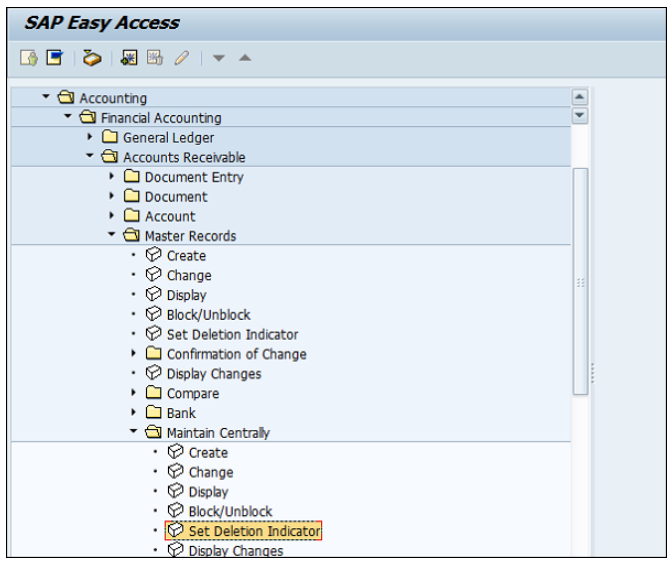
Go to Accounting → Finance Accounting → Accounts Receivable → Master Records → Maintain Centrally → Set Deletion Indicator.
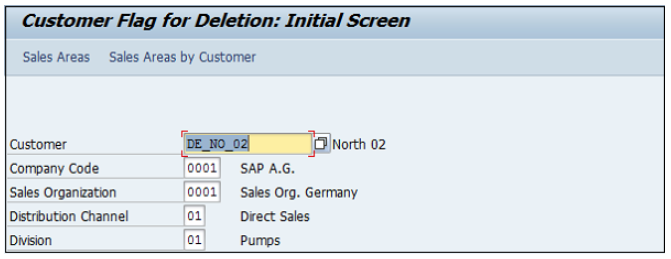
Select the customer id, company code, etc. to be deleted as shown below and press the Enter key.
A new window will open.
Select the Deletion flag as shown below −
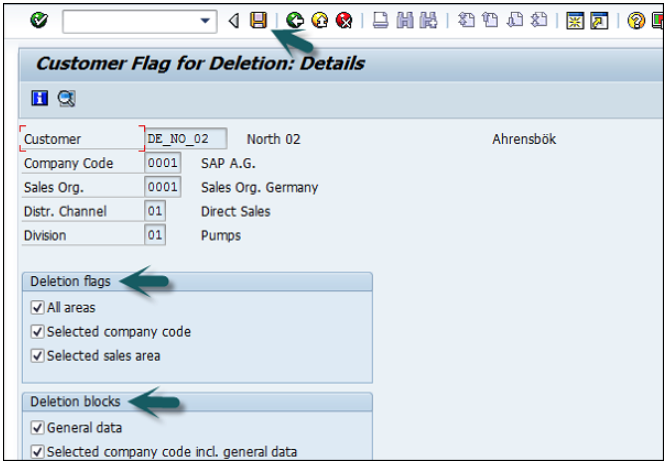
After selecting the Deletion flag, click the save icon at the top.
There are different types of customer account group that can be created in Account Receivable in SAP FI.
| Group | Name |
|---|---|
| X001 | Domestic Customers |
| X002 | Export Customers |
| X003 | One Time Customers |
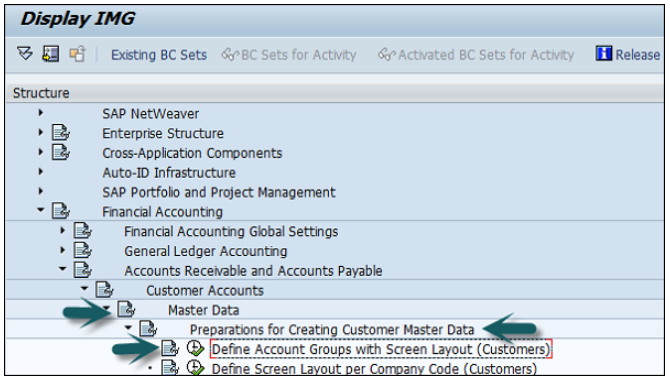
Go to SPRO → SAP Reference IMG → Financial Accounting → AR and AP → Customer Accounts → Master Data → Preparations for creating customer master data → Define Account Groups with screen layout (Customers) → Execute.
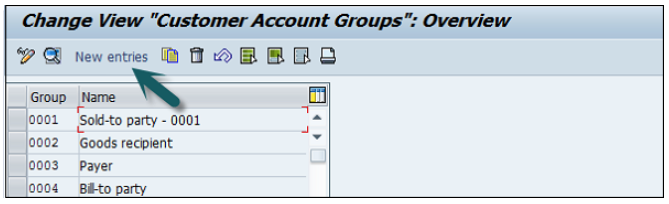
A new window will open.
Click New Entries as shown in the following screenshot.
It will open another new window. Enter the following details −
Customer Account Group − Enter 4-digit account group.
Name − Enter the name under General data field.
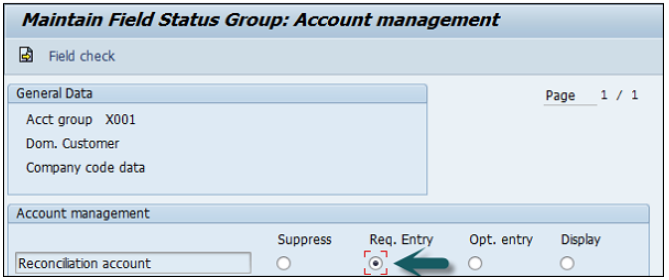
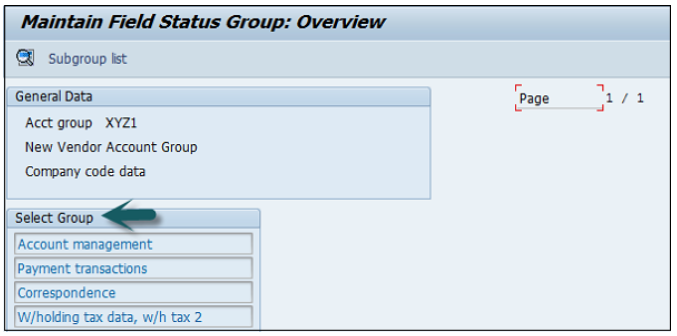
Field Status − Click Company code data.

Once you select Field Status, a new window will open.
Select Account Management from the select group and click Reconciliation account Req. Entry.

Once this is done, click the save icon at the top to save the configuration. Similarly you can create X002, X003 for other customers.
In SAP FI, one-time customer master record is required for those customers who don’t want to maintain their records separately or don’t have frequent transactions.
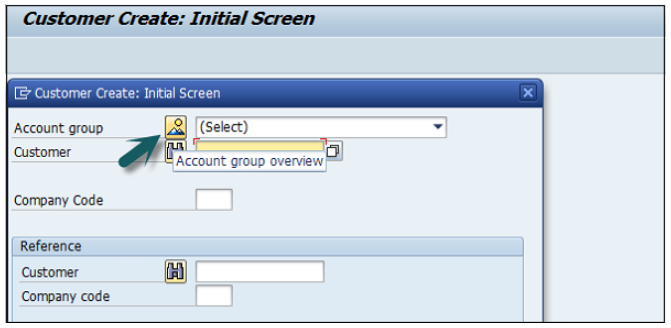
To create one-time customer master, use the T-code FD01.
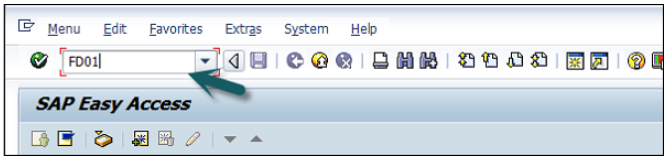
In the next screen, select account group overview button as shown below.
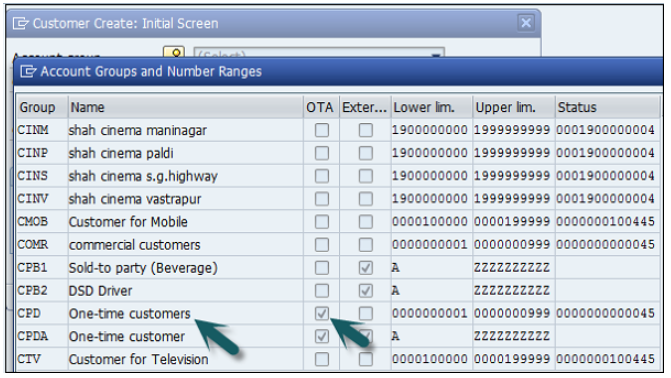
Select the account group for which one-time customer property is checked → click the tick mark
In the main window, enter the following details.
Enter the Customer ID as per the number range assigned to this customer account type
or if it uses internal number assignment, leave it blank and the company code in which this account has to be created.
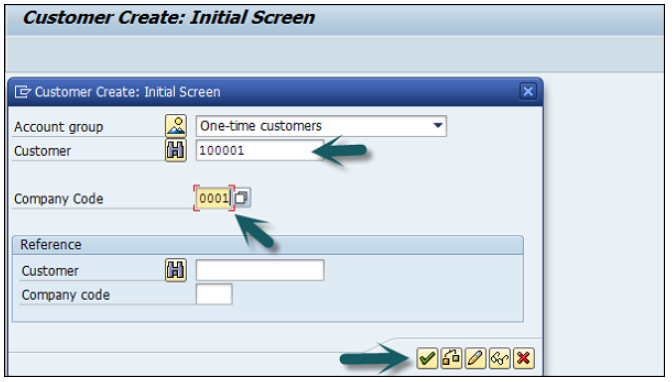
Once you click the tick mark, a new window will open.
Enter the following details −
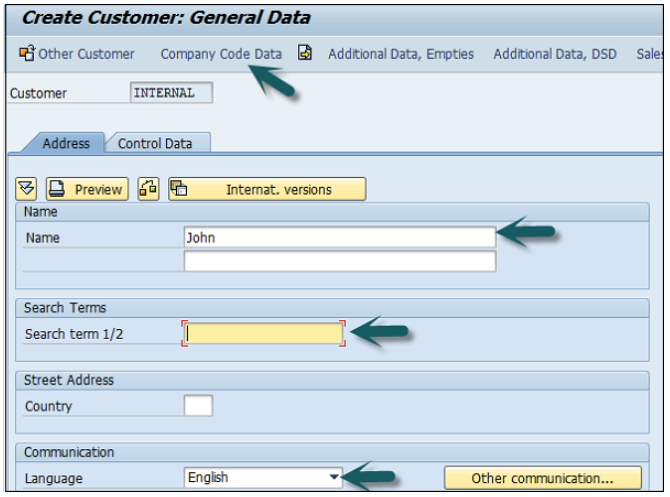
Click the Company code data once the above values are defined.
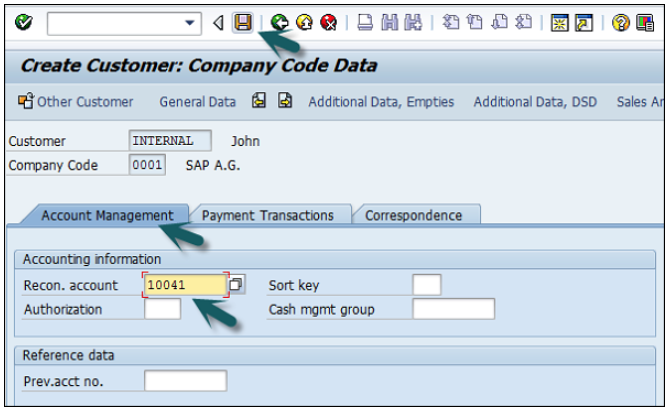
Next, go to Account Management tab and enter Recon Account.
Then, save the customer account details.
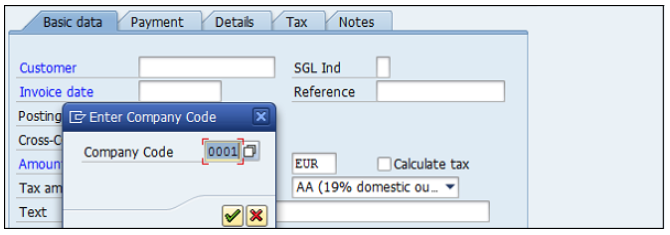
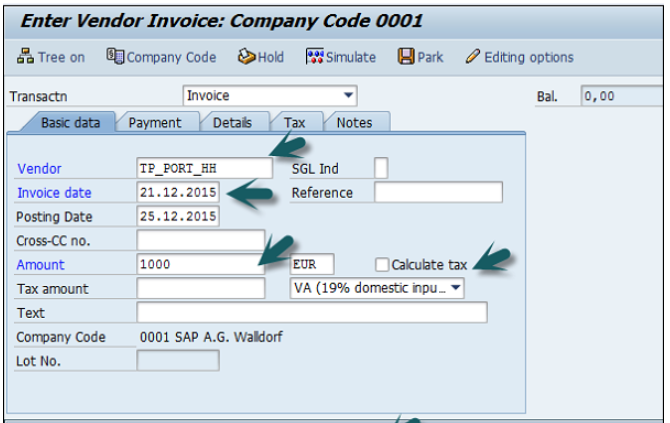
T-code − FB70
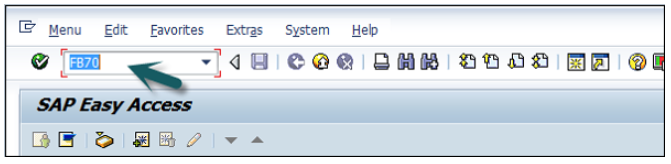
Enter the company code you want to post invoice to as shown below −
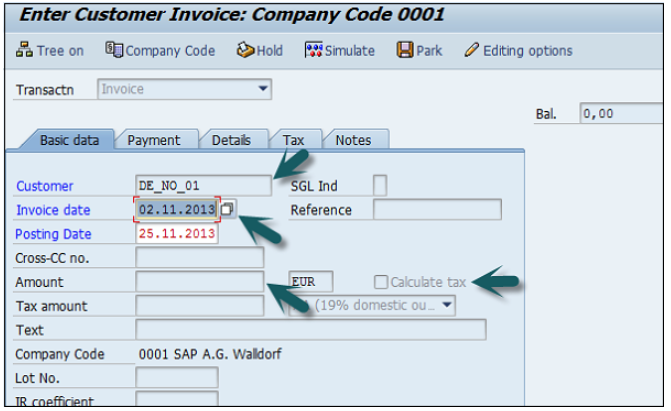
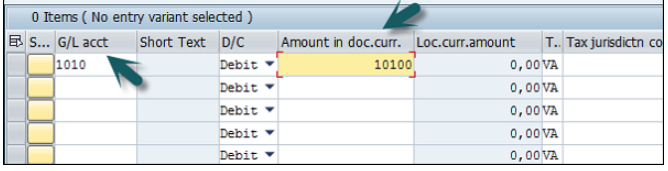
Enter the payment details like payment terms in Payment tab. Go to Details tab and enter the item details.
Once all the details are entered, click the Save button to generate the document number.
You can also reverse an incorrect document and can also clear the open items. A document can only be reversed if −
Use the T-code: FB08
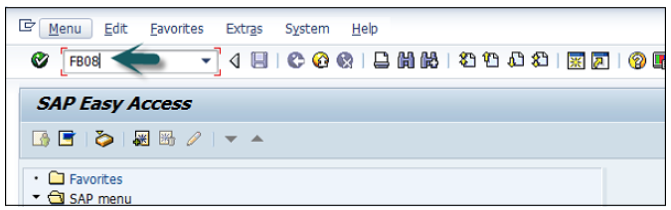
Enter the following details −
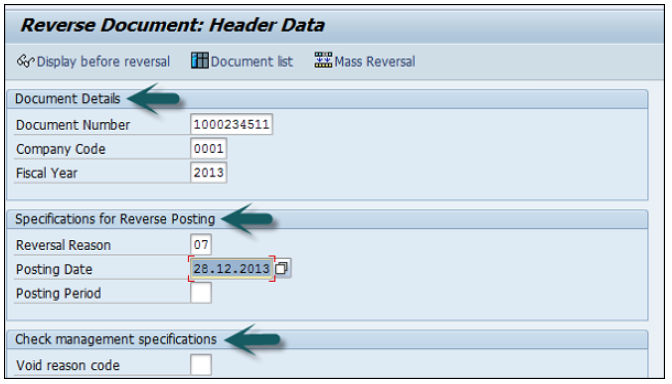
If the document includes a payment check, use void reason checkbox.
You can also click on option display before reversal at the top to see a preview of reversal document.
If things are OK, go back to the previous screen and click Save.
Sales Returns in SAP FI are used to manage full products that the customer has returned.
These are used in consumer goods industry.
All returns are related to quality defects and not incorrect deliveries.
The path that the returned merchandise takes often has to be tracked in detail.
Returned items have to be sent for inspection.
Example − Once the analysis of the returned merchandise is complete, the vendor or manufacturer determines −
The "Sales Returns" component gives you an overview of your physical warehouse stocks and the corresponding postings whenever you require.
T-code FB75.
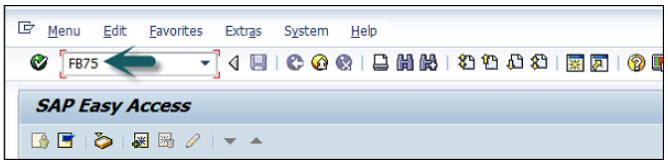
Enter Company Code, as shown in the following screenshot.
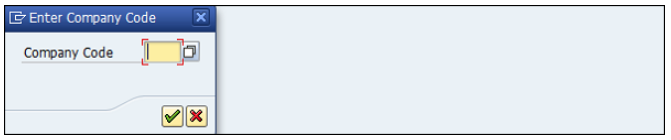
It will open a new window. Enter the following details −
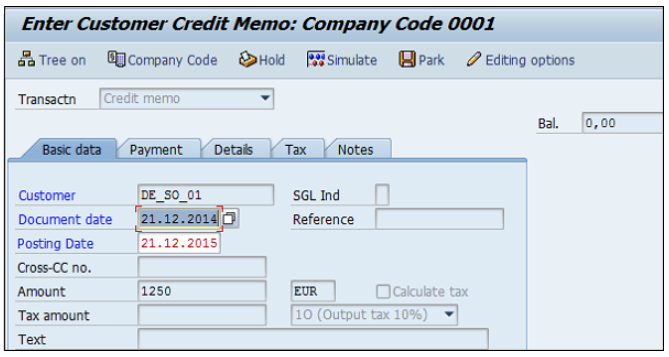
Go to Item details section and enter the following data −
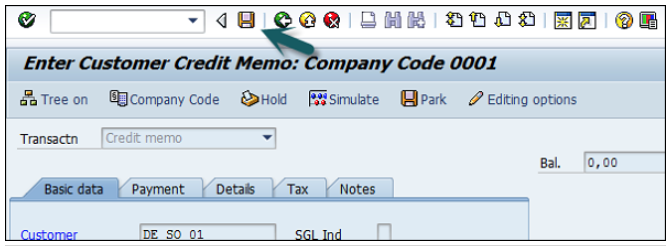
Once the required details are entered, click the Save button at the top.
You will get a confirmation that Sales Return is posted in Company Code 0001.
Once the customer has paid the billing document, you post the incoming payment.
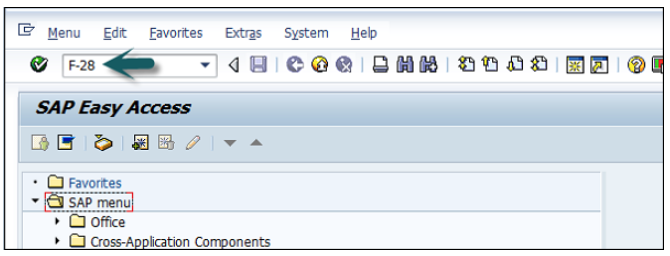
T-code − F-28
A new window will open. Enter the following details −
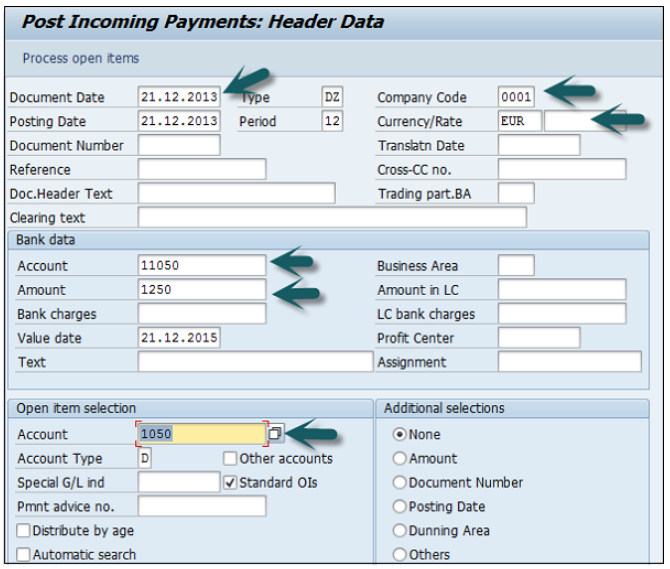
To check the list of open invoices, click Process Open Items at the top −

Enter the assigned payment amount value to balance with the invoice amount.
At the end, save the details.
You can post a vendor invoice in a foreign currency, so that you can process a currency analysis. You should not post your invoice in MM but rather directly in FI. This makes it easier to post backdated invoices.
T-code: F-43
A new window will open. Enter the following details −
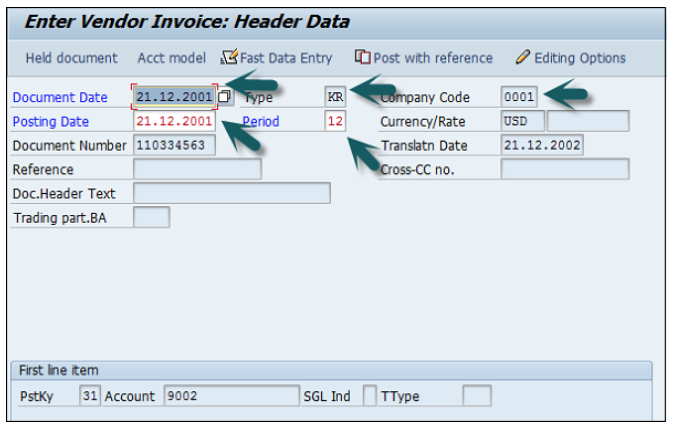
After providing all the required details, click the Save icon.
In SAP FI, you can also post partial payments from the customers. These partial payments are posted as separate open items.
Customers can see clearly what all invoices have been issued to customers and what payments he has made. But it keeps the multiple open items, until the invoice is fully paid/ cleared.
Example − There is a customer with an outstanding amount of 1500 and he makes a payment of 500 as partial payment, then there will be two separate open items of 1500 Debit and 500 Credit in the FI system and no clearing document will be created.
T-code − F-28
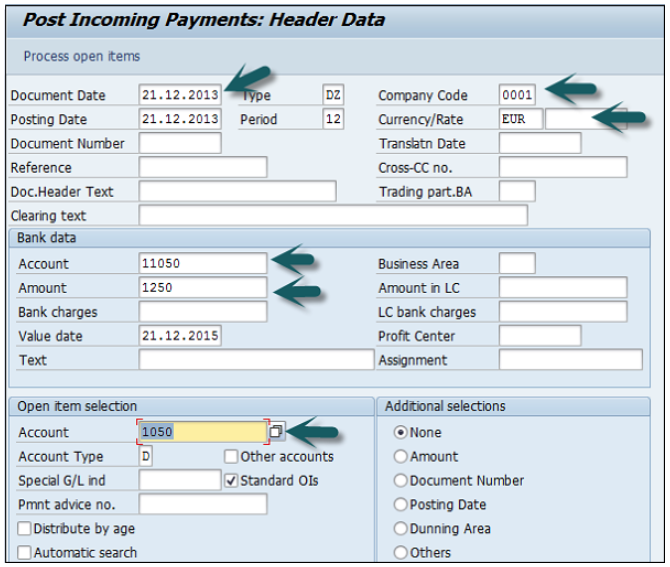
Once you click on Process Open Items → Go to Partial Payment tab and select the invoice for which partial payment is done and the amount.
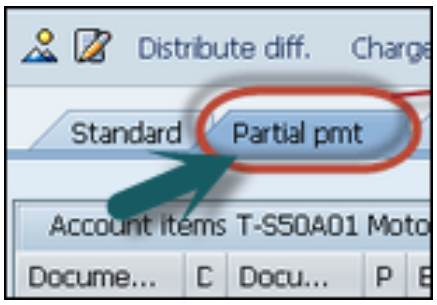
Click the Save button to post the document.

In SAP FI, this is used to reset the incorrect payment invoices. If a payment is made to incorrect invoices, then it can be reset.
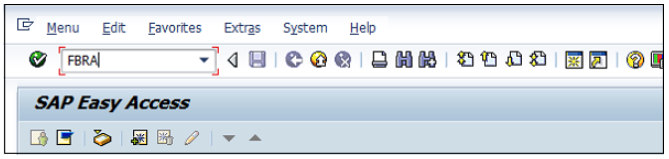
T-code − FBRA
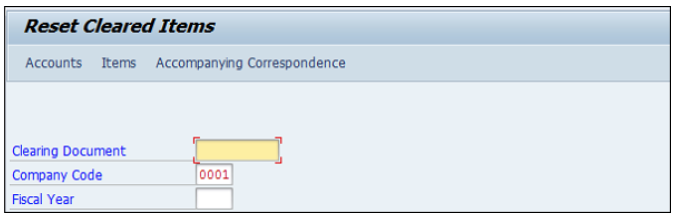
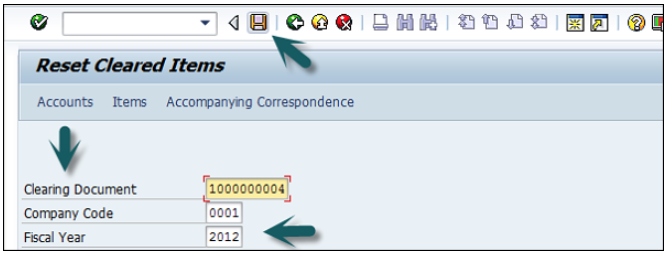
Enter the following details: Clearing Document number, Company Code, and Fiscal Year in the above window.
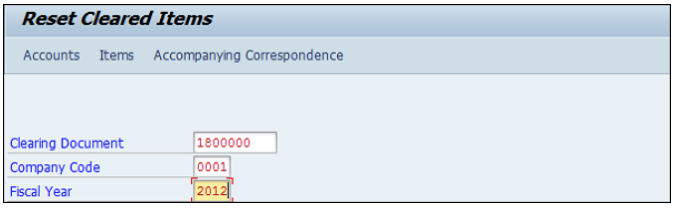
Click the Save icon at the top.

Once you click the Save icon, enter the reversal reason of customer payment and posting date and click
.
It will generate a Reversal Document Number.
In SAP FI, Credit Control is used to specify and control the customer credit limits. A credit control area can include one or more company codes. It is not possible to divide a company code into several credit control areas.
The benefits of defining a credit control area in SAP FI are as follows −
The credit control area is used for credit management in AR and SD components.
You define a credit control area according to the areas of responsibility for credit monitoring. For each credit control area, you enter a key, a name, and the currency in which the credit limit is to be managed in the credit control area. You select a four-character alphanumeric key. In the simplest case, each company code corresponds to one credit control area. In this case, we recommend that you use the same key for the credit control area as for the company code.
Credit control can include one or more company codes and to enable it to do this, you must assign the respective credit control area to the company codes.
If a customer is created in several company codes that are assigned to different credit control areas, a separate credit limit is managed for the customer in each of the different credit control areas.
T-code − FD32
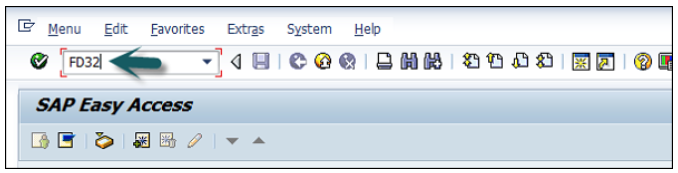
A new window will open. Enter the following details −
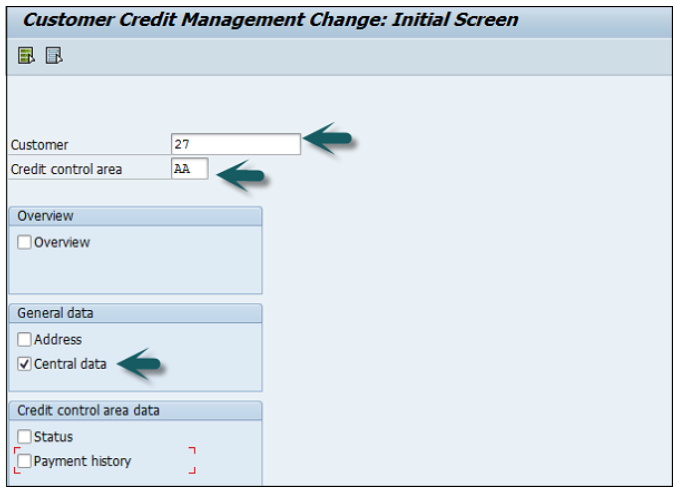
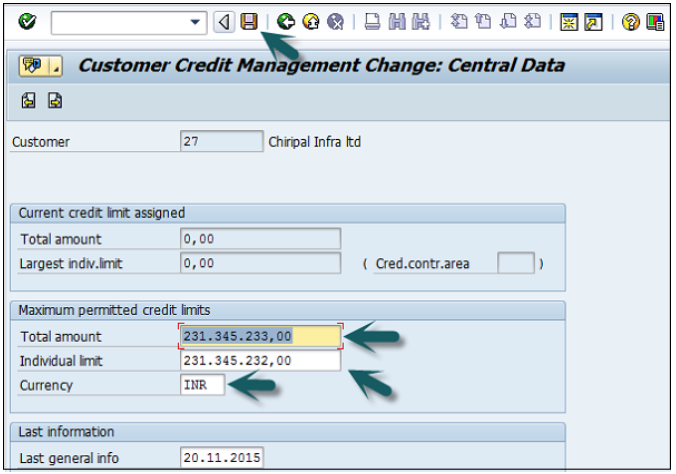
Maintain the credit limit data for customers in the above window.
Individual limit shouldn’t be greater than the total limit for a customer.
Once the details are updated, click the Save icon at the top.
Before you create a vendor master record in Accounting, you need to make sure that the master record is not already created in Purchasing.
You can create a vendor master record by referencing an existing one. In this case, the system copies certain data from the reference master record, however the system does not transfer all the data.
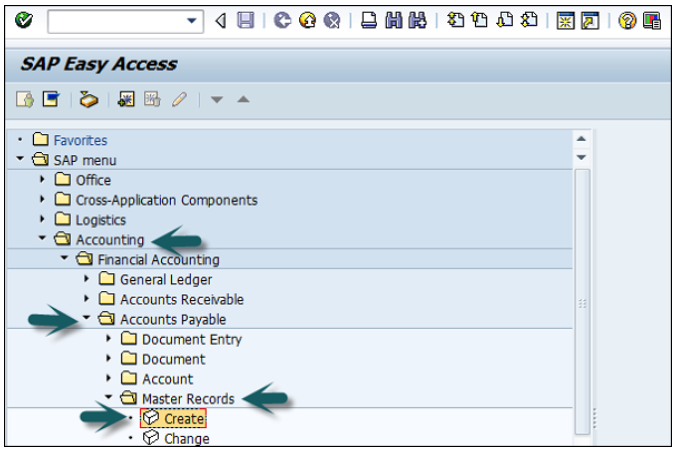
If you have SAP Material Management configured, you can create a vendor master record centrally. Here we will discuss how to create vendor master record for a company code.
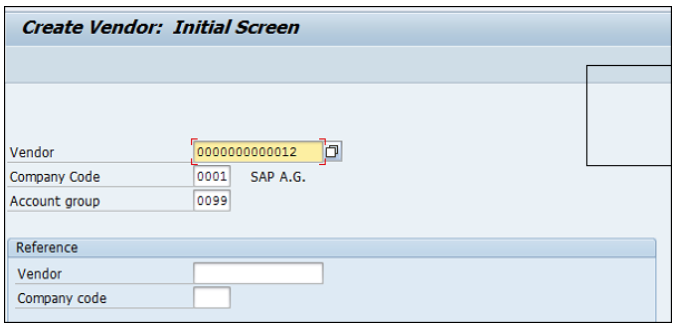
Go to Accounting → Finance Accounting → Accounts Payable → Master Record → Create.
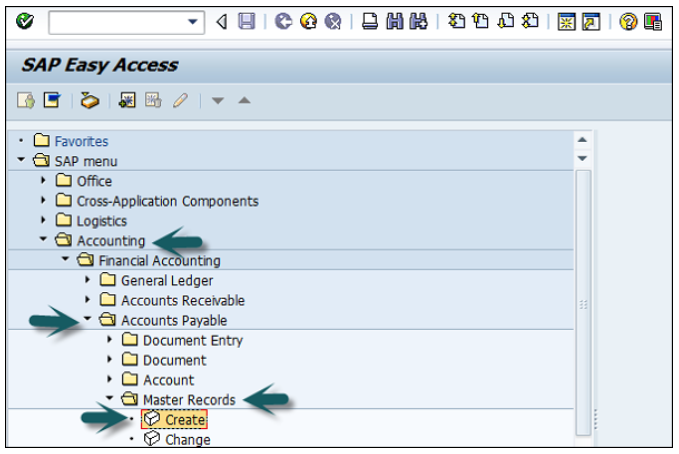
The following window will open.
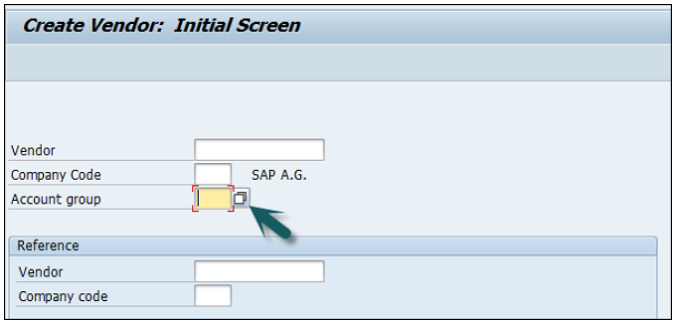
If you are using an external number assignment, enter the vendor account number, otherwise the system will assign once you click "Save the master record".
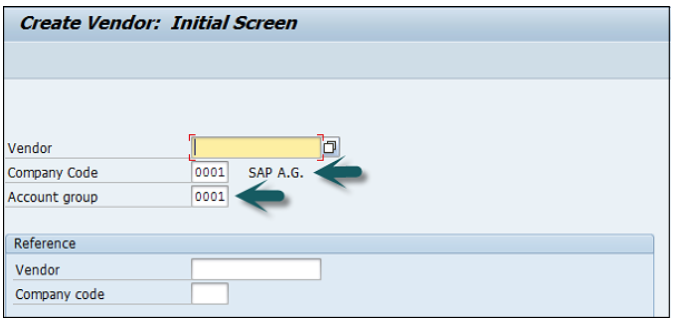
Press Enter after entering the Company code, Account group. It will open a new window will open where you need to enter the following details −
Once you press Enter or click Next Screen, enter the bank account details as shown below and click the Next Screen icon.
Next, enter the contact person details, name, telephone, description and go to the next screen.
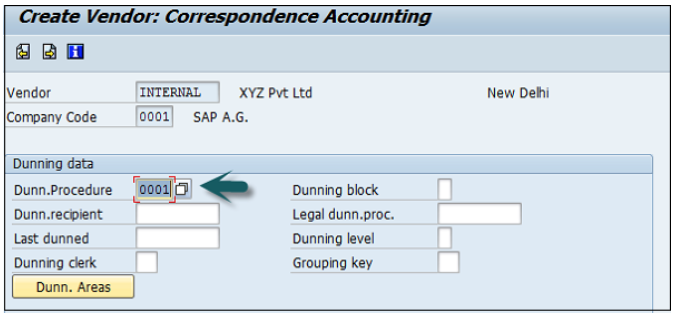
In the next screen, enter the Recon Account and cash management group (domestic/Foreign, etc.)
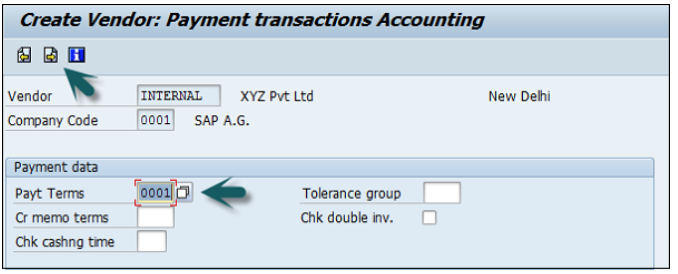
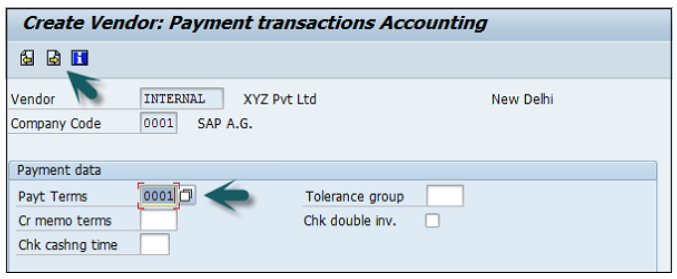
Click the Next Screen icon and enter the payment transactions accounting details.
Enter Payt terms (like pay immediately, pay after 14 days 3% cash, etc.).

Once you are done with all the details, click the Save button at the top.
You will get a message that a vendor has been created in the given company code.

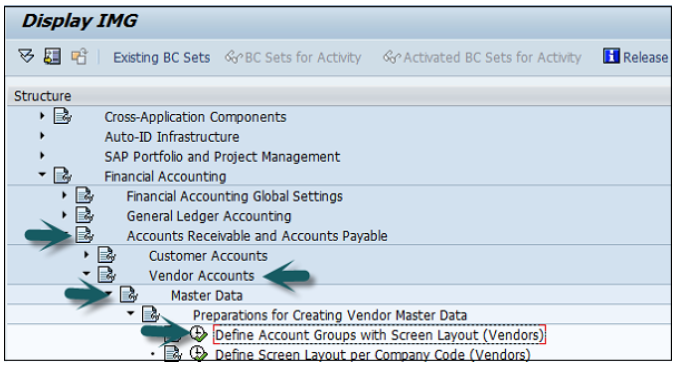
Use the T-code &minus OBD3 or go to the path given below −
SPRO → SAP Reference IMG → Financial Accounting → AR and AP → Vendor accounts → master data → preparation for creating vendor master data → Define Account groups with screen layout (Vendors) → Execute.
Click the New Entries button.

It will open a new window. Enter the following details −
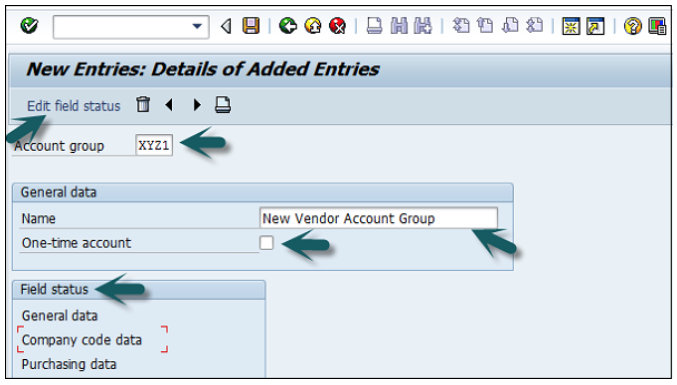
Once you provide the above details, click Edit Field Status and a new window will open.
Select the fields you want to maintain in the field status.
After providing the required details, click the Save icon at the top.

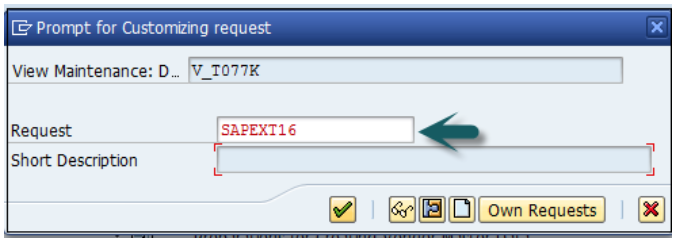
Enter the customizing request number as shown below to create a new vendor account group.
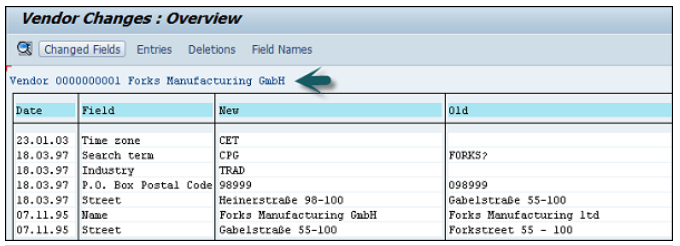
When you change a master record, the system logs these changes and generates the change documents. For each field, it stores the time of change, the name of the user, and the previous field contents.
You can display all the changes for the following −
For several vendor master records, the following changes are displayed separately −
Using the change documents, you can find all the changes that are made and when they were made.
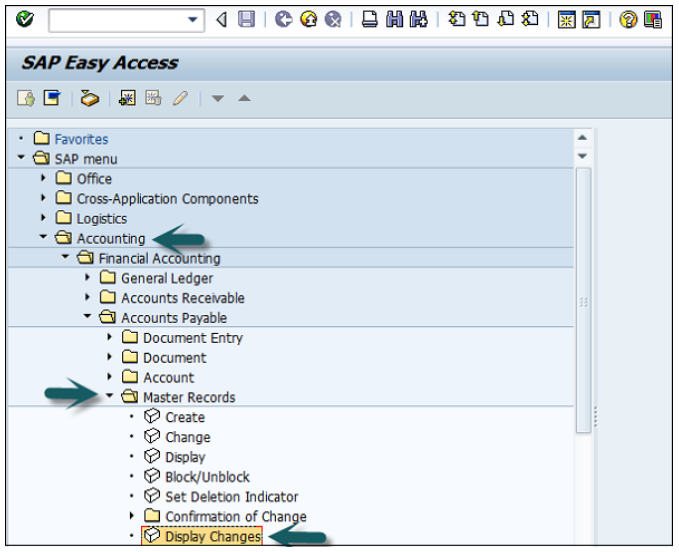
Go to Accounting → Financial Accounting → Accounts Payable → Master Records → Display Changes.
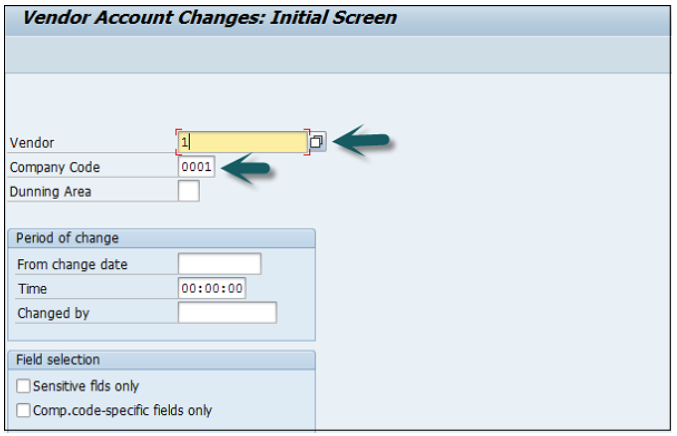
Enter the Vendor Account number and the Company code and press Enter.
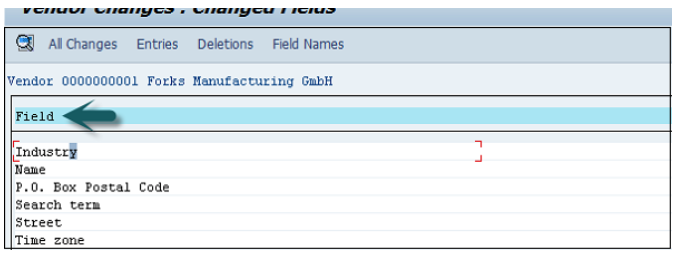
A new window will open.
Select the changed field and click All Changes.
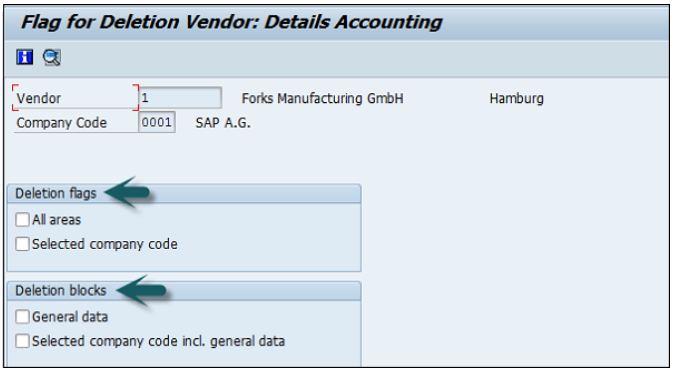
You have to block a vendor master record before you can mark it for deletion. You would also block a vendor that you use only as an alternative payment recipient, so that nobody can post to it by mistake.
You can apply the following blocks −
Posting a block for certain company codes or for all the company codes.
Purchasing a block for certain purchasing organizations or for all the purchasing organizations. This is of course only if you have purchased and installed the purchasing application component.
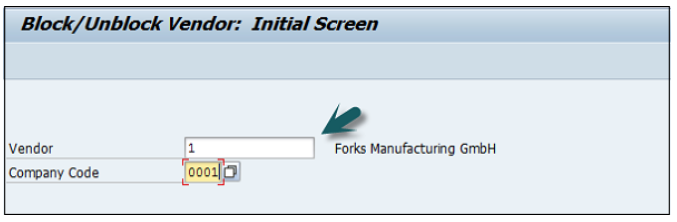
Use the T-code FK05 or go to Accounting → Financial Accounting → Accounts Payable → Master Records → Display Changes.
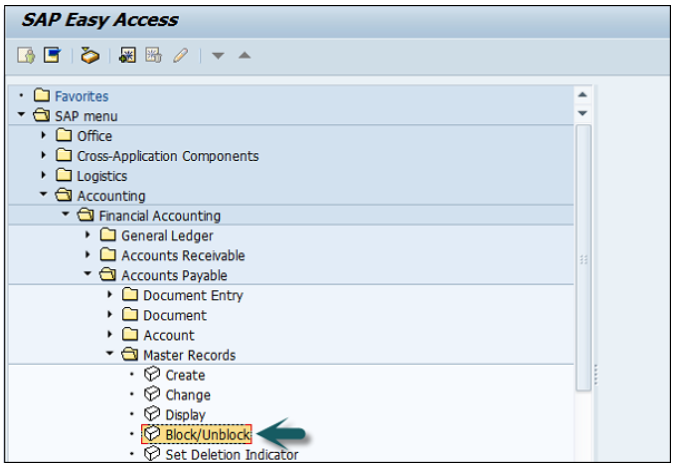
Enter the Company code and Vendor account as shown below and press enter.

Use the T-code FK06 or go to Accounting → Financial Accounting → Accounts Payable → Master Records → Display Changes.
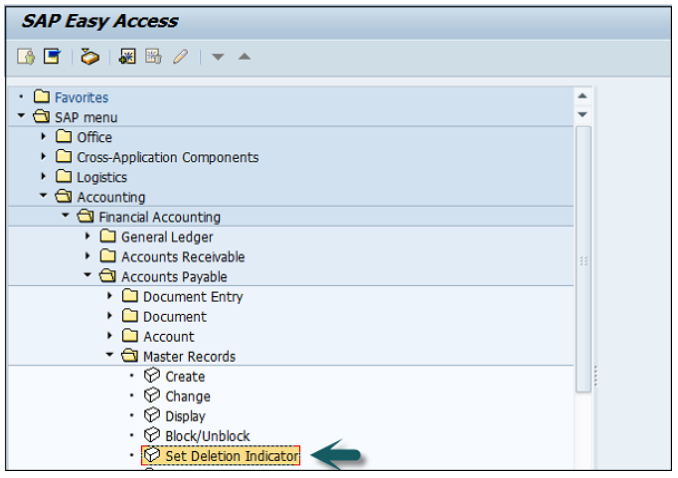
Enter the company code and the Vendor account and press Enter as shown below.
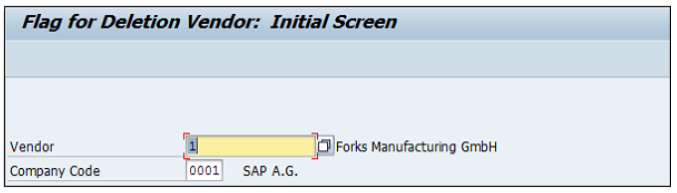
A new window will open.
Select the deletion flag and the deletion blocks and click the Save button at the top.
In SAP FI, you can also create One-Time Vendor Master Record for the Vendors with only a few transactions and there is no need to maintain their master records separately.
In such cases, you can create One-Time Vendor with General Information such as Name, Address, Phone, etc.
Use the T-code FK01 or go to Accounting → Finance Accounting → Accounts Payable → Master Record → Create.
It will open the following window. Select the account group and search for the one-time vendor.

Enter the vendor id as per the number range assigned to the account group and the company code in which you want to create this record and press Enter.
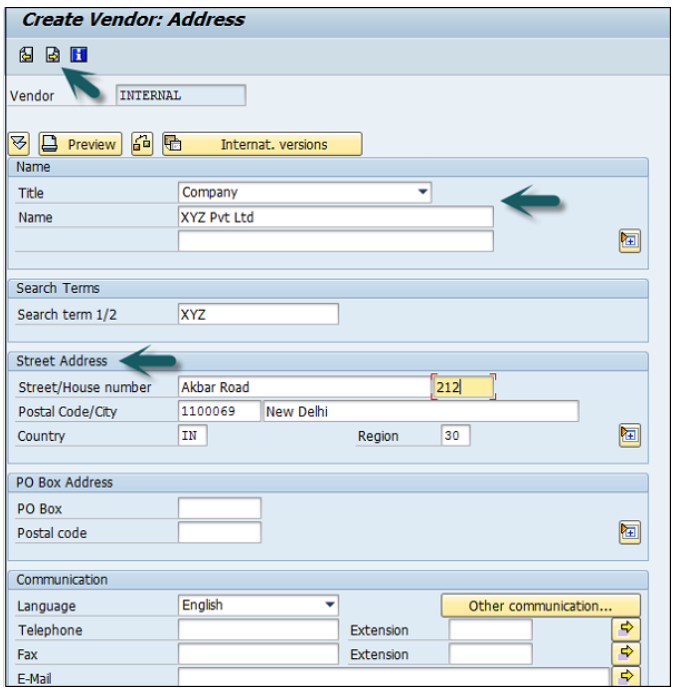
A new window will open. Enter the following details −

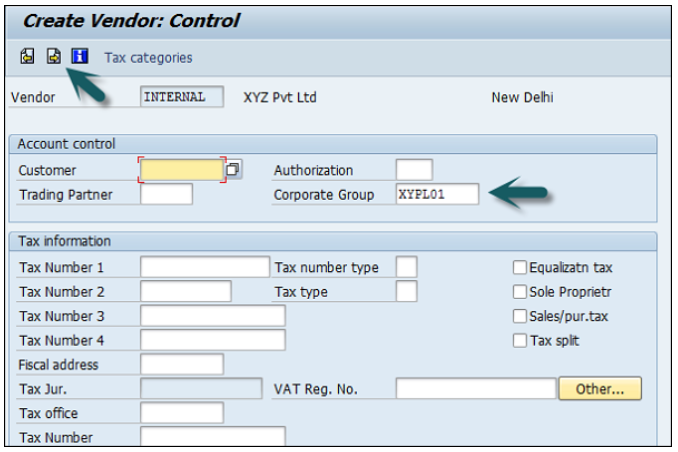
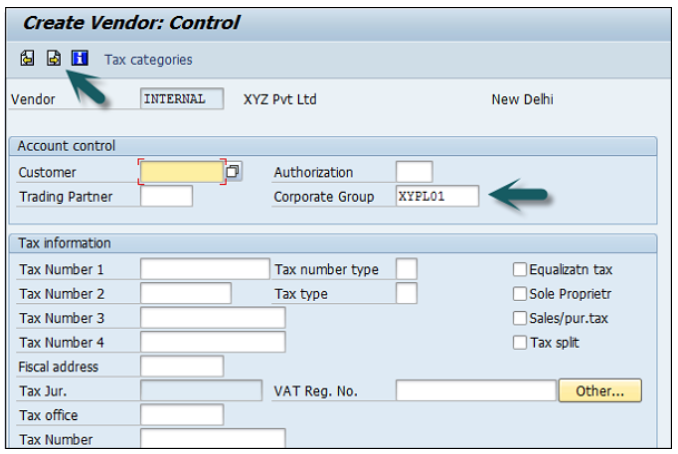
In the next screen, enter the Vendor Control Group details.
If a vendor is from a corporate group, enter the corporate group name.
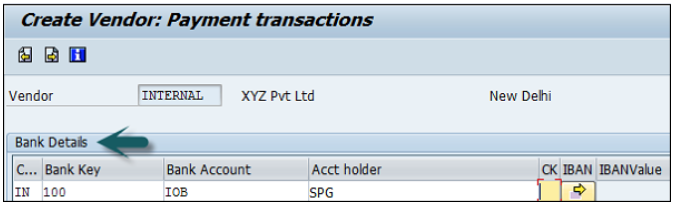
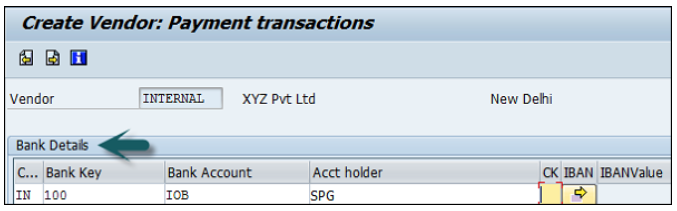
Now, enter the bank account details as shown below and click the Next Screen button.
The next step is to enter the contact person details, name, telephone, description and go to the next screen.
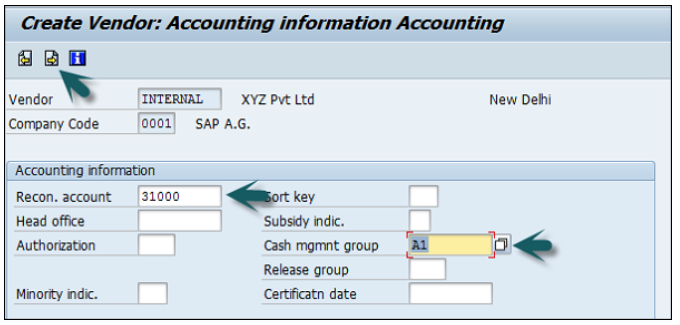
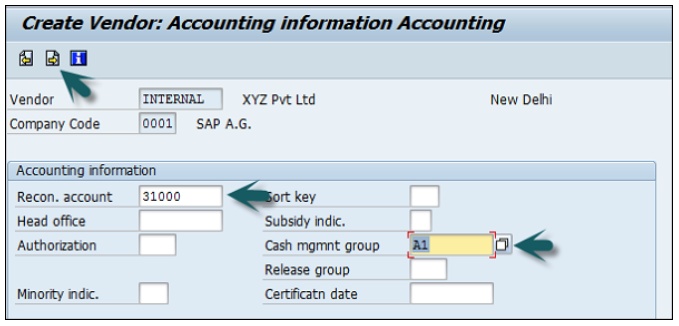
In the next screen, enter the Recon Account and cash management group (domestic/Foreign, etc.)
Click Next and enter the payment transactions accounting details.
Enter Payt terms (like pay immediately, pay after 14 days 3% cash, etc.).
Once you are done with all the details, click the Save button at the top.
You will get a message that a vendor has been created in the given company code.

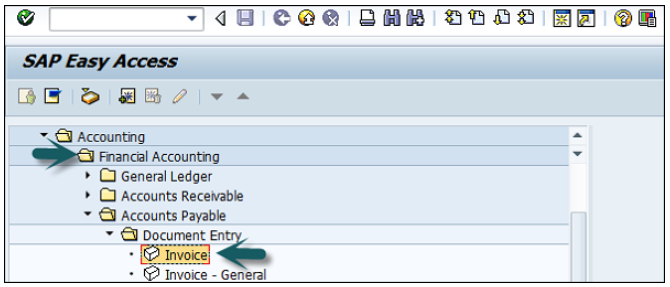
Use the T-code FB60 for an incoming invoice or go to Accounting → Financial Accounting → Accounts Payable → Document Entry → Invoice.
Enter the company code you want to post this invoice to and press Enter. It will open a new window. Enter the following details −
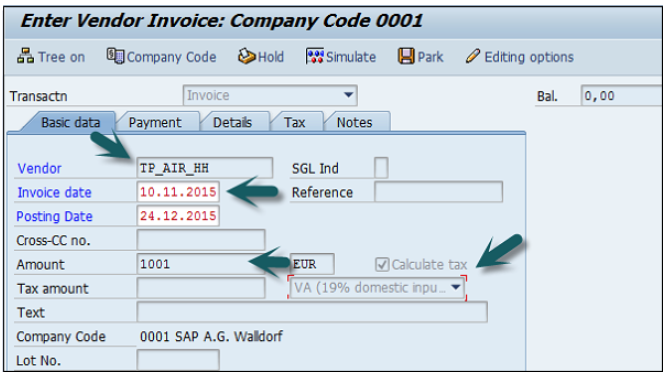
Go to the Payment tab and enter the Payt terms like pay immediately, after 14 days, etc.

In Item details, enter the following details −
After entering these details, click Check the Status of the Document and thereafter, click the Save button at the top.

Use the T-code FB65 or go to Accounting → Financial Accounting → Accounts Payable → Document Entry → Credit memo.
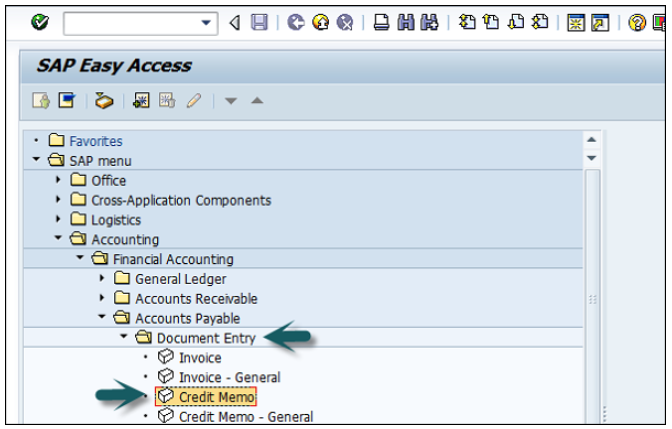
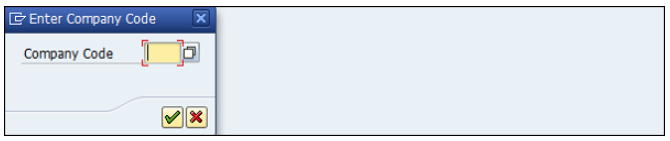
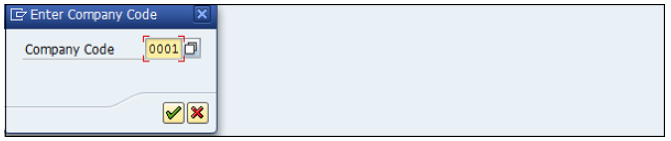
Enter the company code as shown below −
In the next screen, enter the following details −
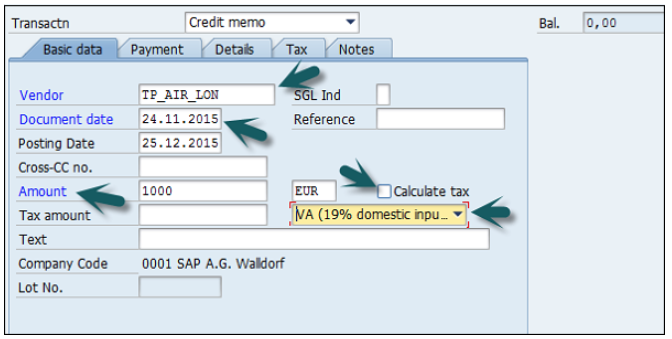
Go to Item details section and enter the following data −
Once the details are entered, click the Save button at the top.
You will get a confirmation that a vendor credit memo is posted in the company code 0001.
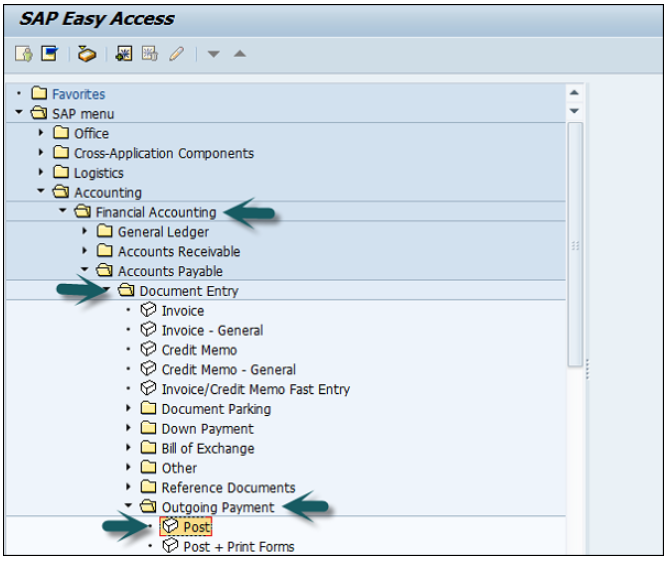
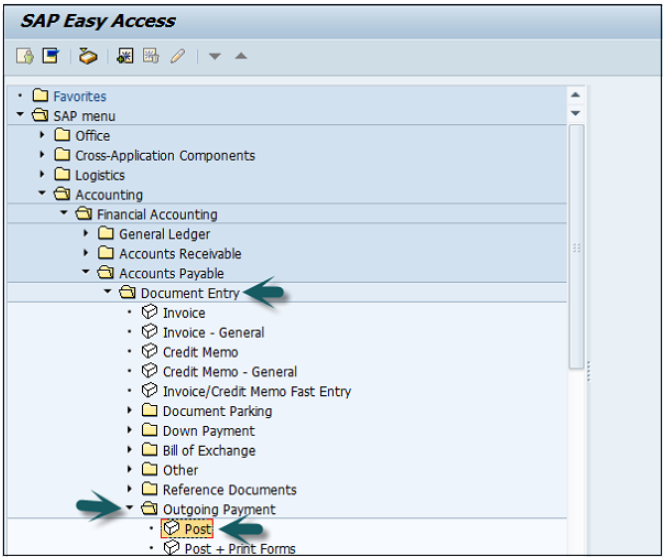
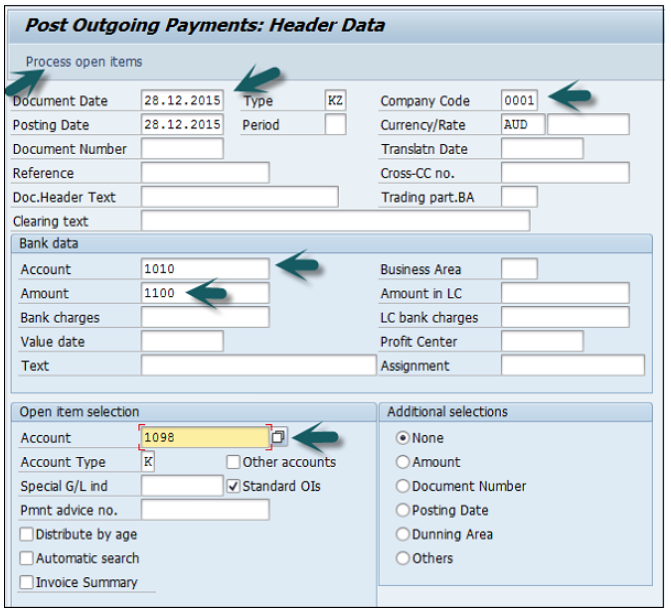
Use the T-code F-53 or go to Accounting → Financial Accounting → Account Payable → Document Entry → Outgoing Payment → Post.
In the next screen, input the following details −
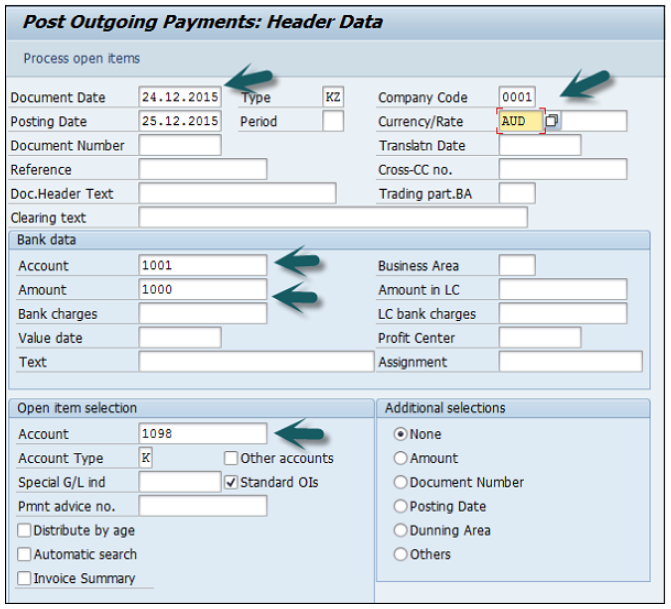
Once you provide the above details, click Process Open Items.

Assign the payment amount to the appropriate invoice so as to balance the payment with the invoice amount.

Click the Save button at the top to get the document number to be generated.
In SAP FI, you can post a vendor invoice in foreign currency so you can do currency analysis. If you post in FI, you can directly post backdate invoices.
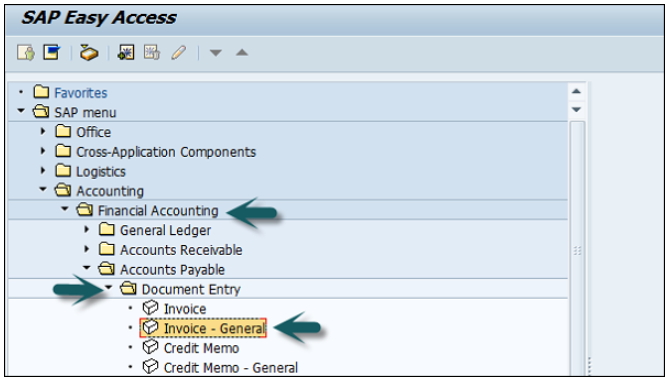
Use the T-code F-43 or go to Accounting → Financial Accounting → Accounts Payable → Document entry → Other → Invoice → General.
In the next window, enter the following details −
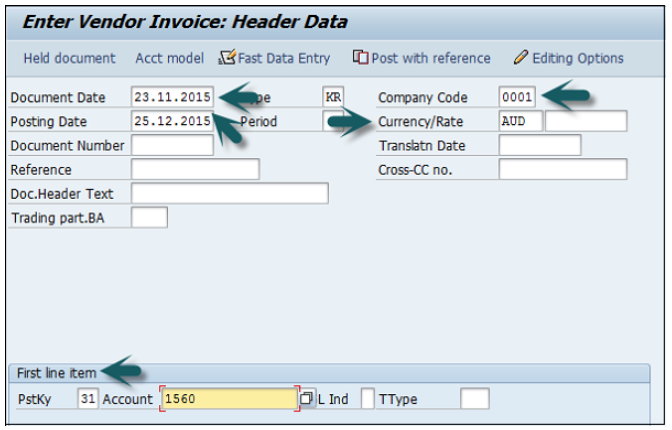
Press Enter and a new window will open.
Input the amount, calculate tax, Tax code, PstKey, Account (Revenue account) and press Enter.
The amount in local currency is displayed in the field.
Click the Save button at the top and note the document number.
Use the T-code FB60 and enter the company code.
In the next screen, input the following details −
After completing the above fields, click Withholding tax.
Click the Save icon and note down the document number to be generated.
In SAP FI, you can also post outgoing partial payments for a vendor.
Partial payment from a vendor will open as an open item and no clearing document will be generated.
Use the T-code F-53 or go to Accounting → Financial Accounting → Accounts Payable → Document Entry → Outgoing Payment → Post.
In the next window, input the following details −
The next step is to click Process Open Items.
It will open a new window wherein you need to take the following actions −
Once the above details are supplied, click the Save icon.
Note down the document number that is generated.
In SAP FI, you can clear a vendor payment if an incorrect payment is made in Account Payables.
Example
You have an invoice # 23156 and this invoice will remain open till you receive a payment for this invoice.
When a payment is received, a new document is created # 50000678, when you enter the receipt and this document also becomes the clearing document.
Now, due to some error, if you have to reverse this payment document, then you need to use the T-code FBRA.
When you use this, the system will first reset the documents as open items and then reverse the document number.
Use the T-code FBRA.
In the next screen, enter the following details −
Confirm the reset of the clearing document.
Automatic Payment Program (APP) serves the purpose of posting accounts payable like payment to a vendor based on vendor invoices automatically.
APP is used to find out due/overdue invoices and to process a list of customer and vendor invoices to make payments in one go. APP cannot be used for all company codes from different countries.
APP has the following categories −
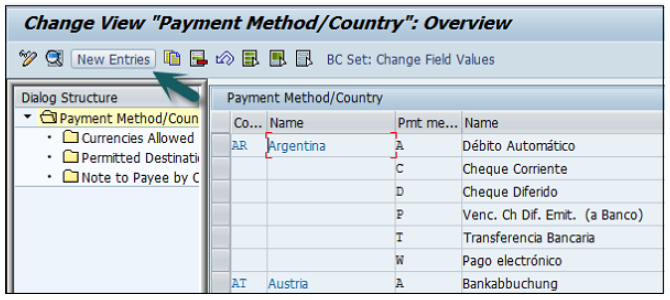
Use the T-code FBZP to see all the following options.


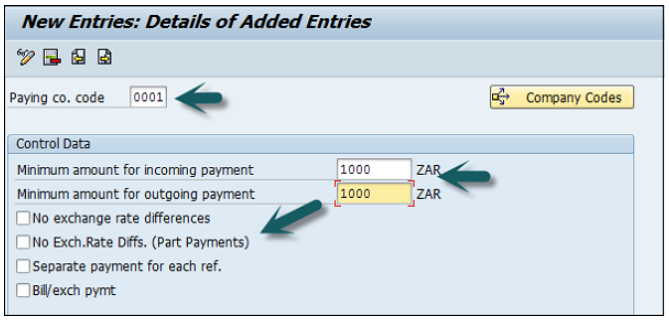
Enter the company code in the field Paying Company Code.
Select the checkboxes Pyt. Meth Suppl. and Max. Cash Discount as shown below −
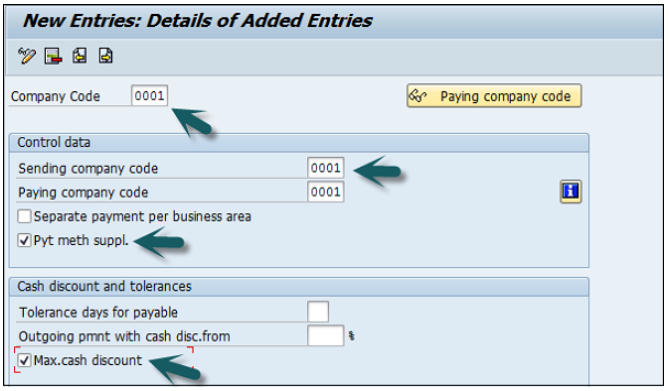
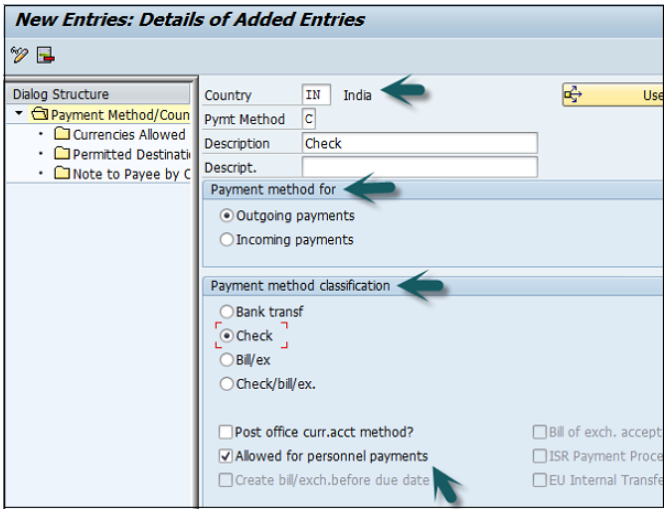
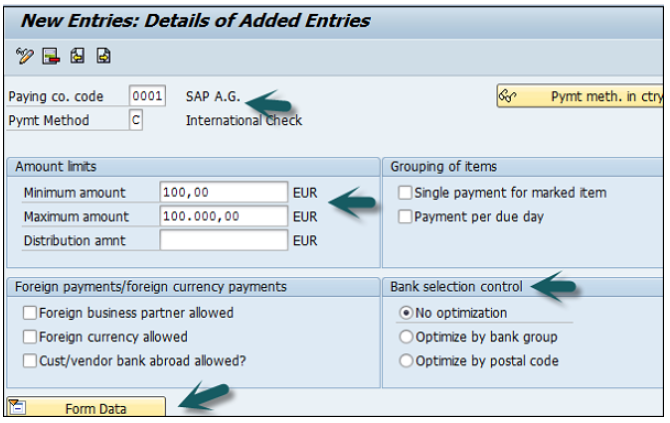
It will open a new window wherein you need to provide the following details −
In the next screen, input the following details −
In the next screen, enter the following details −
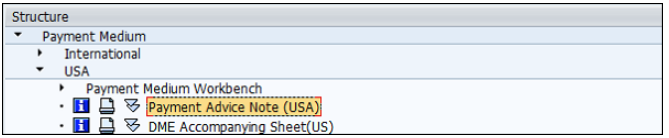
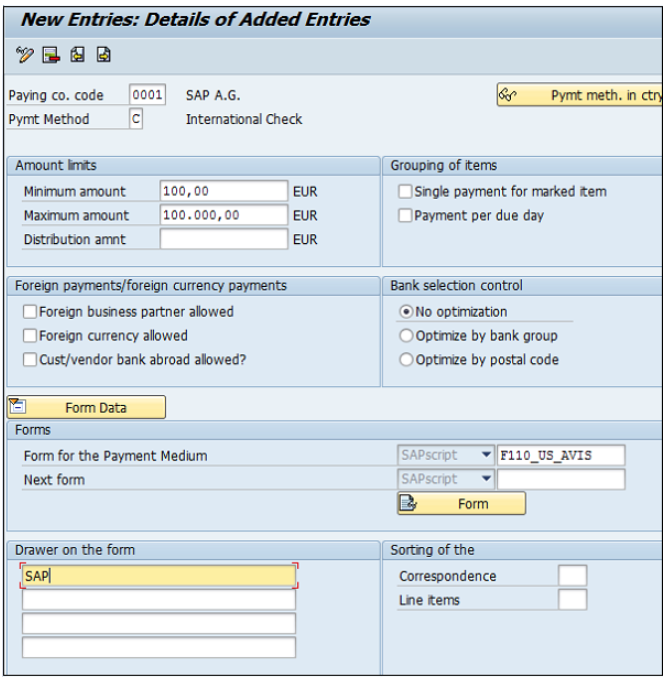
Update Form Data Type.
Click the Search button and select the value.

Enter the field-drawer of the form and once all the details are supplied, click the Save button.

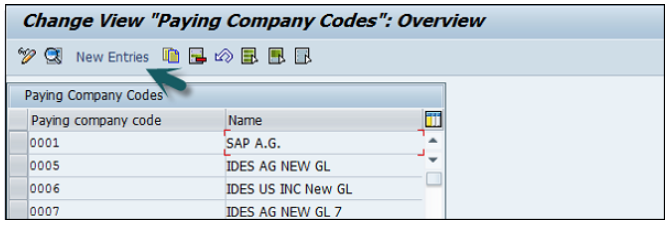
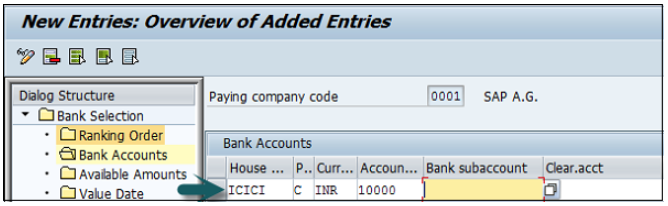
Click the button Ranking Order and go to New Entries as shown below −
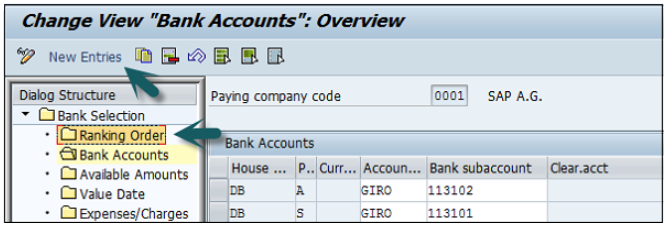
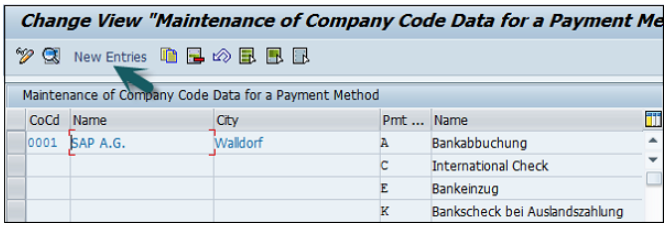
Enter the new bank account details as shown below to create a bank account.
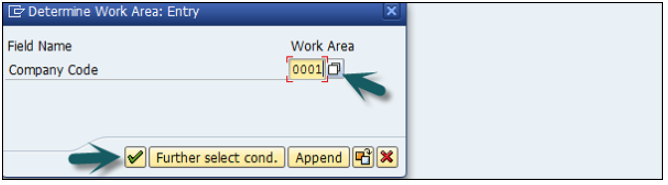
Click the option House Banks on the main screen and enter the company code as shown below −
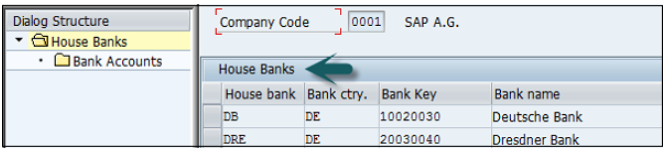
The next window will show a list of all house banks which the company is using to make payments to its vendors and customers.
While clearing Financial Accounting documents that have been posted in a foreign currency, you can post the rounding differences that arise to a separate revenue/expense account.
Earlier these differences were displayed as exchange rate differences at the time of clearing.
Rounding differences can be posted to the General Ledger account as Expense or Revenue.
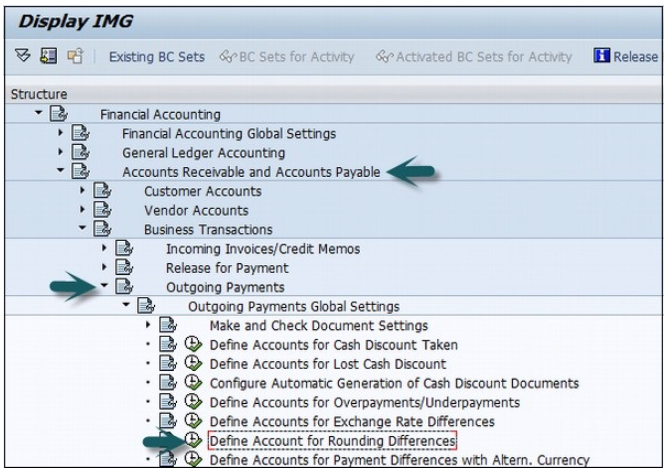
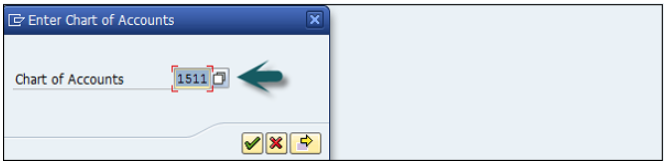
Go to SPRO → SAP Reference IMG → Financial Accounting → AR and AP → Business Transactions → Outgoing Payments → Outgoing Payment Global settings → Define account for rounding differences → Execute.
Select Chart of Accounts and click
. Go to Posting Key.
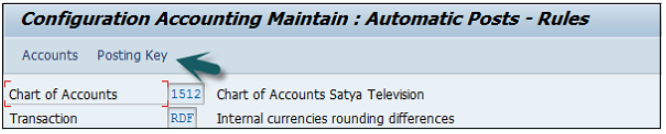
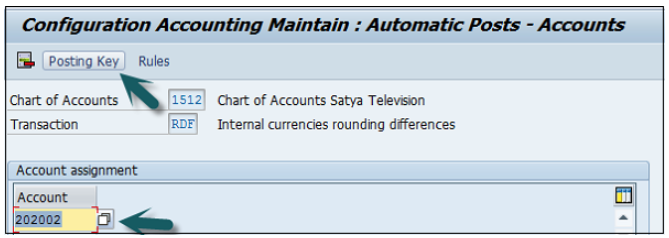
In the next screen, enter the following details −
paragraph