| Module | Module Name | Links | Links | Blake's Links |
| PM | Plant Mantenance | tutorials point | Blake | |
| MM | Material Management | tutorials point Overview | Guru99 | Blake: 1-10 | 11-20 | 21-25 |
| SD | Sales and Distribution | tutorials point Tutorial | Guru99 | Blake |
| PP | Production Planning | tutorials point Tutorial | Guru99 | Blake | 1-7 |
| External Links | ||||
| NewLanguage.html | FICO Module: Blake's : Tutorials Point | |||
| 1 | Home | MM_Doc Tutorials Point | 11 | Source Determination/List | MM_Doc Tutorials Point | 21 | Service Management | MM_Doc Tutorials Point | ||
| 2 | Overview | MM_Doc Tutorials Point | 12 | Procurement Cycle | MM_Doc Tutorials Point | 22 | Valuation | MM_Doc Tutorials Point | ||
| 3 | Screen Navigation | MM_Doc Tutorials Point | 13 | Purchase Requisition | MM_Doc Tutorials Point | 23 | Account Determination | MM_Doc Tutorials Point | ||
| 4 | Procurement Process | MM_Doc Tutorials Point | 14 | Request for Quotation | MM_Doc Tutorials Point | 24 | Configuration | MM_Doc Tutorials Point | ||
| 5 | Organization Structure | MM_Doc Tutorials Point | 15 | Outline Agreement | MM_Doc Tutorials Point | 25 | Transaction Codes | MM_Doc Tutorials Point | ||
| 6 | Enterprise Structure | MM_Doc Tutorials Point | 16 | Quota Arrangement | MM_Doc Tutorials Point | |||||
| 7 | Defining Organizational Structure | MM_Doc Tutorials Point | 17 | Posting Period | MM_Doc Tutorials Point | |||||
| 8 | Organizational Units | MM_Doc Tutorials Point | 18 | Purchase Order Types | MM_Doc Tutorials Point | |||||
| 9 | Master Data | MM_Doc Tutorials Point | 19 | Inventory Management | MM_Doc Tutorials Point | |||||
| 10 | Purchase Info Record | MM_Doc Tutorials Point | 20 | Invoice Verification | MM_Doc Tutorials Point |
Services are meant for direct consumption instead of keeping them in inventory.
Service description along with its unit of measure is stored as master data in a record that is known as the service master record.
The system stores the services that have been procured as a record in a sheet that is called as the service entry sheet.
Service procurement can be of the following two types−
Planned Services − In planned services at the time of procurement specifications like quantity and price are known in advance. It means nature and scope of service is clear before procurement.
Unplanned Services − In unplanned services at the time of procurement specifications like quantity and price are not known in advance. It means nature and scope of service is not clear before procurement. These services can be extended as per the requirement.
Service management deals with the following terms−
Service Master Record
Service Purchase Order
Service Entry Sheet
Logistics ⇒ Materials Management ⇒ Service Master ⇒ Service ⇒ Service Master
TCode: AC03
Step 1 − On the SAP Menu screen, select Service Master by following the above path.
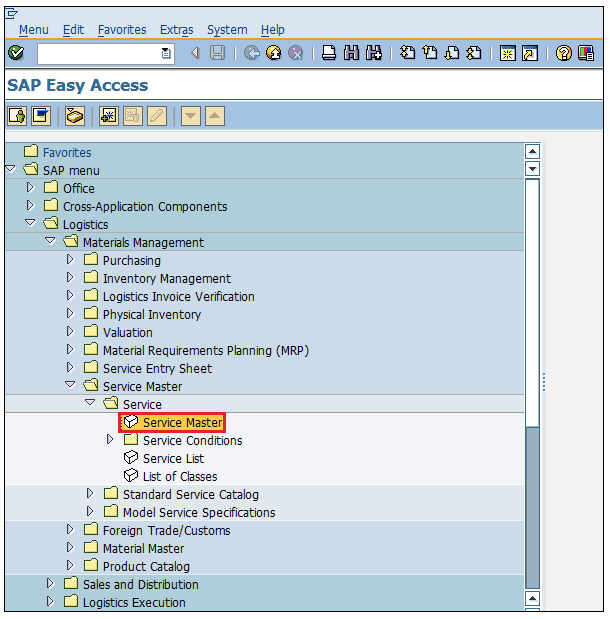
Step 2 − Click the Create New Service icon as shown below.
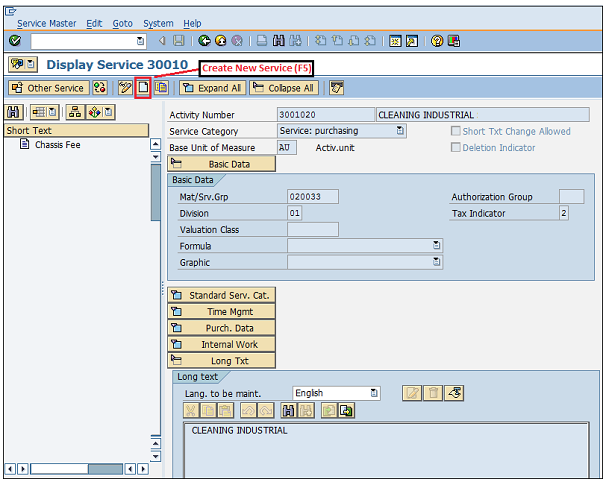
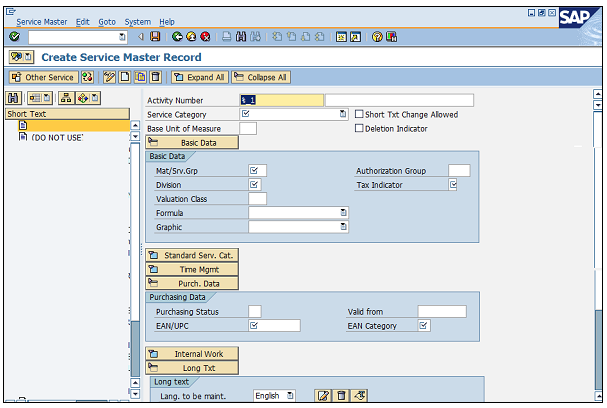
Step 3 − Fill in all the necessary details such as service category, base unit of measure, and valuation class.
Click on Save.
A new Service will be created.
In SAP MM services are accomplished with the help of service purchase order. The requirement of service with its description along with quantity is given to third party in form of service purchase order. In service purchase order important field is item category. For service, item category will be D. So, service purchase order can be created by following the below steps.
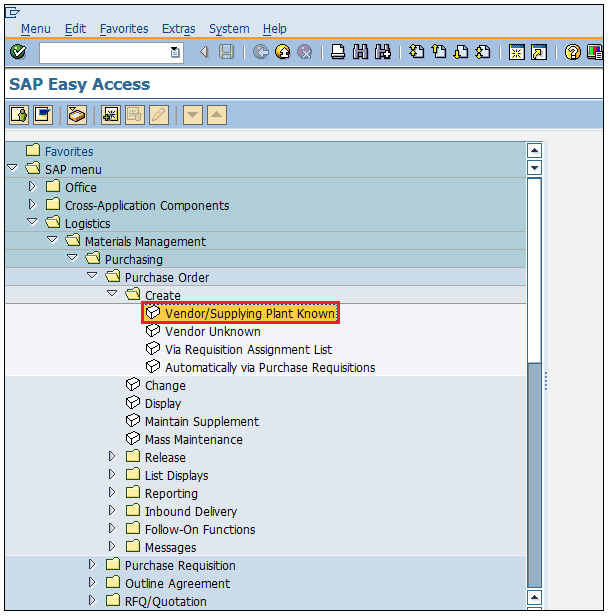
Logistics ⇒ Materials Management ⇒ Purchasing ⇒ Purchase Order ⇒ Create ⇒ Vendor/ Supplying Plant Known
TCode: ME21N
Service Item Category: D
Step 1 − On the SAP Menu screen, select Vendor/ Supplying Plant Known by following the above path.
Step 2 − Provide all the necessary details such as the name of the vendor, item category, name of material, plant for which material is procured, and the date of delivery.
Click on Save.
Service Purchase order will be created.

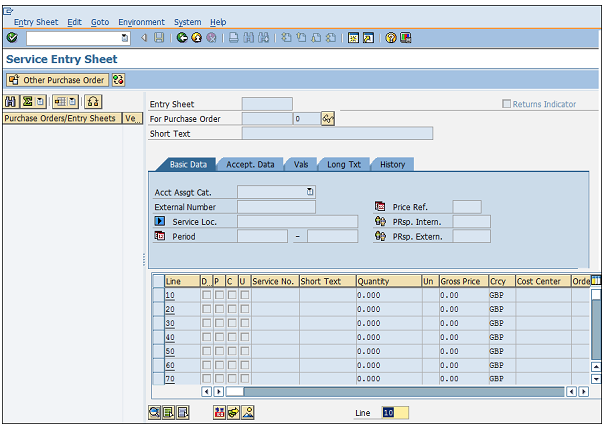
A service entry sheet stores a record of all the services that have been procured. In case of goods procured, we maintain a goods receipt document; whereas in case of services, we maintain a service entry sheet. It accommodates the charges that we need to pay to the vendor. Follow the steps given below to create a service entry sheet.
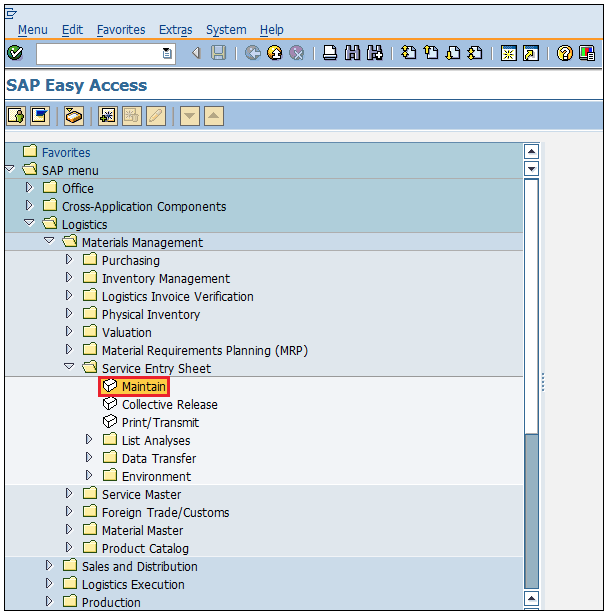
Logistics ⇒ Materials Management ⇒ Service Entry Sheet ⇒ Maintain
TCode: ML81N
Step 1 − On the SAP Menu screen, select the Maintain execute icon by following the above path.
Step 2 − Provide all the necessary details such as purchase order number, service number, quantity, and price.
Click on Save.
A new Service Entry Sheet will be created for the corresponding purchase order.
Material valuation helps in determining the price of the material, and in which general ledger account it needs to be posted.
Material valuation can happen at company code level or plant level.
Material can be valuated based on different types of procurement; it is known as split valuation.
Split valuation helps in valuating the stocks of a material in the same valuation area (company or plant) differently. Some of the examples where split valuation is required are as follows−
Stock that is procured externally from a vendor has a different valuation price than the stock of an in-house production.
Stock obtained from one vendor is valuated at a different price than the stock obtained from another vendor.
Same material having different batch may have different valuation prices.
Split Valuation needs to be activated before setting any other configuration. Follow the steps given below to activate split valuation.
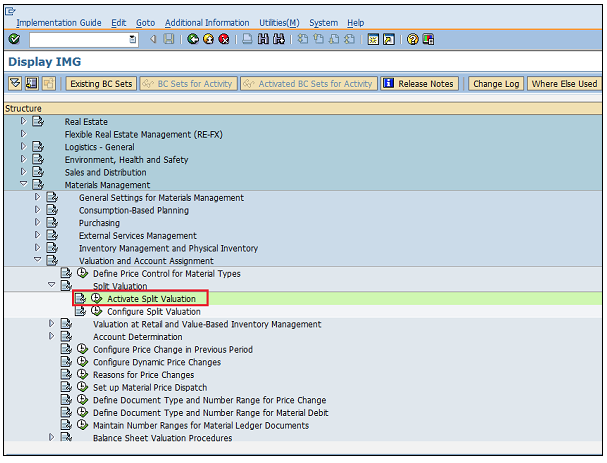
IMG ⇒ Materials Management ⇒ Valuation and Account Assignment ⇒ Split Valuation ⇒ Activate Split Valuation
TCode: OMW0
Step 1 − On the Display IMG screen, select Activate Split Valuation by following the above path.
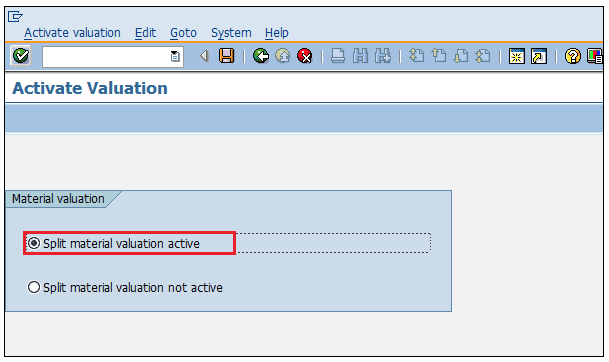
Step 2 − Click the option Split Material Valuation Active.
Click on Save.
Split valuation is now activated.
Some important terms under split valuation are as follows.
Valuation Area − Material may be valuated at plant level or at company code level. The level at which materials are valuated is known as valuation area.
Valuation Category − Valuation category is the criteria on which material is split valuated.
Valuation Type − Valuation type specifies the features of a valuation category.
Follow the steps given below to do split valuation configuration such as defining valuation category and valuation type.
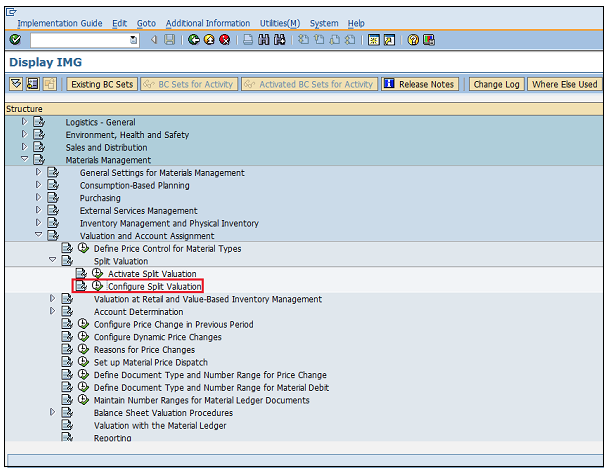
IMG ⇒ Materials Management ⇒ Valuation and Account Assignment ⇒ Split Valuation ⇒ Configure Split Valuation
TCode: OMWC
Step 1 − On the Display IMG screen, select Configure Split Valuation by following the above path.
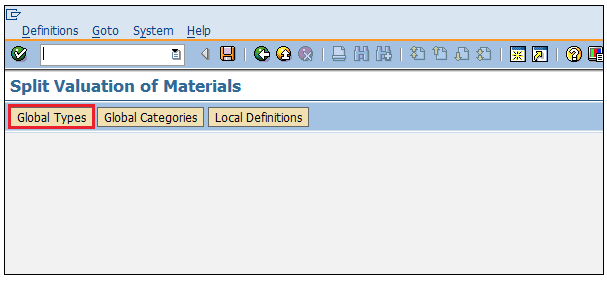
Step 2 − Click Global Types to create valuation type.
Step 3 − Click the Create button.
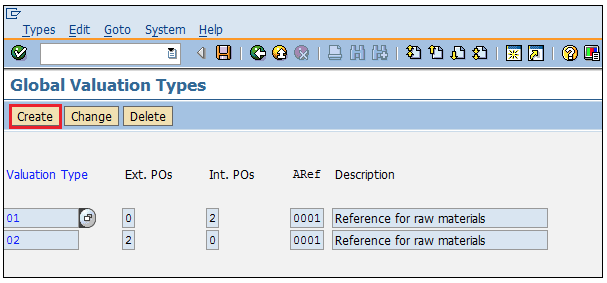
Step 4 − Provide the name of the valuation type.
Click on Save.
A new Valuation Type will be created.

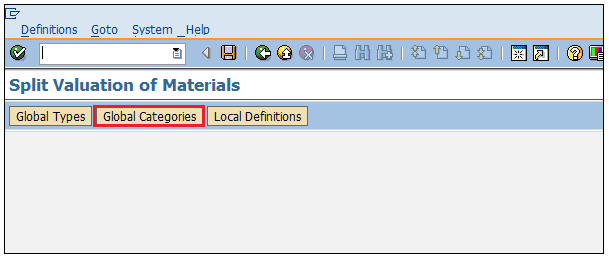
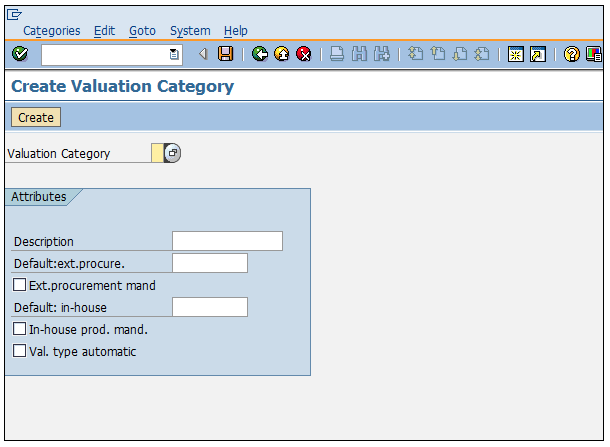
Step 5 − Now go to the same screen and click Global Categories to create valuation category.
Step 6 − Click the Create button.
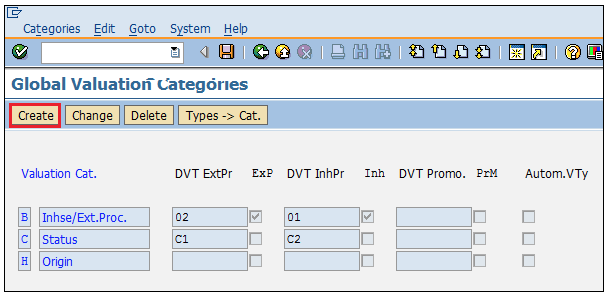
Step 7 − Provide the name of the valuation category.
Click on Save.
A new Valuation Category will be created.
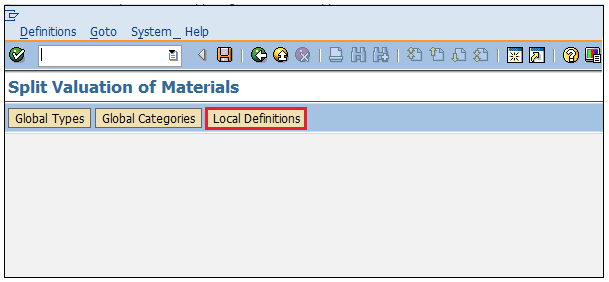
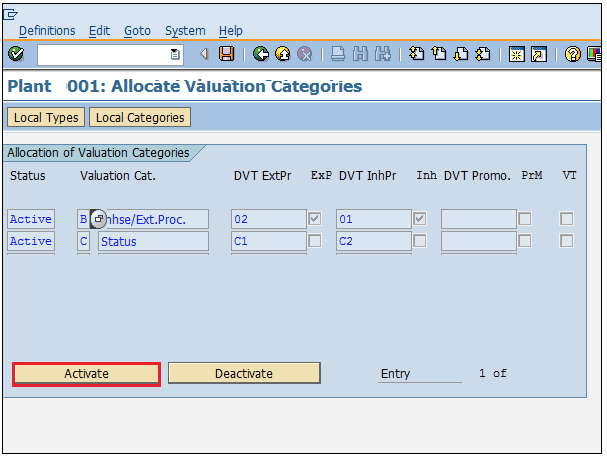
Step 8 − Now go to the same screen and click Local Definitions to map valuation type and valuation category.
Step 9 − Click the "Cats. → OU button"..
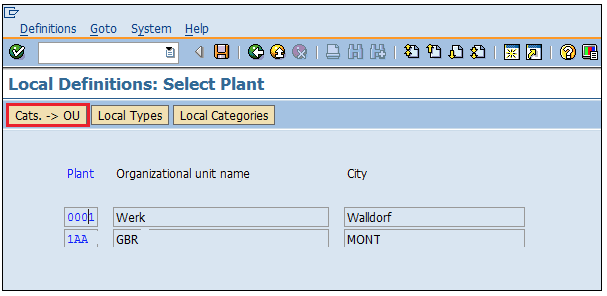
Step 10 − Provide valuation type, valuation category, and set the status as active, and then click the Activate button.
Valuation category and valuation type are now mapped and both are activated.
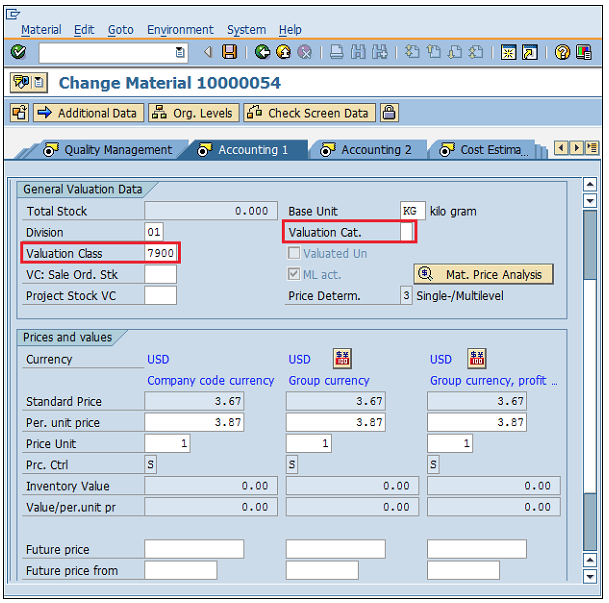
After maintaining the valuation type and valuation category, you can mention them in the material master as shown below.
Go to mm02 (Change screen for material master). Here you can maintain the valuation category and valuation class in accounting view.
On this basis, valuation of the material will be done in a purchase order.
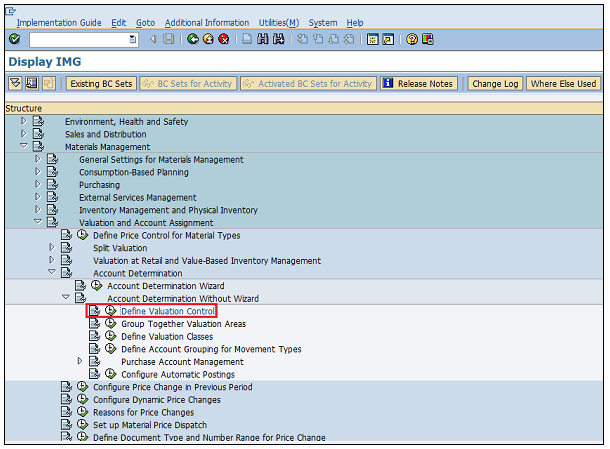
IMG ⇒ Materials Management ⇒ Valuation and Account Assignment ⇒ Account Determination ⇒ Account Determination without Wizard ⇒ Define Valuation Control
TCode: OMWM
Step 1 − On the Display IMG screen, select Define Valuation Control by following the above path.
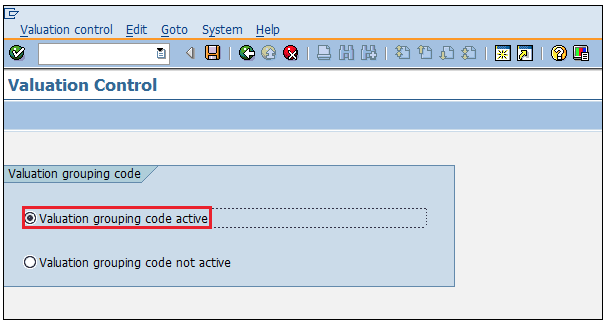
Step 2 − Select Valuation grouping code.
Click on Save.
Valuation grouping code is now activated.
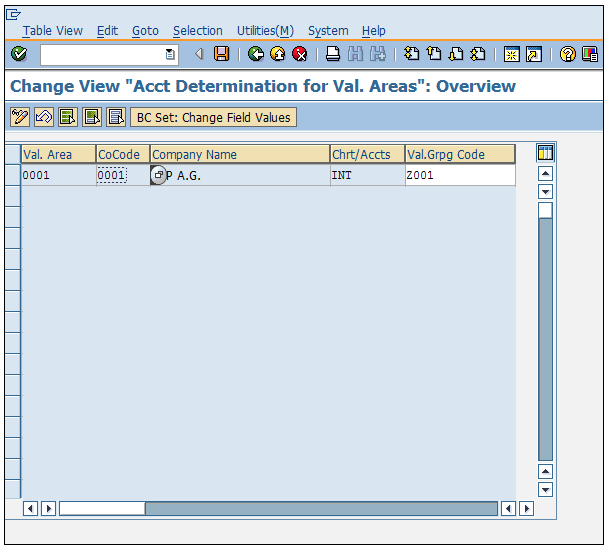
In valuation grouping, valuation area and valuation grouping code are assigned to the company code. This can be done by following the below steps.
IMG ⇒ Materials Management ⇒ Valuation and Account Assignment ⇒ Account Determination ⇒ Account Determination without Wizard ⇒ Group Together Valuation Areas
TCode: OMWD
Step 1 − On the Display IMG screen, select Group Together Valuation Areas by following the above path.
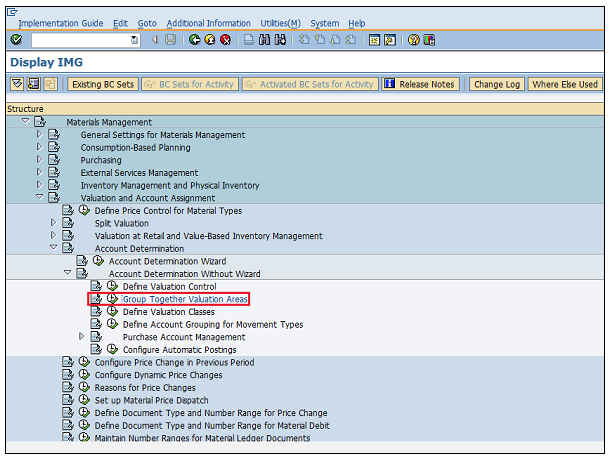
Step 2 − Here you can define a valuation area with grouping code, and assign them to a company code.
Click on Save.
Valuation area and valuation grouping code are now defined for a company code.
Valuation class categorizes the G/L account on the basis of material type. For example, raw material will have different G/L account than the finished material, as the costs will be different in both the cases. Account reference is also maintained along with the valuation class. Account reference and valuation class can be defined by following the steps given below.
IMG ⇒ Materials Management ⇒ Valuation and Account Assignment ⇒ Account Determination ⇒ Account Determination without Wizard ⇒ Define Valuation Classes
TCode: OMSK
Step 1 − On the Display IMG screen, select Define Valuation Classes by following the above path.
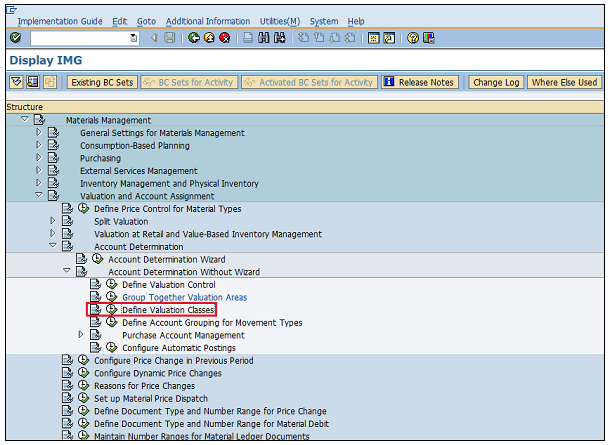
Step 2 − Click the Account Category Reference button.
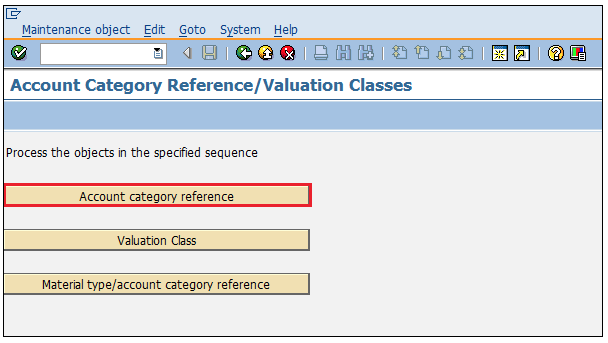
Step 3 − Click New Entries.
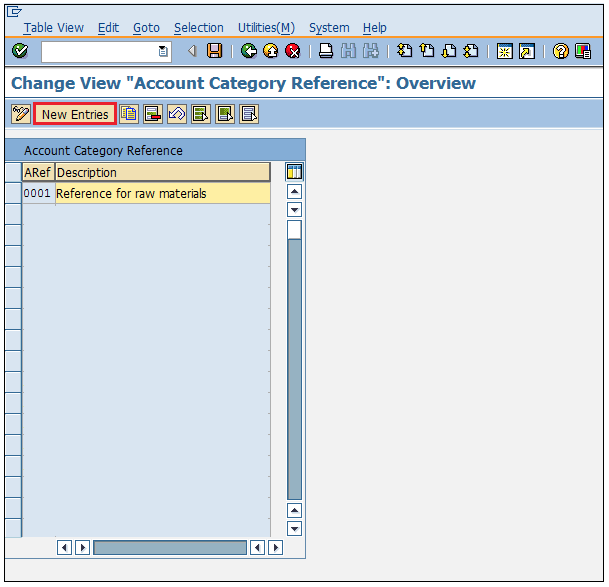
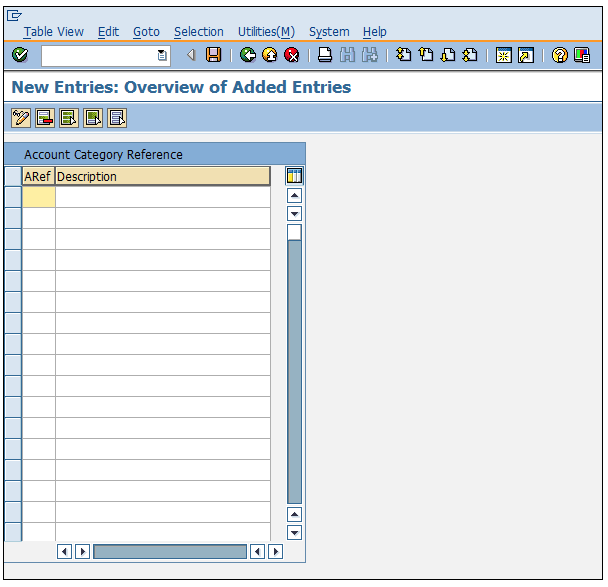
Step 4 − Provide the name of ARef (Account reference) along with its description.
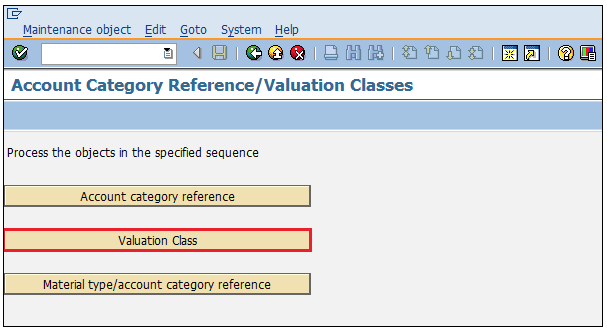
Step 5 − Now go to same screen and click Valuation Class.
Step 6 − Click New Entries.
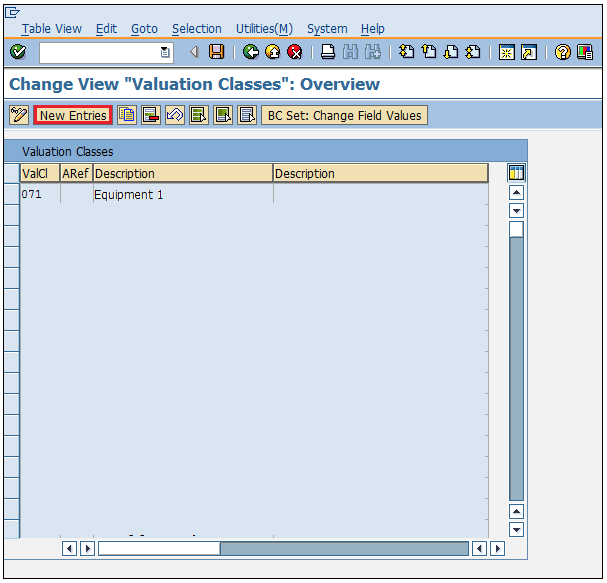
Step 7 − Provide the name of valuation class, ARef (Account reference), and description of valuation class.
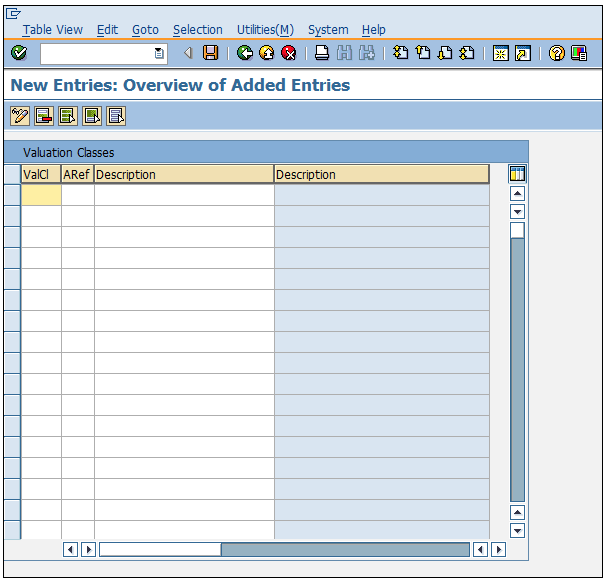
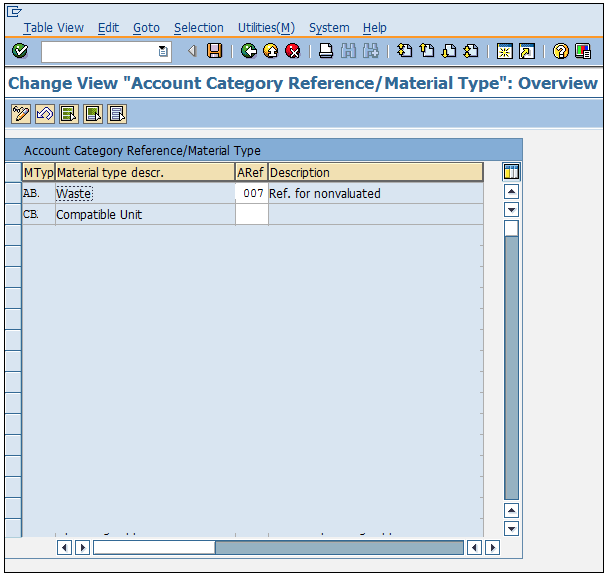
Step 8 − Now go to the same screen and click Material Type/Account Category Reference.
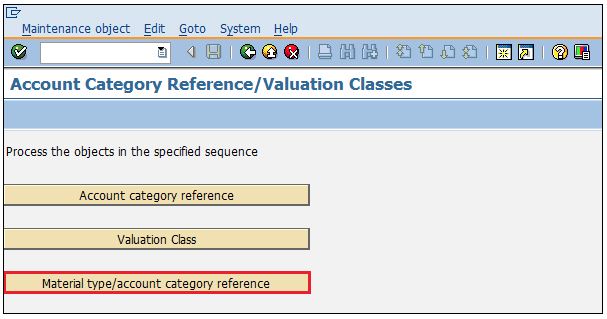
Step 9 − Here you can map material type with ARef (Account reference).
Click on Save.
G/L account can now be posted for different material types.
G/L account is automatically determined for each of the transactions. It happens so because automatic postings are configured in the SAP system. Automatic posting can be configured by following the steps given below.
IMG ⇒ Materials Management ⇒ Valuation and Account Assignment ⇒ Account Determination ⇒ Account Determination without Wizard ⇒ Configure Automatic Postings
TCode: OMWB
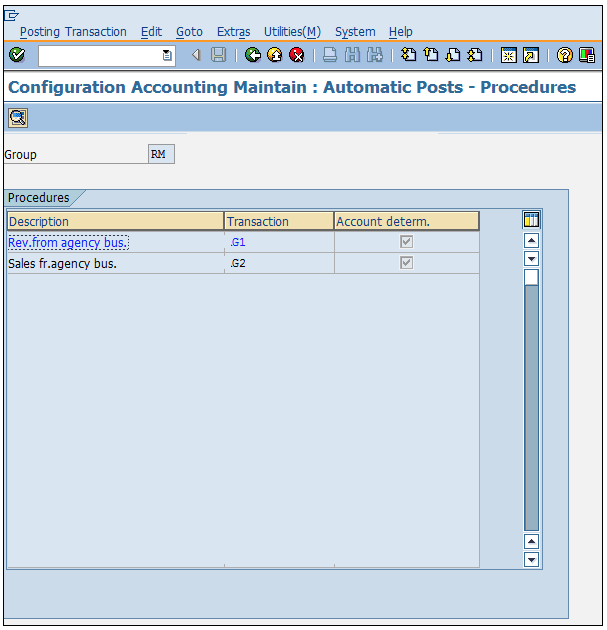
Step 1 − On the Display IMG screen, select Configure Automatic Postings by following the above path.
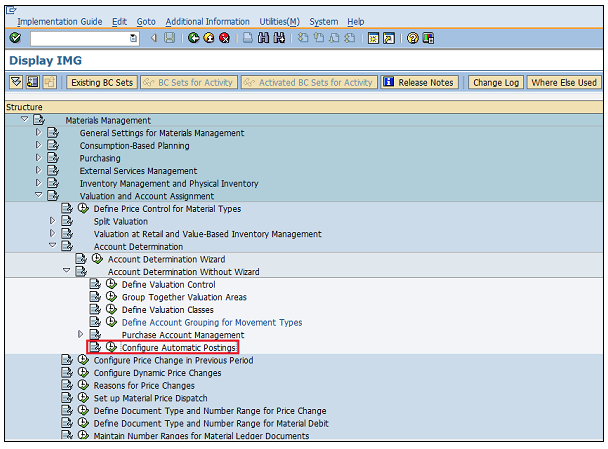
Step 2 − Click Account Assignment.
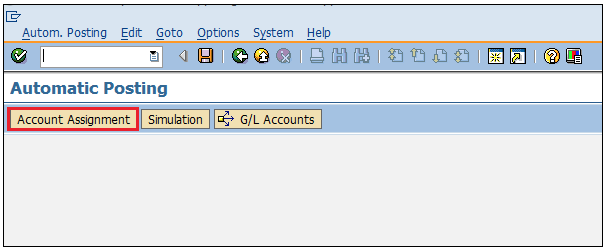
Step 3 − Here you can maintain the transaction for which automatic account determination is there.
Click on Save.
Automatic posting for transactions is now configured.
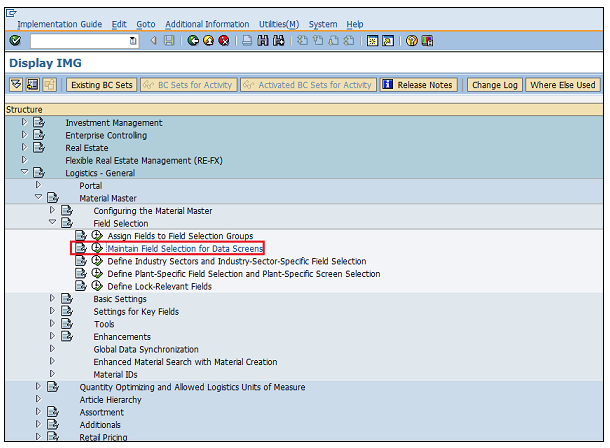
SAP MM is flexible enough to allow its configurations to be modified in the background to suit the business requirements of an organization. Configurations help in making custom enhancements in the structure. This chapter describes some of the important configurations in SAP MM.
This configuration allows one to make some fields optional, hidden, or mandatory in the master record. Follow the steps given below to set this configuration.
IMG ⇒ Logistic General ⇒ Material Master ⇒ Field Selection ⇒ Assign Fields to Field Selection Groups
TCode: OMSR
Step 1 − On the Display IMG screen, select Assign Fields to Field Selection Groups by following the above path.
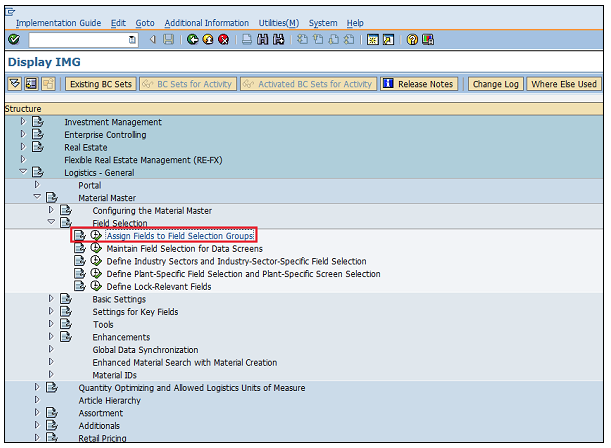
Step 2 − Select the entry in which you want to make the changes.
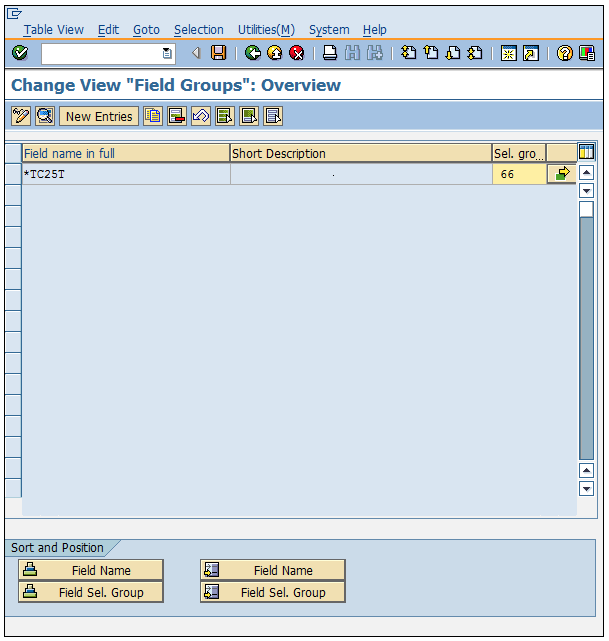
Step 3 − Here you can change the properties of the fields as hidden, display, required entry, or optional entry.
Click on Save.
Field Groups are now set with the desired field entries.
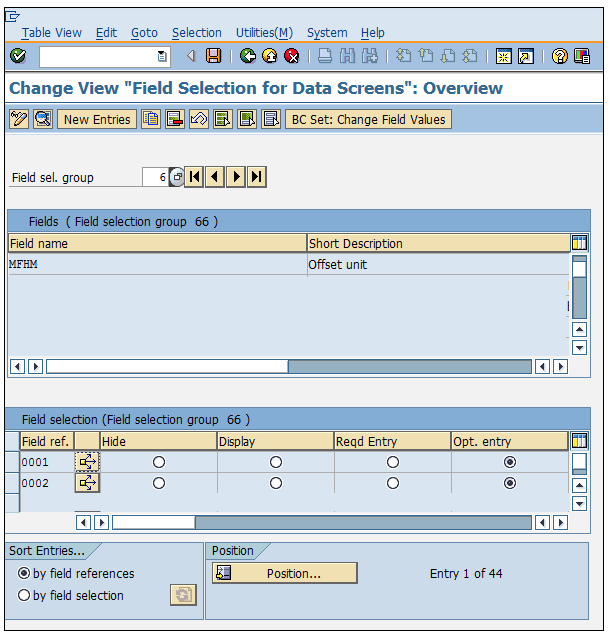
This configuration allows one to make some data screens in the master data as optional, hidden, or mandatory. Follow the steps given below to set this configuration.
IMG ⇒ Logistic General ⇒ Material Master ⇒ Field Selection ⇒ Maintain Field Selection for Data Screens
TCode: OMS9
Step 1 − On the Display IMG screen, select Maintain Field Selection for Data Screens by following the above path.
Step 2 − Select the field selection group in which you want to make changes.
Here you can make changes in the field reference as hidden, display, required entry, or optional entry.
Click on Save.
Field selection for data screens is now maintained.
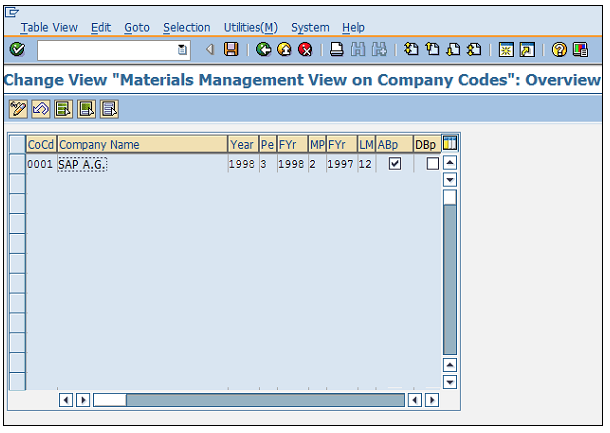
This configuration allows one to maintain company codes with a period along with the fiscal year. Follow the steps given below to set this configuration.
IMG ⇒ Logistic General ⇒ Material Master ⇒ Basic Settings ⇒ Maintain Company Codes for Materials Management
TCode: OMSY
Step 1 − On the Display IMG screen, select Maintain Company Codes for Materials Management by following the above path.
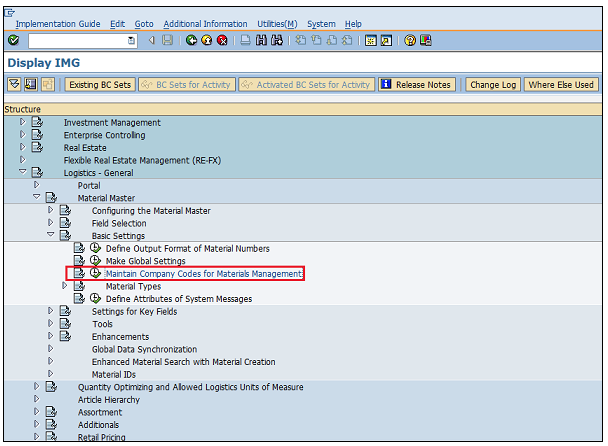
Step 2 − Provide details such as name, company code, along with the fiscal year and the period for that.
Click on Save.
Company code is now maintained for materials management.
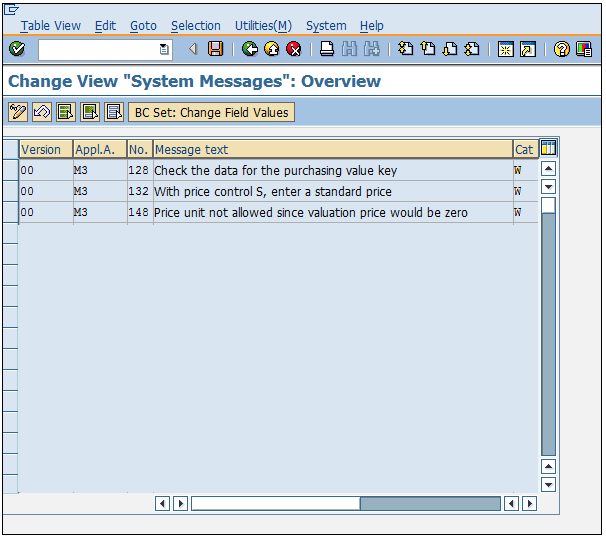
Sometimes the system does not allow us to save a document when its information is incomplete. In such cases, the system issues some messages to indicate the probable cause of error. These system messages can be set up by following the steps given below.
IMG ⇒ Logistic General ⇒ Material Master ⇒ Basic Settings ⇒ Define Attributes of System Messages
TCode: OMT4
Step 1 − On the Display IMG screen, select Define Attributes of System Messages by following the above path.
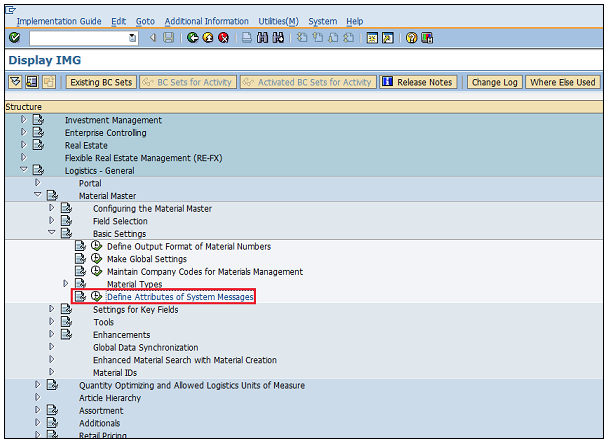
Step 2 − Here you can maintain type of message (warning or error), message number along with the description of message.
Click on Save.
System messages are now maintained.
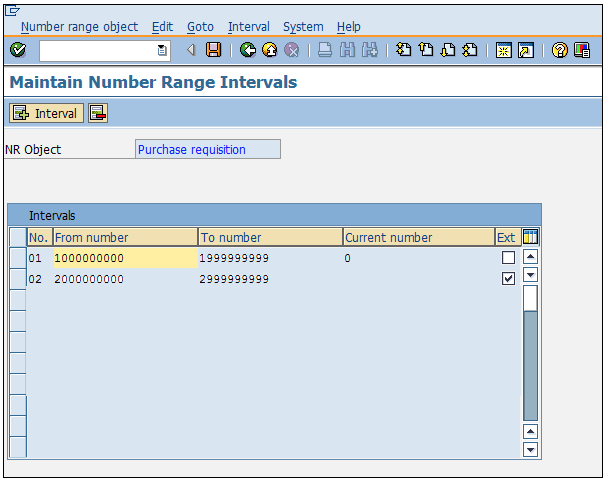
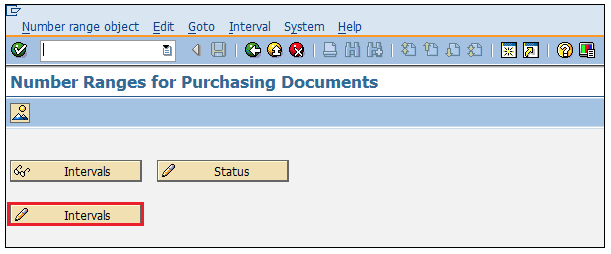
When we create a purchase requisition, every requisition is recognized by a unique number that is known as the purchase requisition number. We can define a number range manually, otherwise the system can automatically assign the same. Follow the steps given below to define a number range for purchase requisition.
IMG ⇒ Materials Management ⇒ Purchasing ⇒ Purchase Requisition ⇒ Define Number Ranges
TCode: OMH7
Step 1 − On the Display IMG screen, select Define Number Ranges by following the above path.

Step 2 − Select edit mode of Intervals tab.
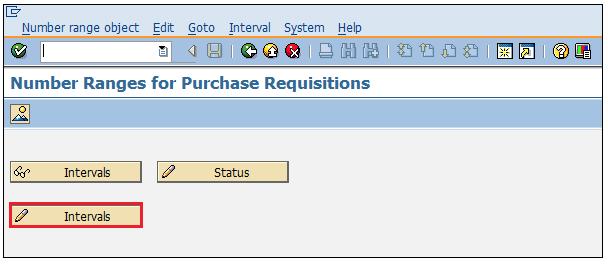
Step 3 − Here you can maintain a number range accordingly.
Then click on Save.
Number range for purchase requisition is now maintained.
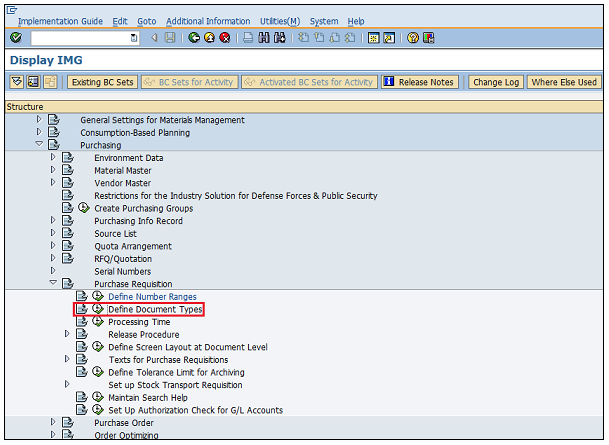
Different types of documents are created for purchase requisition. Follow the steps given below to maintain document types for purchase requisition.
IMG ⇒ Materials Management ⇒ Purchasing ⇒ Purchase Requisition ⇒ Define Document Types
Step 1 − On the Display IMG screen, select Define Document Types by following the above path.
Step 2 − Click New Entries.
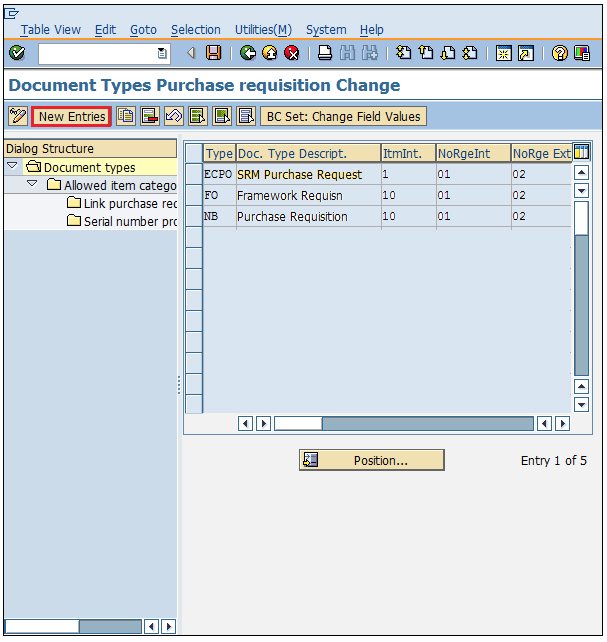
Step 3 − Provide details such as the name of the document type with its description.
Click on Save.
Document types for purchase requisition are now defined.

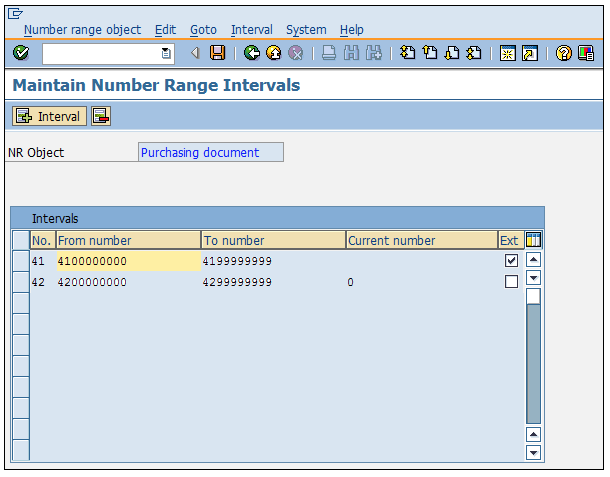
When we create RFQ/Quotation, every quotation is recognized by a unique number known as quotation number. We can define a number range manually, otherwise the system can automatically assign the same. Follow the steps given below to define a number range for RFQ/Quotation.
IMG ⇒ Materials Management ⇒ Purchasing ⇒ RFQ/Quotation ⇒ Define Number Ranges
TCode: OMH6
Step 1 − On the Display IMG screen, select Define Number Ranges by following the above path.

Step 2 − Select edit mode of Intervals tab.
Step 3 − Here you can maintain a number range accordingly.
Then click on Save.
Number range for RFQ/Quotation is now maintained.
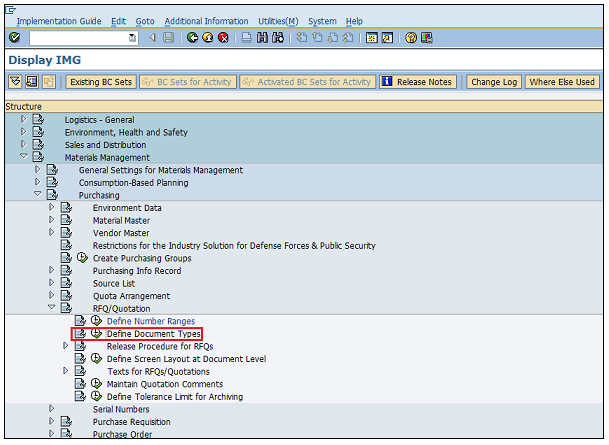
Different types of documents are created for RFQ/Quotation. Follow the steps given below to maintain document types for RFQ/Quotation.
IMG ⇒ Materials Management ⇒ Purchasing ⇒ RFQ/Quotation ⇒ Define Document Types
Step 1 − On the Display IMG screen, select Define Document Types by following the above path.
Step 2 − Click New Entries.
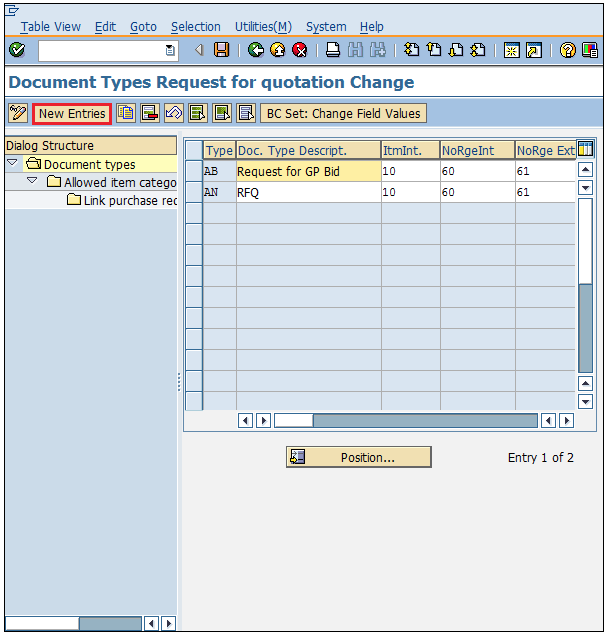
Step 3 − Provide details such as document type with its description.
Click on Save.
Document types for RFQ/Quotation are now defined.
| Sr.No. | T-Code & Description |
|---|---|
| 1 | OX15 Create Company |
| 2 | OX02 Create Company Code |
| 3 | OX10 Create Plant |
| 4 | OX09 Create Storage Location |
| 5 | OX08 Create Purchasing Organization |
| 6 | OME4 Create Purchasing Group |
| 7 | OX18 Assign Plant to Company Code |
| 8 | OX01 Assign Purchasing Organization to Company Code |
| 9 | OX17 Assign Purchasing Organization to Plant |
| 10 | MM01 Create Material |
| 11 | MM02 Change Material |
| 12 | MM03 Display Material |
| 13 | MB51 Material Document List |
| 14 | MMDE Delete All Materials |
| 15 | MMNR Define Material Master Number Ranges |
| 16 | XK01 Create Vendor |
| 17 | XK02 Change Vendor |
| 18 | XK03 Display Vendor |
| 19 | ML33 Create Vendor Conditions |
| 20 | ME11 Maintain Purchasing Info Record |
| 21 | ME01 Maintain Source List |
| 22 | ME51N Create Purchase Requisition |
| 23 | ME52N Change Purchase Requisition |
| 24 | ME53N Display Purchase Requisition |
| 25 | ME41 Create RFQ/Quotation |
| 26 | ME42 Change RFQ/Quotation |
| 27 | ME43 Display RFQ/Quotation |
| 28 | ME31L Create Scheduling Agreement |
| 29 | ME32L Change Scheduling Agreement |
| 30 | ME33L Display Scheduling Agreement |
| 31 | MEQ1 Create Quota Arrangement |
| 32 | MEQ2 Change Quota Arrangement |
| 33 | MEQ3 Display Quota Arrangement |
| 34 | ME21N Create Purchase Order |
| 35 | ME22N Change Purchase Order |
| 36 | ME23N Display Purchase Order |
| 37 | ME29N Release Purchase Order |
| 38 | ME59N Automatic generation of Purchase Order |
| 39 | MIGO Post Goods Movement |
| 40 | MB1A Goods Withdrawal |
| 41 | MB1B Transfer Posting |
| 42 | MB1C Post Other Goods Receipts |
| 43 | MB01 Post Goods Receipt for Purchase Order |
| 44 | OMJJ Customizing: Define New Movement Types |
| 45 | MIRO Enter Incoming Invoice |
| 46 | MIRA Fast Invoice Entry |
| 47 | MR8M Cancel Invoice Document |
| 48 | MRBR Release Blocked Invoices |
| 49 | OMR6 Tolerance limits: Invoice Verification |
| 50 | MIR5 Display List of Invoice Documents |
| 51 | MIR6 Invoice Overview |
| 52 | MIR7 Park Invoice |
| 53 | MRIS Settle Invoicing Plan |
| 54 | AC02 Service Master |
| 55 | ML81N Create Service Entry Sheet |
| 56 | MRRL Evaluated Receipt Settlement |
| 57 | MMB1 Create Semi Finished Product |
| 58 | MMF1 Create Finished Product |
| 59 | MMG1 Create Returnable Packaging |
| 60 | MMH1 Create Trading Goods |
| 61 | MMI1 Create Operating Supplies |
| 62 | MMK1 Create Configurable Material |
| 63 | MMN1 Create Non-Stock Material |
| 64 | MMBE Stock Overview |
| 65 | MB52 List of Warehouse Stocks on Hand |
| 66 | MB21 Create Reservation |
| 67 | MBST Cancel Material Document |
| 68 | MB5T Stock in Transit |
paragraph