| Module | Module Name | Links | Links | Blake's Links |
| PM | Plant Mantenance | tutorials point | Blake | |
| MM | Material Management | tutorials point Overview | Guru99 | Blake: 1-10 | 11-20 | 21-25 |
| SD | Sales and Distribution | tutorials point Tutorial | Guru99 | Blake |
| PP | Production Planning | tutorials point Tutorial | Guru99 | Blake | 1-7 |
| External Links | ||||
| NewLanguage.html | FICO Module: Blake's : Tutorials Point | |||
| 1 | Home | MM_Doc Tutorials Point | 11 | Source Determination/List | MM_Doc Tutorials Point | 21 | Service Management | MM_Doc Tutorials Point | ||
| 2 | Overview | MM_Doc Tutorials Point | 12 | Procurement Cycle | MM_Doc Tutorials Point | 22 | Valuation | MM_Doc Tutorials Point | ||
| 3 | Screen Navigation | MM_Doc Tutorials Point | 13 | Purchase Requisition | MM_Doc Tutorials Point | 23 | Account Determination | MM_Doc Tutorials Point | ||
| 4 | Procurement Process | MM_Doc Tutorials Point | 14 | Request for Quotation | MM_Doc Tutorials Point | 24 | Configuration | MM_Doc Tutorials Point | ||
| 5 | Organization Structure | MM_Doc Tutorials Point | 15 | Outline Agreement | MM_Doc Tutorials Point | 25 | Transaction Codes | MM_Doc Tutorials Point | ||
| 6 | Enterprise Structure | MM_Doc Tutorials Point | 16 | Quota Arrangement | MM_Doc Tutorials Point | |||||
| 7 | Defining Organizational Structure | MM_Doc Tutorials Point | 17 | Posting Period | MM_Doc Tutorials Point | |||||
| 8 | Organizational Units | MM_Doc Tutorials Point | 18 | Purchase Order Types | MM_Doc Tutorials Point | |||||
| 9 | Master Data | MM_Doc Tutorials Point | 19 | Inventory Management | MM_Doc Tutorials Point | |||||
| 10 | Purchase Info Record | MM_Doc Tutorials Point | 20 | Invoice Verification | MM_Doc Tutorials Point |
The combined information of material and vendor is kept in a record that is known as purchase info record.
But a particular material can be ordered from different vendors in different time intervals.
This information can be maintained in a list that is called as the source list.
The key points to note about a source list are as follows −
Source list includes a list of possible sources of supply for a material over a given framework of time.
Source list specifies the time period of ordering a particular material from a given vendor.
Source list can be copied from one plant to another plant.
Source list can be created by the following two ways −
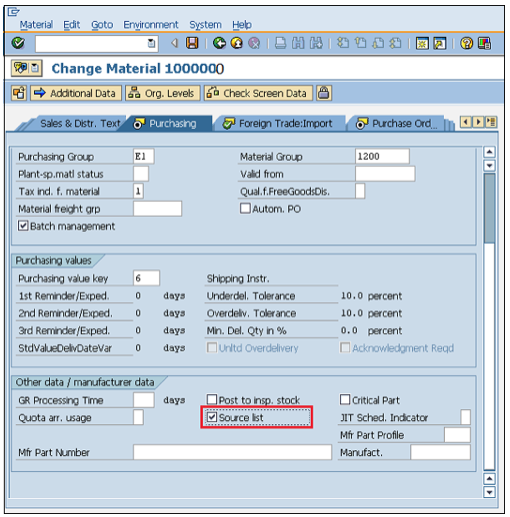
Source list can be automatically created by changing a few settings in the material master. Automatic source list can be created by following the steps given below.
Step 1 − Go to MM02 (Edit mode of material master for which you want to create source list automatically).
Select all the views.
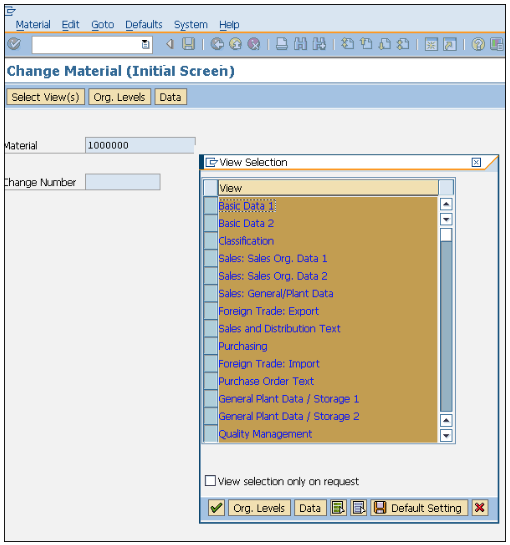
Step 2 − Inside purchasing view, check the box for source list.
Click on Save.
Source list will be created automatically for the material.
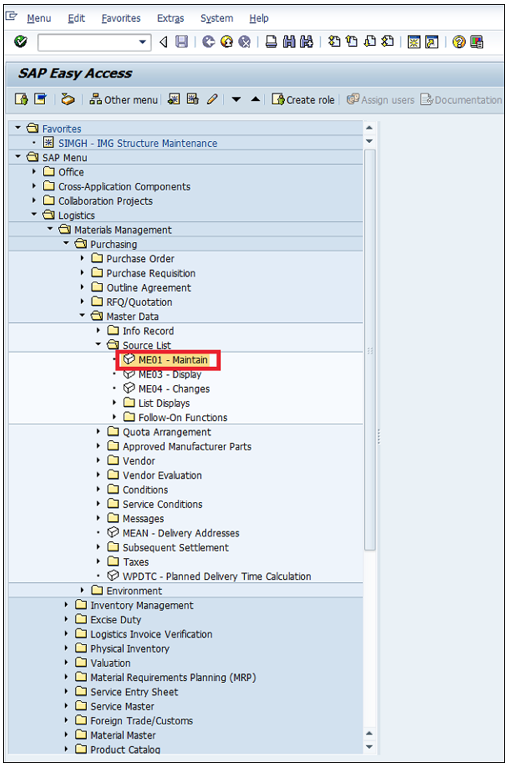
Source list can be created manually by following the steps given below −
Logistics ⇒ Material Management ⇒ Purchasing ⇒ Master Data ⇒ Source List ⇒ Maintain
TCode: ME01
Step 1 − On the SAP Menu screen, click Maintain by following the above path.
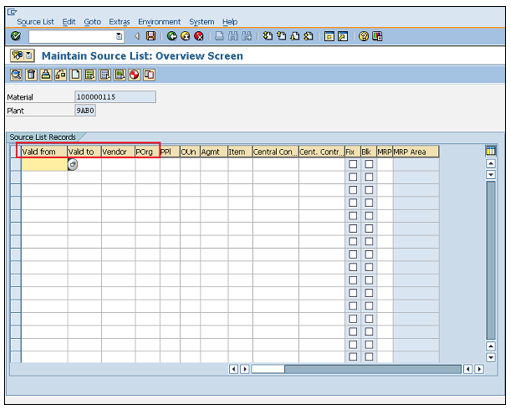
Step 2 − Enter the material number for which you want to maintain the source list and respective plant details.
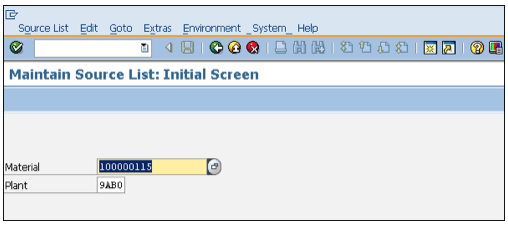
Step 3 − Fill in all the necessary details such as valid periods, name of vendor, purchasing organization, etc.
Click on the Save icon.
Source list for the material is now maintained.
Every organization acquires material or services to complete its business needs. The process of buying materials and obtaining services from vendors or dealers is called procurement. The steps required to procure material forms the procurement cycle. Every organization performs some common sequential steps to procure material in the right quantity at the right price. The important steps in a procurement cycle are as follows −
This is the first step in a procurement cycle. It is the logical subdivision, where it is determined what material or services are required by the company, and which supplier can fulfill the requirement. A list of requirements is made and then it is approved by a senior authority within the organization. After approval, a formal list is made that is known as the purchase order with one more level of approval which is sent to the vendor.
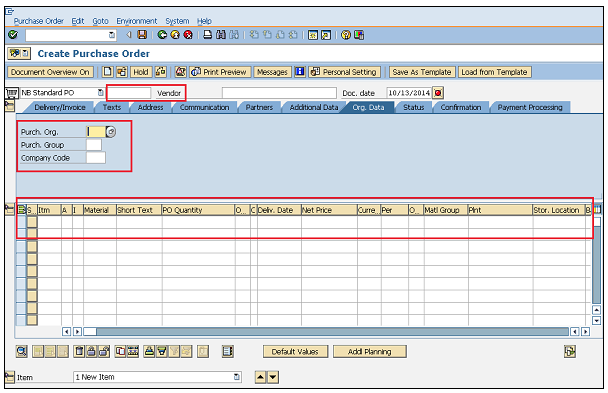
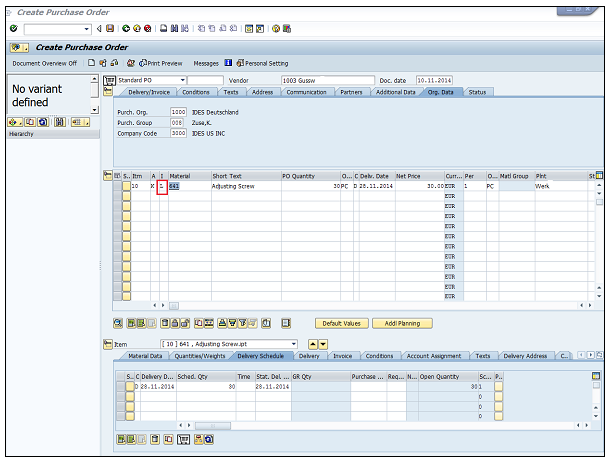
Purchase order is the formal and final confirmation of the requirements that is sent to the vendor to supply material or services. A purchase order includes important information such as name of the material with its corresponding plant, details of purchasing organization with its company code, name of vendor, and date of delivery. A purchase order can be created by following the steps given below −
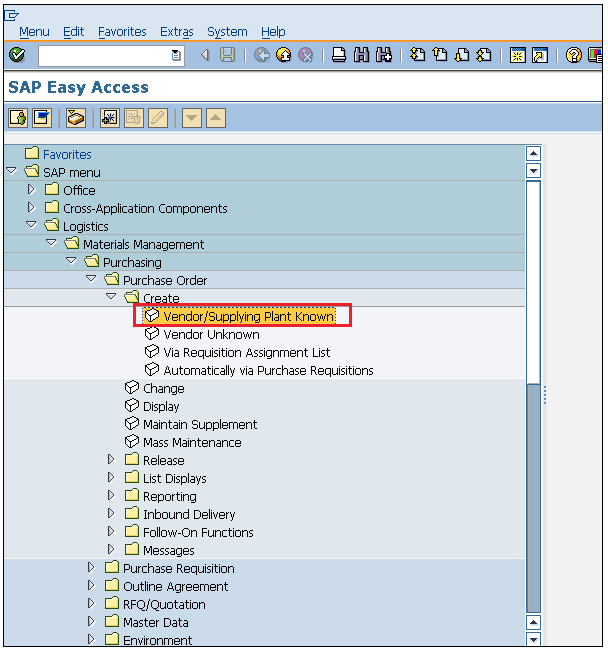
Logistics ⇒ Materials Management ⇒ Purchasing ⇒ Purchase Order ⇒ Create ⇒ Vendor/ Supplying Plant Known
TCode: ME21N
Step 1 − On the SAP Menu screen, select Create Vendor/Supplying Plant Known by following the above path.
Step 2 − Fill in all the necessary details such as name of the vendor, purchasing organization, purchasing group, company code, and details of the material, for example, material number, price, currency, and plant.
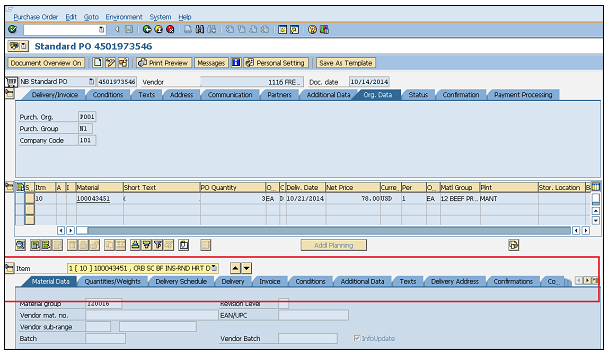
Step 3 − Fill in all the necessary details under Item, by selecting the tabs as shown in the following screenshot −
Invoice/Delivery Tab (Provide the tax code, Payment terms and conditions, and incoterms)
Assignment Tab (Provide a valid G/L code, business area, and WBS element)
Click on Save.
A new Purchase Order will be created.
After processing the purchase order, the vendor delivers the material to the ordering party and this process is called Goods Receipt. It is the phase where the material is received by the ordering party and its condition and quality are verified. Once the material is verified against the predefined quality, a goods receipt is posted. Goods receipt can be posted by following the steps given below.
Logistics ⇒ Materials Management ⇒ Inventory management ⇒ Goods movement ⇒ Goods movement
TCode: MIGO
Step 1 − On the SAP Menu screen, select Goods movement (MIGO) by following the above path.
Step 2 − Fill in all the necessary details such as movement type (101 for goods receipt), name of the material, quantity received, details of storage location and the plant where the material will be placed.
Click on Save.
Goods Receipt is now posted for the material.
Invoice is received from the vendor after goods receipt, and then the invoice is verified by the ordering party. This is the phase where the vendor (seller) is paid from the company and reconciliation of the invoice and PO is accomplished. An invoice can be posted by following the steps given below −
Logistics ⇒ Materials Management ⇒ Logistic Invoice verification ⇒ Document Entry ⇒ Enter Invoice
TCode: MIRO
Step 1 − On the SAP Menu screen, select Enter Invoice by following the above path.
Step 2 − Fill in all the necessary details such as invoice posting date, amount that is paid to the vendor along with the quantity for which the amount is paid.
Click on Save.
Invoice is now posted for the goods receipt.
Procurement in every organization starts with gathering requirements. Once requirements are gathered, we need to inform the purchasing organization. A Purchase Requisition is a document that contains a list of requirements. The key points to note about a purchase requisition are as follows −
A purchase requisition is a request that is made to the purchasing organization to procure a certain list of materials.
It is an internal document and remains within the organization.
Purchase requisition needs approval from the purchasing organization.
If a purchase requisition has already been approved, then it can be modified only to a limited extent.
Purchase requisition can be created for the following procurement types −
Standard − Getting finished material from vendor.
Subcontracting − Providing raw material to vendor and getting finished material.
Consignment − Procuring material that is kept in company’s premises and paying to vendor for that.
Stock transfer − Getting material from within the organization.
External service − Getting services like maintenance from third party vendor.
A Purchase Requisition can be created by following the steps given below −
Logistics ⇒ Materials Management ⇒ Purchasing ⇒ Purchasing Requisition ⇒ Create
TCode: ME51N
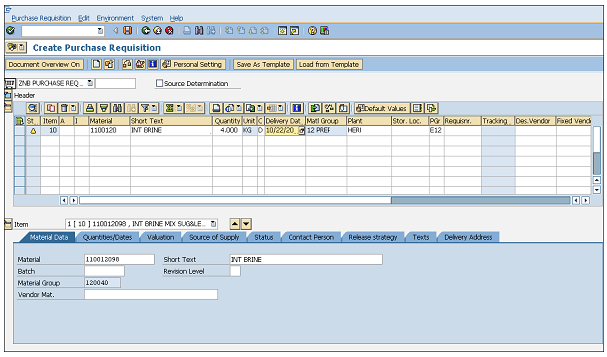
Step 1 − On the SAP Menu screen, select the Create execute icon by following the above path.
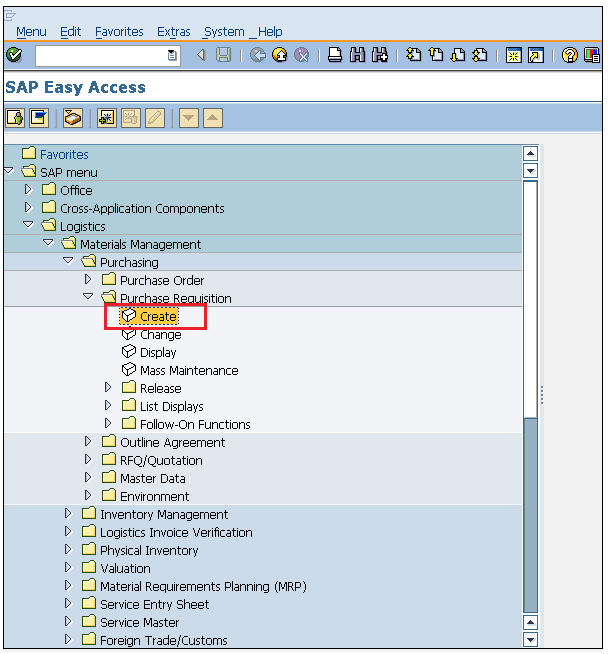
Step 2 − Fill in all the required details such as name of the material, quantity, delivery date, material group, and plant.
Click on Save.
A new Purchase Requisition will be created.
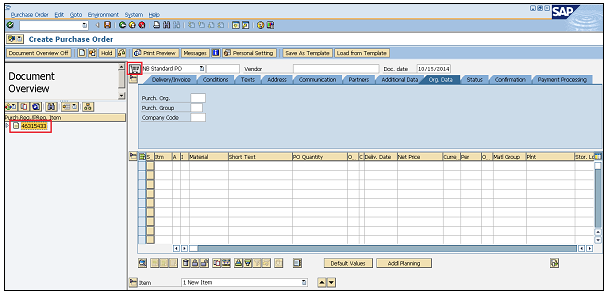
After creating a purchase requisition, we need to send our requirements to the vendor. It is done through a document that is known as the purchase order. A purchase order can be directly created from a purchase requisition.
Follow the steps given below to create a purchase order from a purchase requisition. −
TCode: ME21N
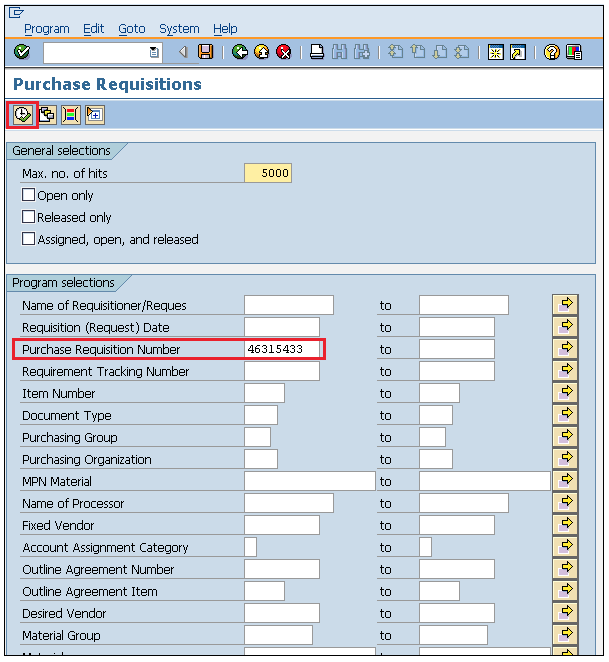
Step 1 − Enter TCode to go to the purchase order home screen. Select Purchase Requisition as shown in the following screenshot.
TCode: ME21N
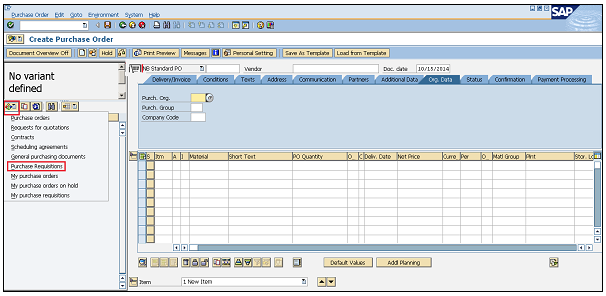
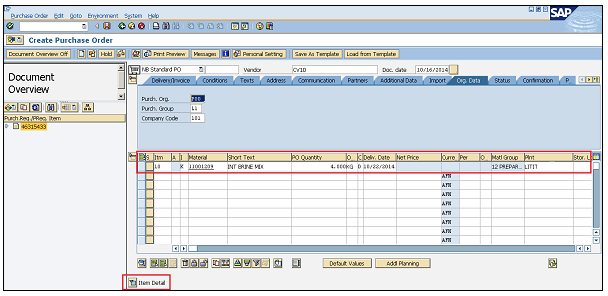
Step 2 − Provide the purchase requisition number for which you want to create a purchase order. Then select the execute icon.
Step 3 − Drag the standard reference Purchase Requisition to the cart next to the NB Standard PO.
Step 4 − Verify the details of the purchase order and do the necessary changes as per requirement.
Click on Save.
You now have a purchase order from the selected purchase requisition.
An RFQ can be created by the following two ways −
An RFQ can be created manually by following the steps given below −
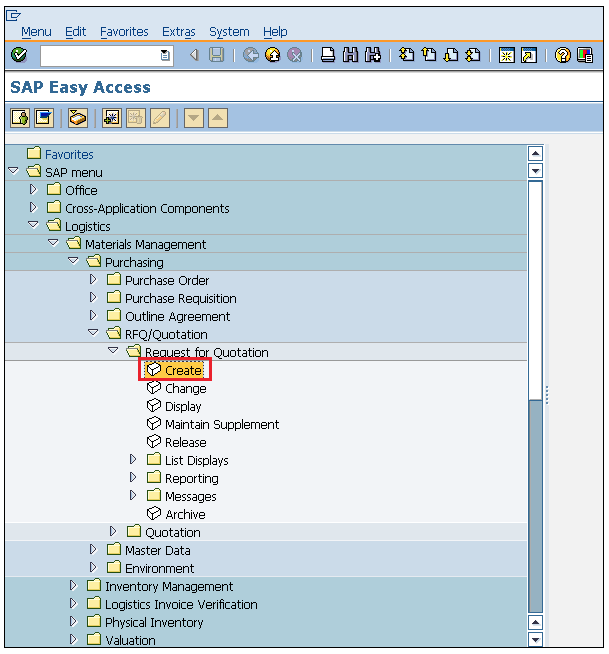
Logistics ⇒ Materials Management ⇒ Purchasing ⇒ RFQ/Quotation ⇒ Request for Quotation ⇒ Create
TCode: ME41
Step 1 − On the SAP Menu screen, select the Create execute icon by following the above path.
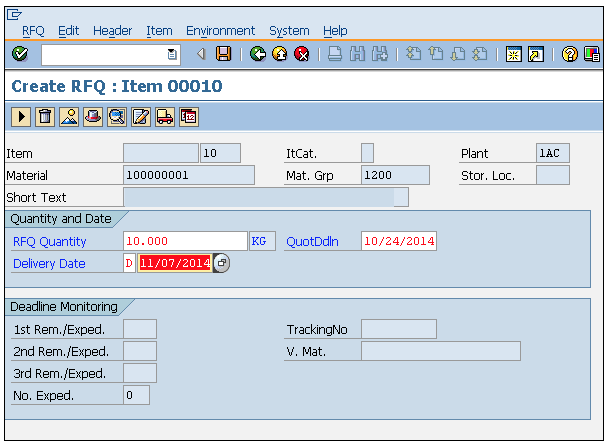
Step 2 − Fill in all the required details such as type of RFQ (if standard, then AN), language, date of RFQ, purchasing organization, and group.
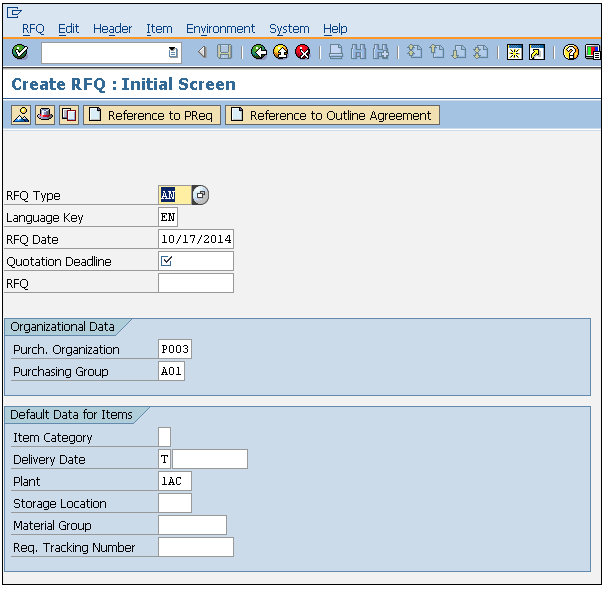
Step 3 − Provide the name of the material, quantity of material, material group, and quotation deadline date.
Step 4 − Provide the quantity and delivery date for the material.
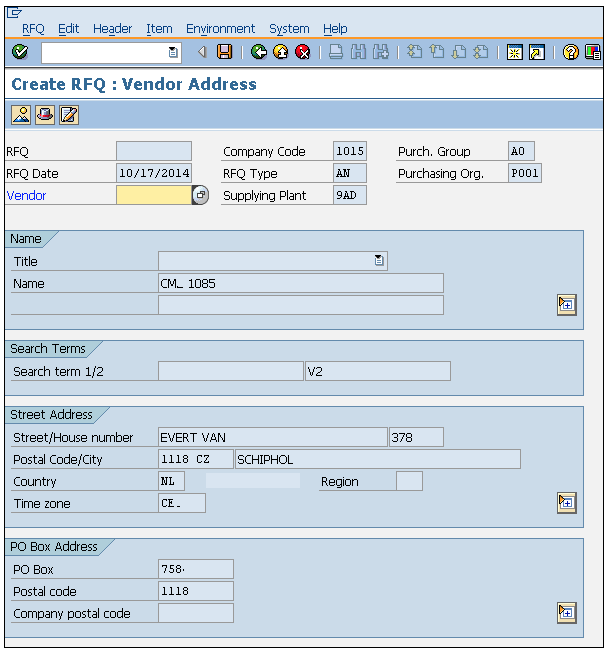
Step 5 − Provide the vendor address (street number, city, country, pin code) to which you are addressing the RFQ.
Click on Save.
A new Request for Quotation will be created.
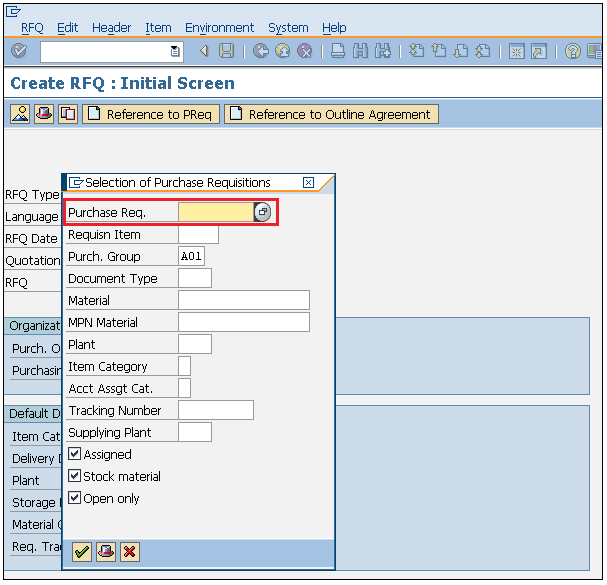
RFQ can also be created with reference to purchase requisition by following the steps given below −
Step 1 − On the home screen of RFQ, select Reference to PReq tab.
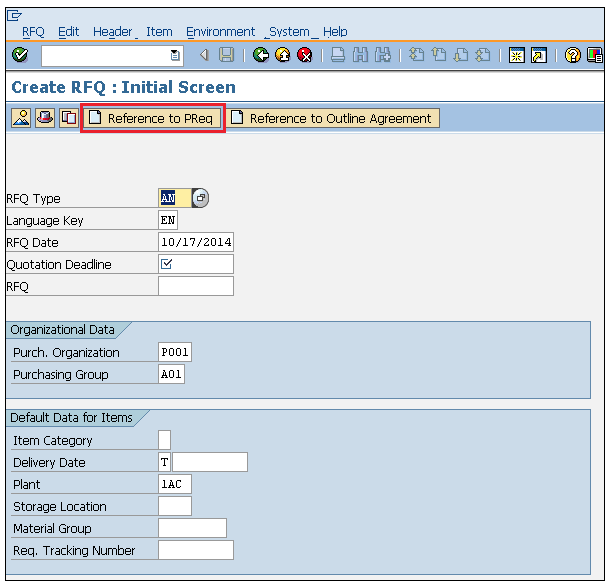
Step 2 − Enter the requisition number for which you want to create an RFQ.
Click on Save.
A new Request for Quotation will be created with reference to Purchase Requisition.
Vendor selection is an important process in the procurement cycle. Vendors can be selected by quotation process. After having shortlisted a vendor, an organization enters into an agreement with that particular vendor to supply certain items with certain conditions. Typically when an agreement is reached, a formal contract is signed with the vendor. So, an outline agreement is a long-term purchasing agreement with a vendor. −
The key points to note about an outline agreement are as follows
An outline agreement is a long-term purchasing agreement with a vendor containing terms and conditions regarding the material that is to be supplied by the vendor.
The terms of an outline agreement are valid up to a certain period of time and cover a certain predefined quantity or value.
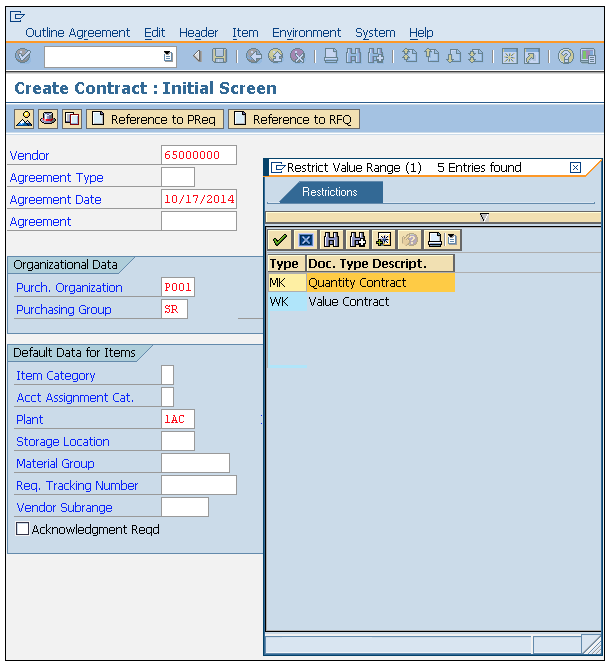
An outline agreement can be of the following two types −
A contract is a long-term outline agreement between a vendor and an ordering party over a predefined material or service over a certain framework of time. There are two types of contracts −
Quantity Contract − In this type of contract, the overall value is specified in terms of the total quantity of material to be supplied by the vendor.
Value Contract − In this type of contract, the overall value is specified in terms of the total amount to be paid for that material to the vendor.
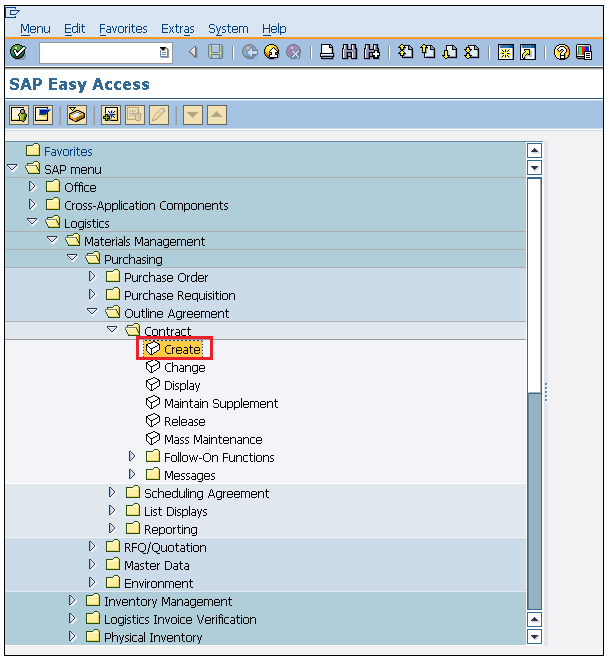
Follow the steps given below to create a contract. −
Logistics ⇒ Materials Management ⇒ Purchasing ⇒ Outline Agreement ⇒ Contract ⇒ Create
TCode: ME31K
Step 1 − On the SAP Menu screen, select the Create execute icon by following the above path.
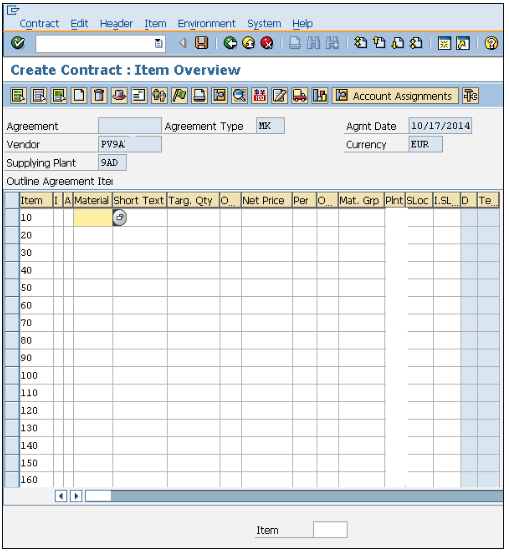
Step 2 − Provide the name of the vendor, type of contract, purchasing organization, purchasing group, and plant along with the agreement date.
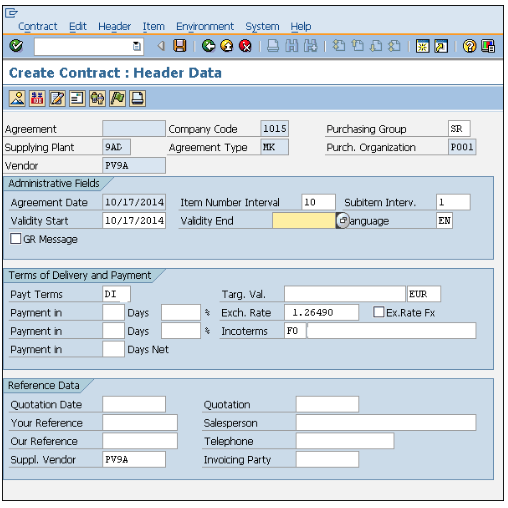
Step 3 − Fill in all the necessary details such as the agreement validity start date, end date, and pay terms (i.e. terms of payment).
Step 4 − Provide material number along with the target quantity.
Click on Save.
A new Contract will be created.
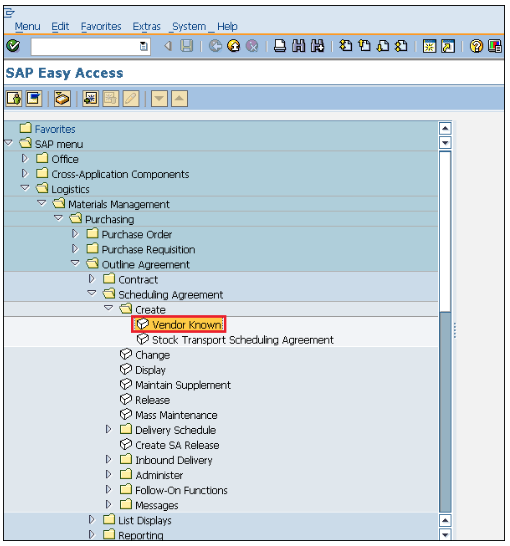
A scheduling agreement is a long-term outline agreement between the vendor and the ordering party over a predefined material or service, which are procured on predetermined dates over a framework of time. A scheduling agreement can be created in the following two ways −
Follow the steps given below to create a scheduling agreement.
Logistics ⇒ Materials Management ⇒ Purchasing ⇒ Outline Agreement ⇒ Scheduling Agreement ⇒ Create ⇒ Vendor Known
TCode: ME31L
Step 1 − On the SAP Menu screen, select the Create execute icon by following the above path.
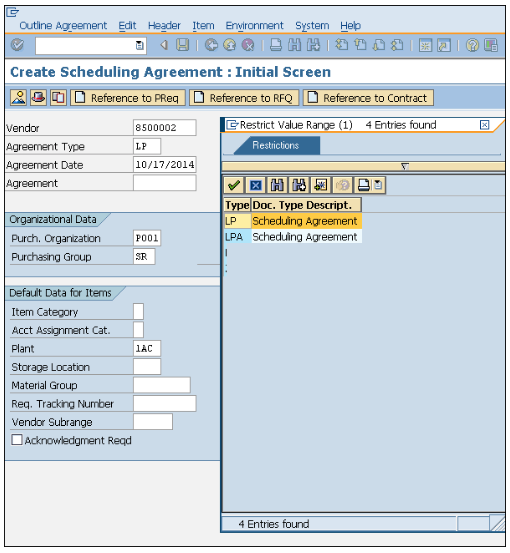
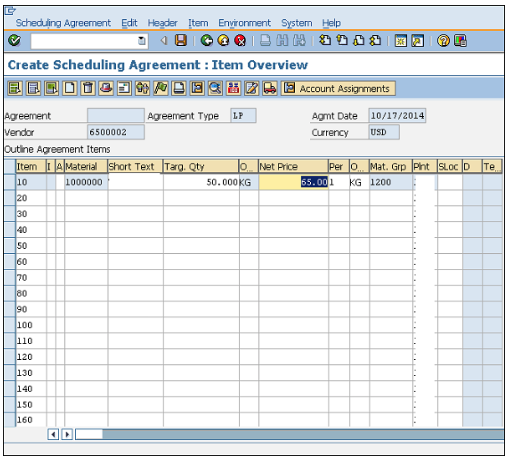
Step 2 − Provide the name of the vendor, agreement type (LP for scheduling agreement), purchasing organization, purchasing group, plant along with agreement date.
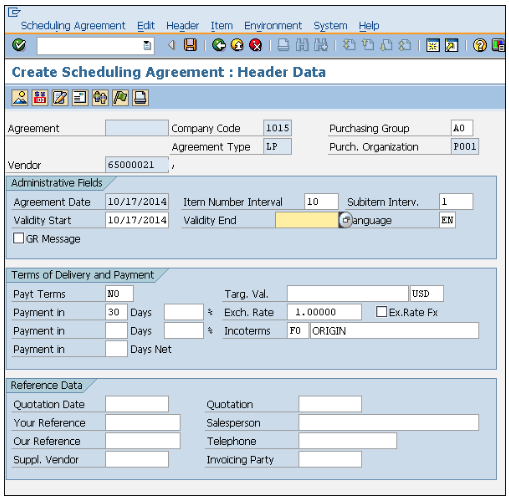
Step 3 − Fill in all the necessary details such as the agreement validity start date, end date, and pay terms (i.e. terms of payment).
Step 4 − Provide material number along with the target quantity, net price, currency, and material group.
Click on Save.
A new Scheduling Agreement will be created.
Schedule lines can be maintained for a scheduling agreement by following the steps given below.
Logistics ⇒ Materials Management ⇒ Purchasing ⇒ Outline Agreement ⇒ Scheduling Agreement ⇒ Delivery Schedule ⇒ Maintain
Step 1 − On the SAP Menu screen, select the Maintain execute icon by following the above path.
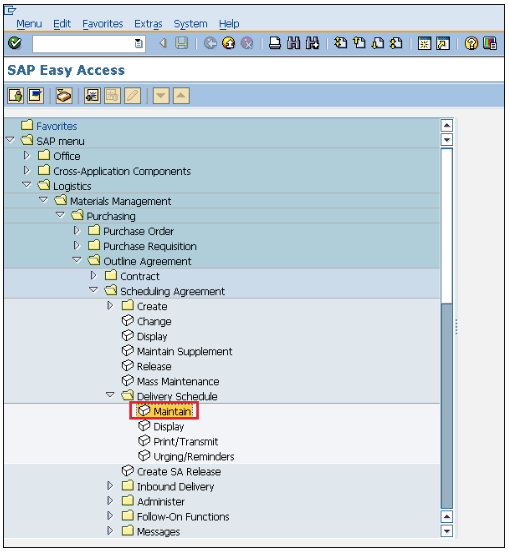
Step 2 − Provide the scheduling agreement number.

Step 3 − Select the line item.
Go to Item tab.
Select Delivery Schedule.
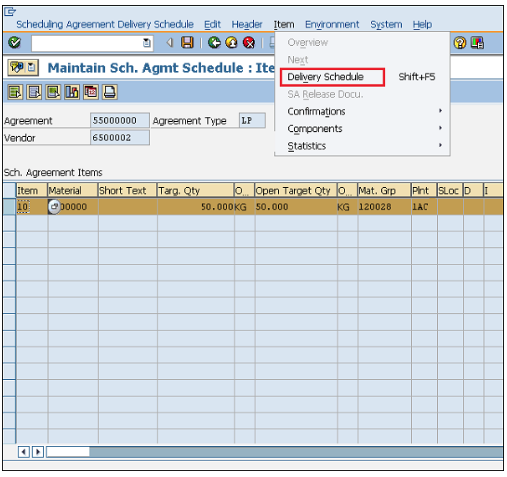
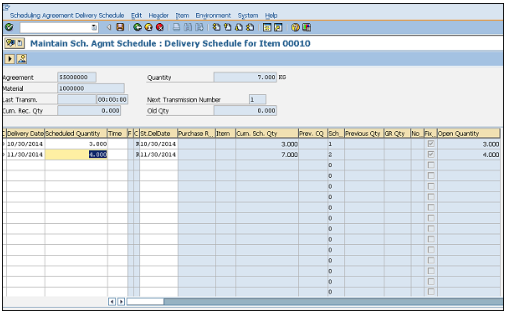
Step 4 − Provide the delivery schedule date and the target quantity.
Click on Save.
Schedule lines are now maintained for the scheduling agreement.
A particular material can be procured from different vendors depending upon the requirement. In this way, the total requirement of a material is distributed to different vendors, i.e., the quota is assigned to each source of supply. This is known as quota arrangement. The key points to note about quota arrangement are as follows −
Quota arrangement divides the total requirement of material among certain sources of supply, i.e. vendors, and then assigns a quota to each source.
This particular quota specifies the portion of material that is to be procured from an assigned vendor or source.
Quota rating is used to determine the amount of material that is to be assigned to a particular source or vendor. The source with the lowest quota rating represents a valid source.
Quota rating can be calculated by using the following formula −
Quota rating = (Quota Allocated Quantity + Quota Base Quantity)/Quota
Where Quota Allocated Quantity is total quantity from all orders that is procured from a particular source. Quota Base Quantity is quantity from new source of supply. Quota is total requirement of material that is given to a particular source of supply.
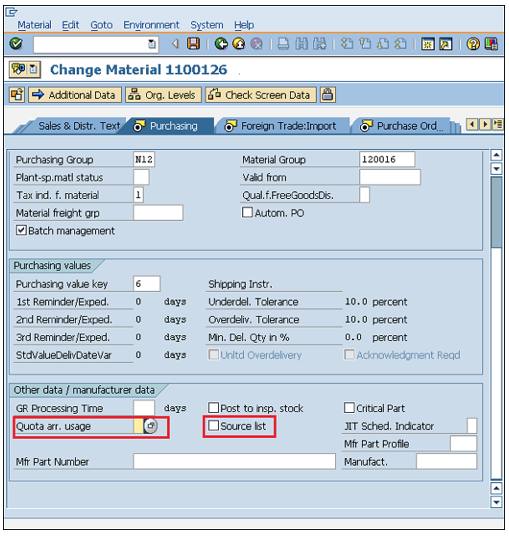
The mandatory setting before creating a quota is that the info record and the source list should be maintained for the particular material. Also, in the material master, the source list and quota arrangement usage check boxes should be checked. This setting can be made in the material master by going to TCode MM03. In purchasing view, check the quota arrangement usage and the source list. Setting is now maintained for quota arrangement.
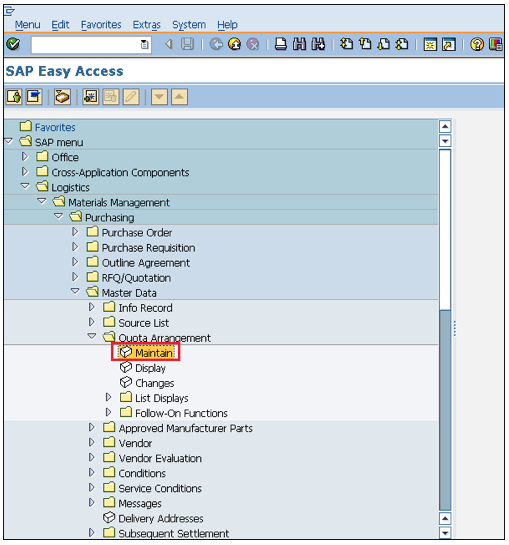
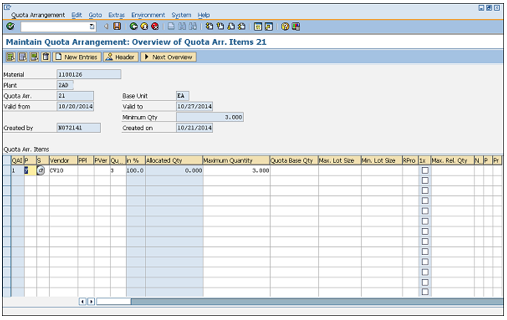
Quota arrangement divides the total requirement of a material among certain sources of supply, i.e., vendors. Follow the steps given below to create a quota arrangement.
Logistics ⇒ Materials Management ⇒ Purchasing ⇒ Master Data ⇒ Quota Arrangement ⇒ Maintain
TCode: MEQ1
Step 1 − On the SAP Menu screen, select the Maintain execute icon by following the above path.
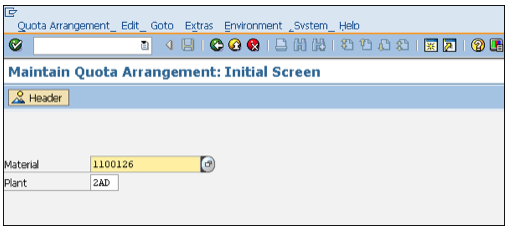
Step 2 − Enter the material number and plant for which quota arrangement needs to be maintained.
Step 3 − Provide dates in ‘valid from’ and ‘valid to’ and value in ‘quantity split’.
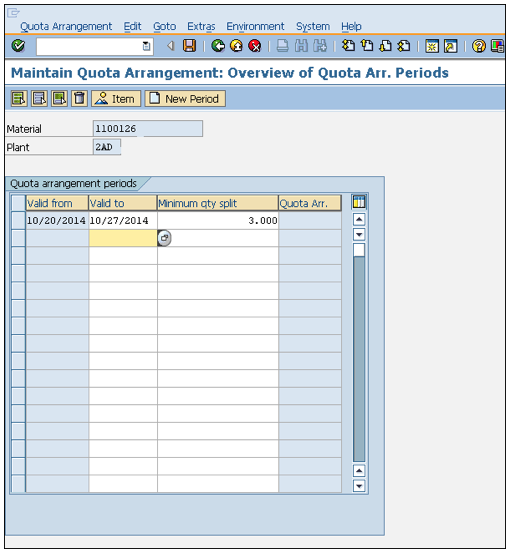
Step 4 − Enter the name of vendors and the assigned allocated quantity to them.
Click on Save.
Quota arrangement is now maintained for the particular material.
SAP ERP systems were designed so that business can be conducted in an efficient way. Documents such as purchase order, request for quotation, goods receipt are essential elements in a business. These documents need security, i.e., if any of the documents is posted incorrectly, then the business can get affected at various levels. In order to secure these documents, we have a concept known as the posting period.
A posting period allows one to post and make changes in the documents only in a specific time period. Sometimes you will get errors like “posting allowed only in this time period for a certain company code”. It means for a particular company code, a posting period is maintained and posting to that document is only allowed within that period. A posting period for a company can be defined using five fields which are as follows −
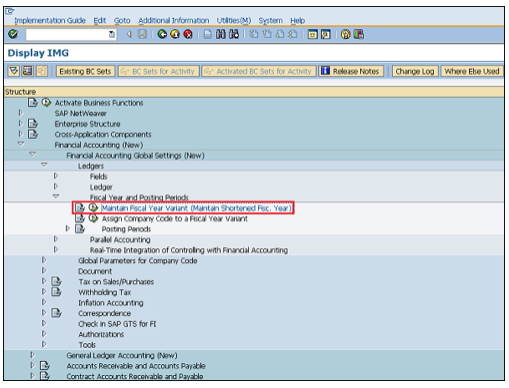
Fiscal year variant is the time period during which financial statements are withdrawn for a company. Different companies have different fiscal years. Fiscal year variant can be maintained by following the steps given below.
Financial accounting ⇒ Financial Accounting Global Settings ⇒ Ledgers ⇒ Fiscal Year and Posting Periods ⇒ Maintain Fiscal Year Variant
TCode: OB29
Step 1 − On the Display IMG screen, select Maintain Fiscal Year Variant by following the above path.
Step 2 − Click New Entries.
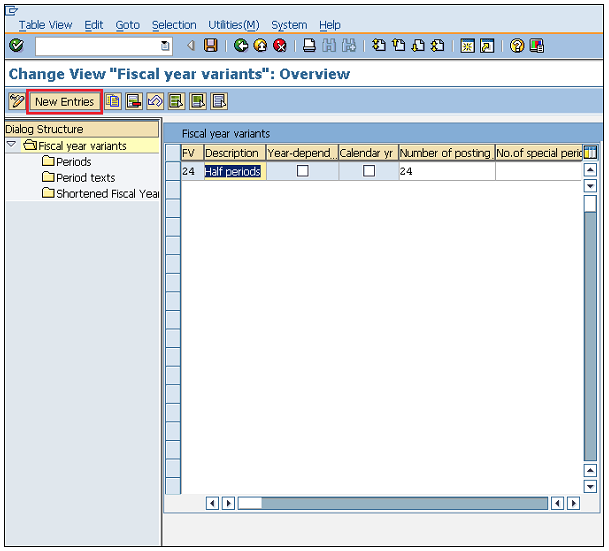
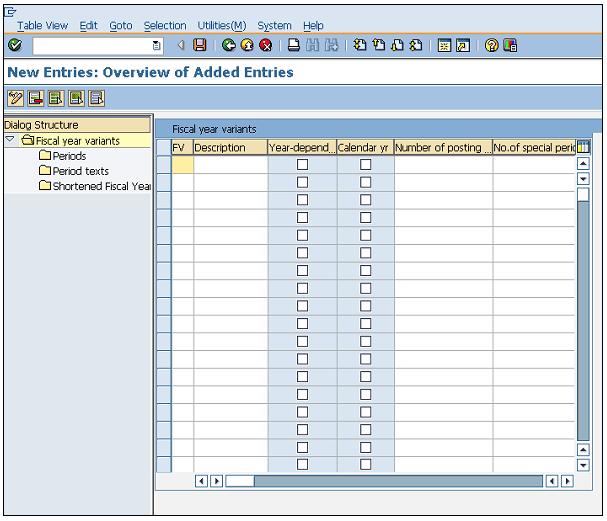
Step 3 − Provide the name of the fiscal year variant along with the description and number of posting.
Click on Save.
A new Fiscal Year Variant will be created.
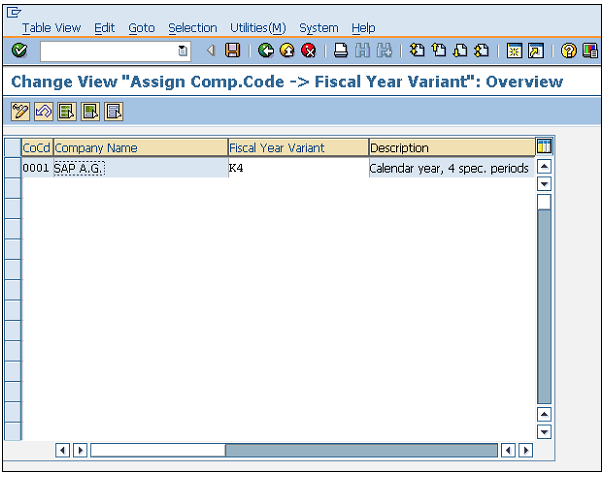
Follow the steps given below to assign company code to the fiscal year variant.
Financial accounting ⇒ Financial Accounting Global Settings ⇒ Ledgers ⇒ Fiscal Year and Posting Periods ⇒ Assign Company Code to Fiscal Year Variant
TCode: OB37
Step 1 − On the Display IMG screen, select Assign Company Code to Fiscal Year Variant by following the above path.
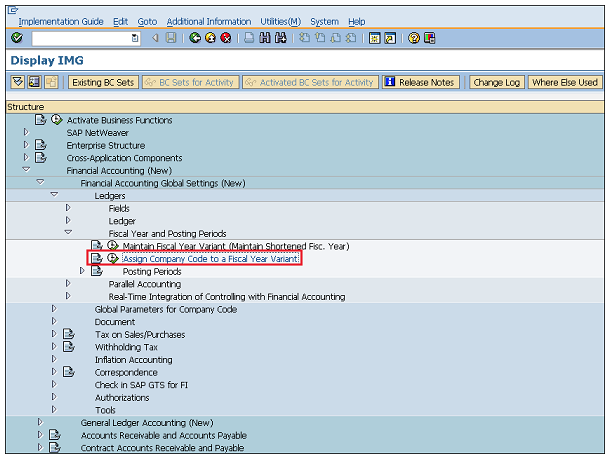
Step 2 − We can view the existing assignment and change it accordingly.
Click on Save.
Fiscal Year Variant is now assigned to company code.
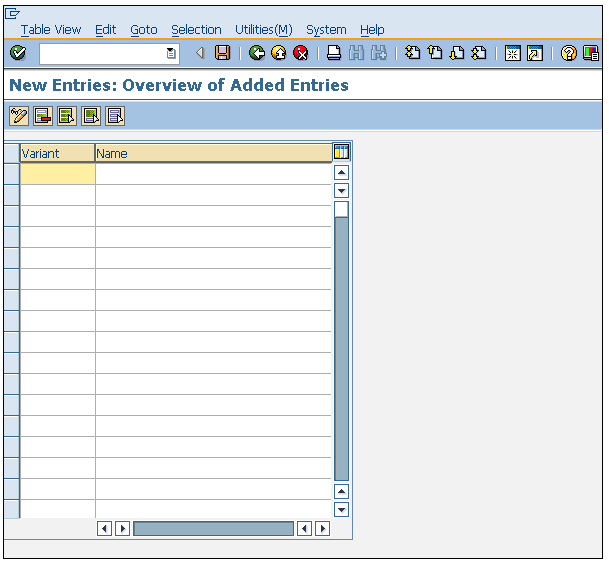
Follow the steps given below to define variants for open posting periods.
Financial accounting ⇒ Financial Accounting Global Settings ⇒ Ledgers ⇒ Fiscal Year and Posting Periods ⇒ Posting Periods ⇒ Define Variants for Open Posting Periods
TCode: OBBO
Step 1 − On the Display IMG screen, select Define Variants for Open Posting Periods by following the above path.

Step 2 − Click New Entries.
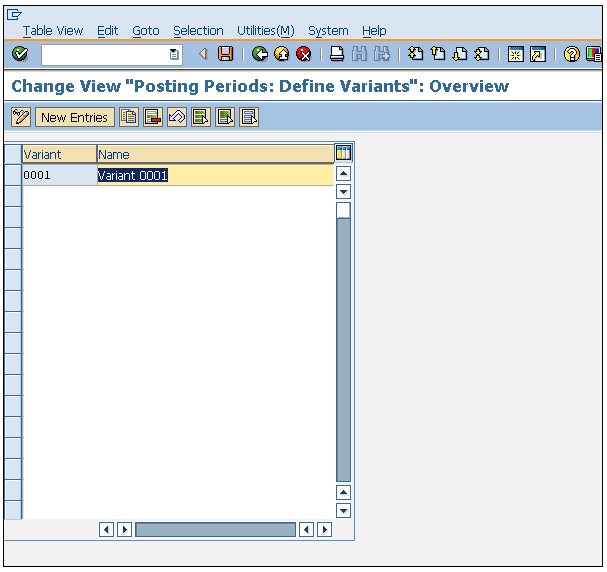
Step 3 − Enter the name of the variant.
Click on Save.
A new Variant will be created for open posting periods.
Follow the steps given below to assign a variant to company code.
Financial accounting ⇒ Financial Accounting Global Settings ⇒ Ledgers ⇒ Fiscal Year and Posting Periods ⇒ Posting Periods ⇒ Assign Variants to Company Code
TCode: OBBP
Step 1 − On the Display IMG screen, select Assign Variants to Company Code by following the above path.
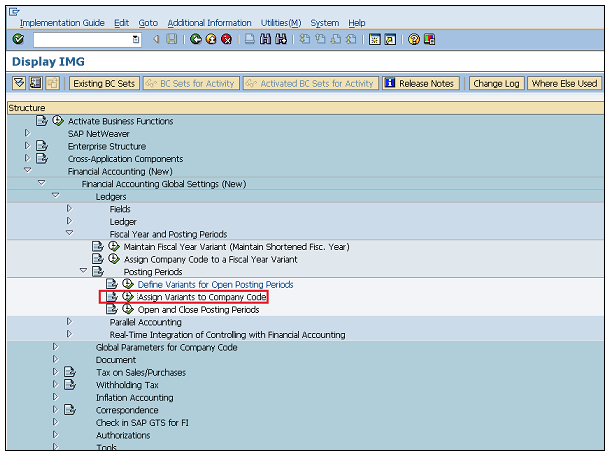
Step 2 − We can view the existing assignment and change it accordingly.
Click on Save.
Variant is now assigned to company code.

Posting period allows you to post and make changes in the documents only in a specific time period. Open and close posting periods can be maintained by following the steps given below.
Financial accounting ⇒ Financial Accounting Global Settings ⇒ Ledgers ⇒ Fiscal Year and Posting Periods ⇒ Posting Periods ⇒ Open and Close Posting Periods
TCode: OB52
Step 1 − On the Display IMG screen, select Open and Close Posting Periods by following the above path.
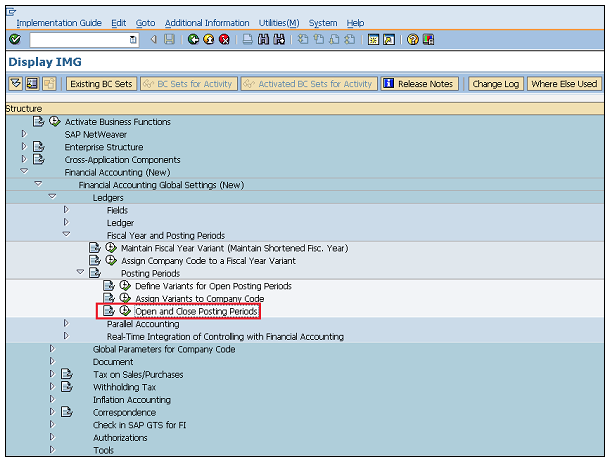
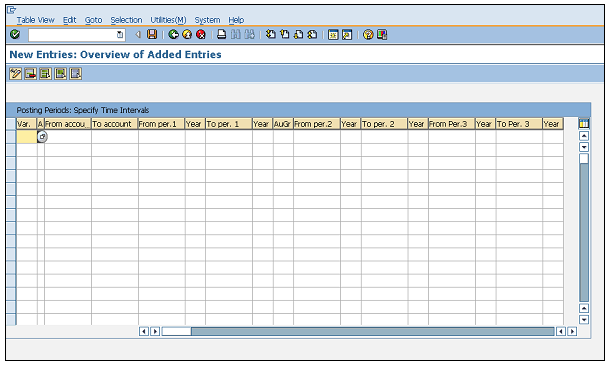
Step 2 − Click New Entries.
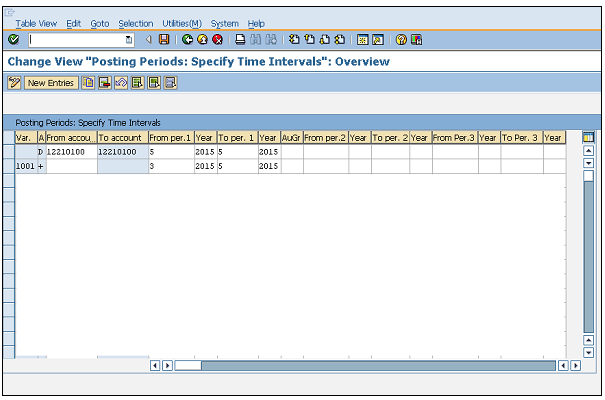
Step 3 − Provide the name of variant, account details, and the year allowed for posting.
Click on Save.
Posting Period is now maintained for the variant.
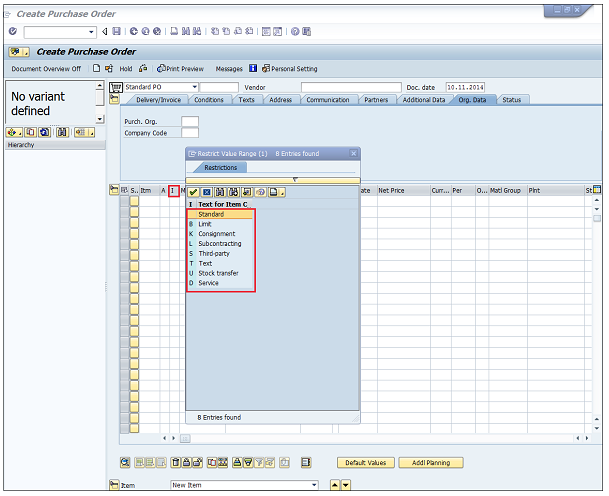
For different procurement types, there are four types of purchase orders, which are as follows −
In subcontracting, the vendor (the subcontractor) receives components from the ordering party with the help of which it produces a product. The product is ordered by your company through a purchase order. The components required by the vendor (seller) to manufacture the ordered products are listed in the purchase order and provided to the subcontractor.
Follow the steps given below to create a subcontracting purchase order.
TCode to create Purchase Order: ME21N
Subcontracting Item Category: L
Provide the TCode in the command field.
It will take you to the purchase order screen.
Provide all the necessary details such as the name of the vendor, item category, name of material, plant for which material is procured, and the date of delivery.
Click on Save. Subcontracting Purchase order will be created.
In consignment, material is available at the organization store premises, however it still belongs to the vendor (seller)/Owner of the material. If you utilize the material from the consignment stocks, then you have to pay to the vendor.
Follow the steps given below to create a consignment purchase order.
TCode to create Purchase Order: ME21N
Consignment Item Category: K
Provide the TCode in the command field.
It will take you to the purchase order screen.
Provide all the necessary details such as the name of the vendor, item category, name of material, plant for which material is procured, and the date of delivery.
Click on Save. Consignment Purchase order will be created.
In stock transfer, goods are procured and supplied within a company. One plant orders the goods internally from another plant (receiving plant/issuing plant). The goods are procured with a special type of purchase order known as the stock transport order.
Follow the steps given below to create a stock transfer purchase order.
TCode to create Purchase Order: ME21N
Stock Transfer Item Category: U
Provide the TCode in the command field.
It will take you to the purchase order screen.
Provide all the necessary details such as the name of the vendor, item category, name of material, plant for which material is procured, and the date of delivery.
Click on Save. Stock Transfer Purchase order will be created.

In service, a third party provides services to a company. These services include maintenance functions such as electricity and oiling of machines. Follow the steps given below to create a service purchase order.
TCode to create Purchase Order: ME21N
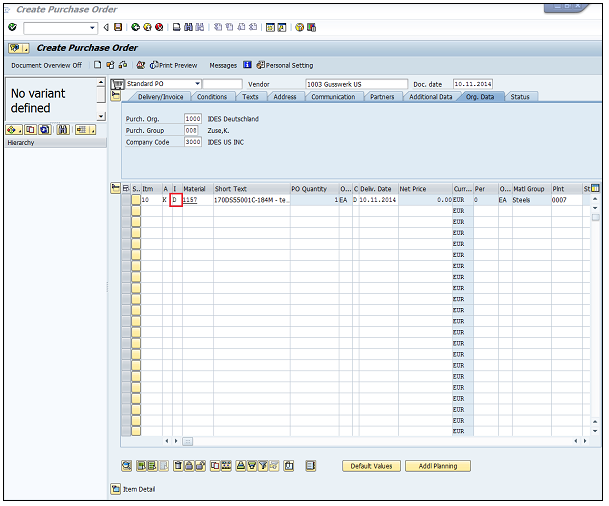
Service Item Category: D
Provide the TCode in the command field.
It will take you to the purchase order screen.
Provide all the necessary details such as the name of the vendor, item category, name of material, plant for which material is procured, and the date of delivery.
Click on Save. Service Purchase order will be created.
Procurement process starts with gathering requirements and ends with procuring goods from vendors. Once the goods are procured from a vendor, they need to be placed in the company’s premises in correct place so that they can be consumed when required. Inventory management deals with placing and handling the stock received from the vendors in correct place within the company’s premises. −
Listed below are the points to note about inventory management −
Inventory management deals with the management of stock, either on value or quantity basis.
It includes planning, entry, and keeping records of all the movements of goods.
Goods movement creates a document that updates all the stock quantity and value in the inventory that is known as the material document.
A material document is referred by a document number and document year.
One normally comes across the following terms while doing inventory management −
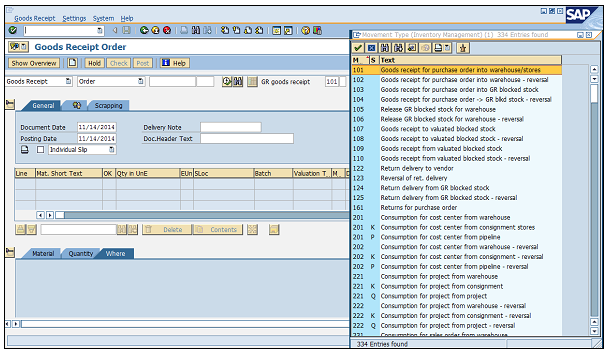
Movement type describes the type of stock posting in inventory. It represents whether the posting in stock is against goods receipt or goods issue. The important movement types in SAP MM are as follows −
101 − Goods receipt for purchase order or order.
103 − Goods receipt for purchase order into GR blocked stock.
201 − Goods issue for a cost center.
261 − Goods issue for an order
301 − Transfer posting plant to plant in one step
305 − Transfer posting plant to plant in two steps - placement in storage
311 − Transfer posting storage location to storage location in one step
313 − Stock transfer storage locations to storage location in two steps - removal from storage.
Movement types can be reached out by following the steps given below −
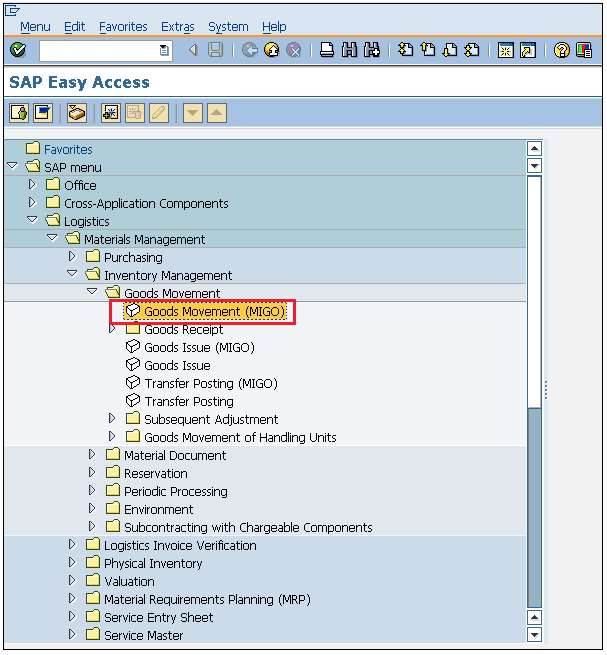
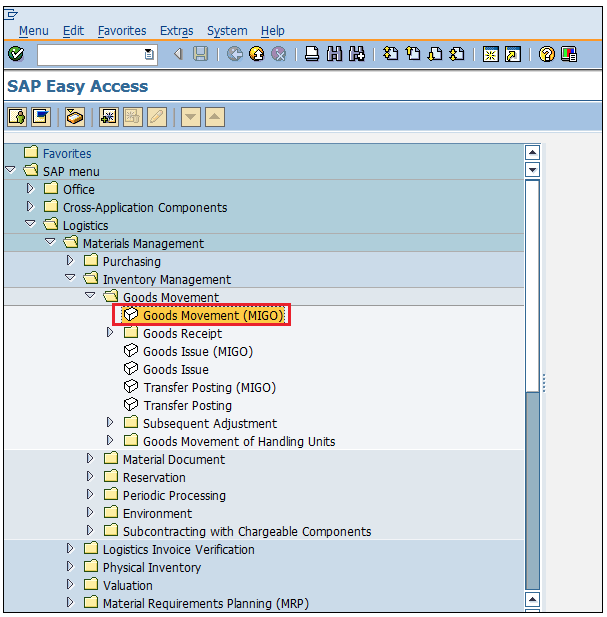
Logistics ⇒ Materials Management ⇒ Inventory Management ⇒ Goods Movement ⇒ Goods Movement (MIGO)
TCode: MIGO
Step 1 − On the SAP Menu screen, select Goods Movement (MIGO) by following the above path.

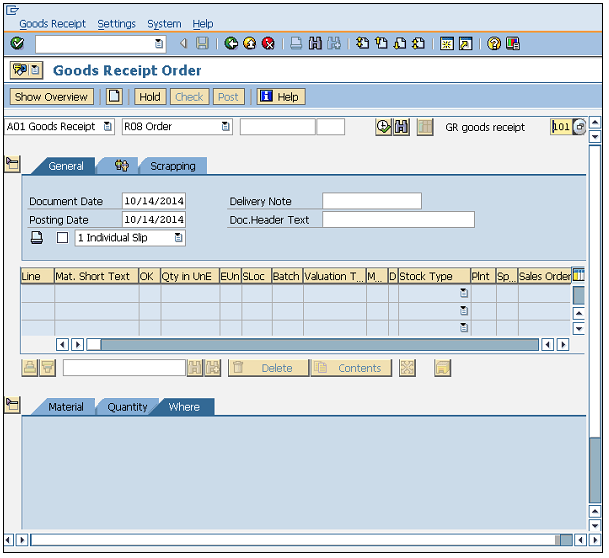
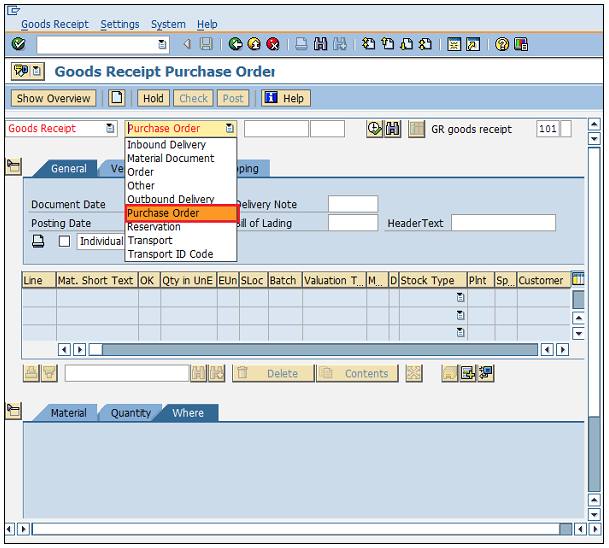
Step 2 − Select GR Goods Receipt drop-down.
You will get a lot of standard movement types and you can choose one according to your requirement.
Goods receipt is the phase where the material is received by the ordering party and its condition and quality are verified. Depending upon the movement type, stock is posted in inventory with the help of goods receipt. Goods receipt will show the increase in warehouse stock. Goods receipt has two scenarios −
Creation of Goods Receipt
Cancellation of Goods Receipt
Goods receipt can be posted by following the steps given below.
Logistics ⇒ Materials Management ⇒ Inventory Management ⇒ Goods Movement ⇒ Goods Movement (MIGO)
TCode: MIGO
Step 1 − On the SAP Menu screen, select Goods Movement (MIGO) by following the above path.
Step 2 − Goods receipt can be posted against various documents.
Select the required document from the drop-down.
In this case, we are selecting purchase order.
Select the movement type according to the requirement.
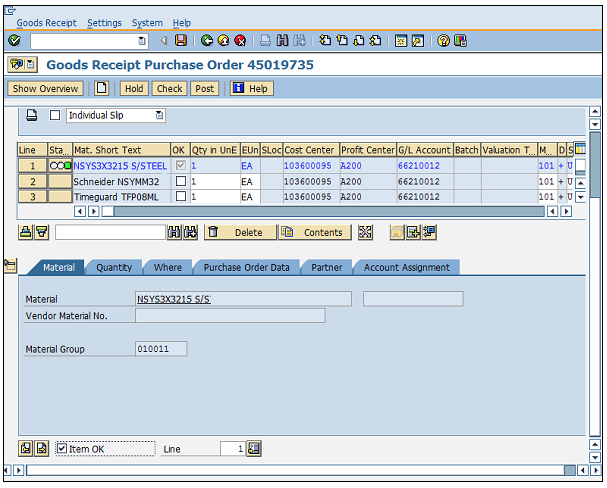
Step 3 − It will fetch all the details from the selected reference document such as material, quantity, plant, etc.
Select check tab to check the document.
Then click on Save.
A material document number will be generated.
Goods receipt is now posted against a purchase document.
Sometimes a goods receipt is not posted correctly, in which case, it is to be cancelled. Follow the steps given below to cancel a goods receipt.
Logistics ⇒ Materials Management ⇒ Inventory Management ⇒ Goods Movement ⇒ Goods Movement (MIGO)
TCode: MIGO
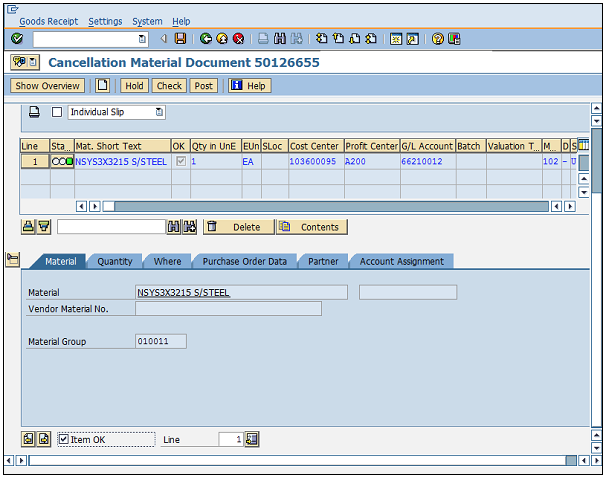
Step 1 − On the MIGO screen, select Cancellation against a Material Document Number from the drop-down.
Provide the material document number.
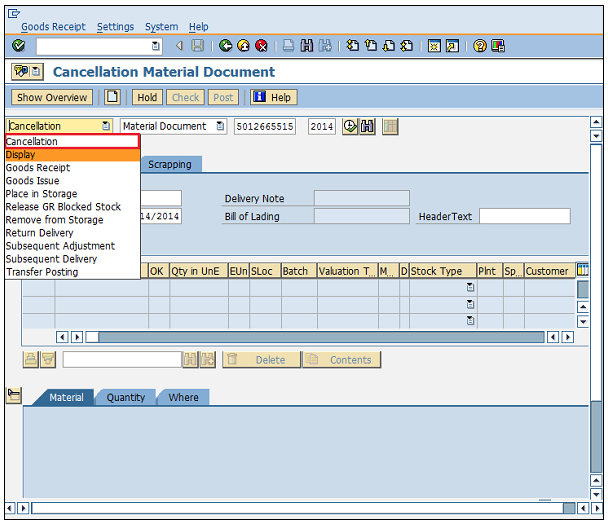
Step 2 − It will fetch all the details from the material document.
Select the check tab to check the document.
Then click on Save.
A material document number will be generated.
Goods receipt is now cancelled.
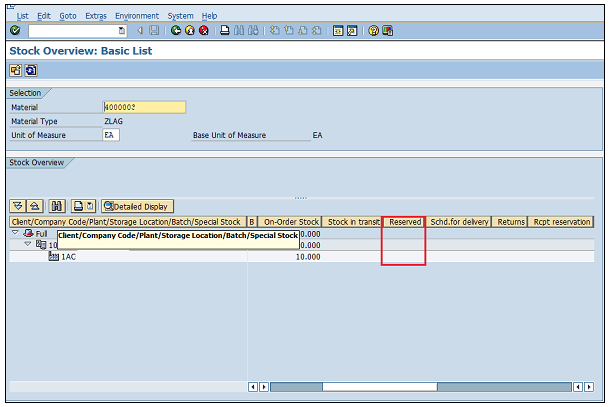
Sometimes, stocks are to be blocked in advance so that they can be made available at a particular point of time.
This is known as reservation.
Reservation ensures that availability of stock at a particular time.
Reserved quantity can be viewed by TCode MMBE.
Provide the material number and plant.
Reserved quantity can be seen in the reserved tab as shown below.
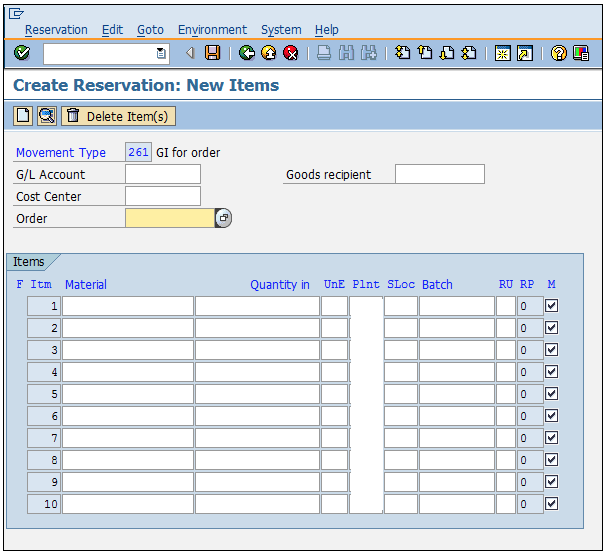
Follow the steps given below to create a Reservation.
Logistics ⇒ Materials Management ⇒ Inventory Management ⇒ Reservation ⇒ Create
TCode: MB21
Step 1 − On the SAP Menu screen, select the Create execute icon by following the above path.
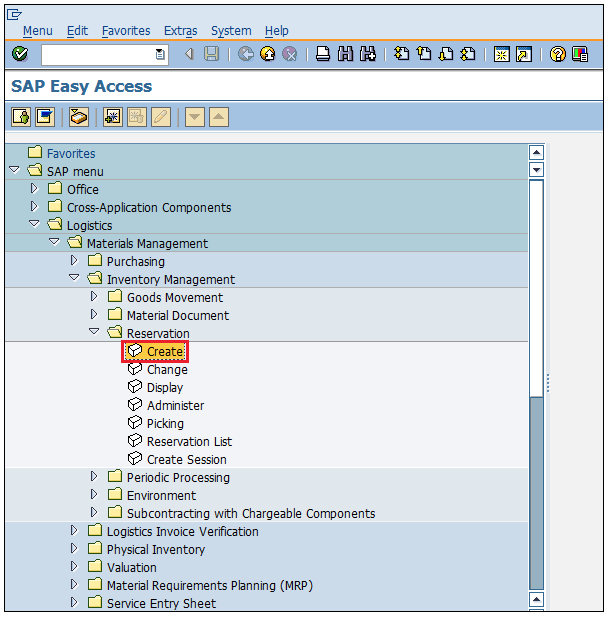
Step 2 − Enter the date, movement type, and the plant for which reservation is to be made.
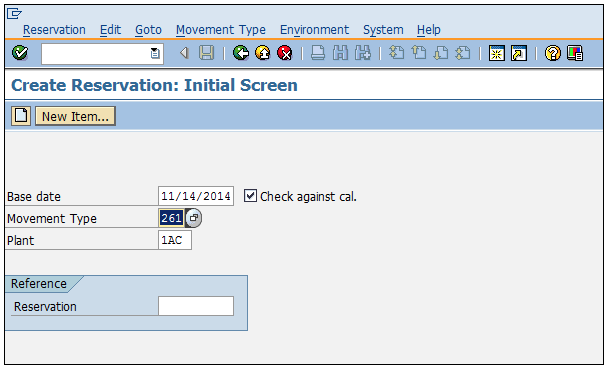
Step 3 − Enter the order number against which you want to make a reservation.
Provide the details of material and the quantity that is to be reserved.
Click on Save. Reservation is now made for the order.
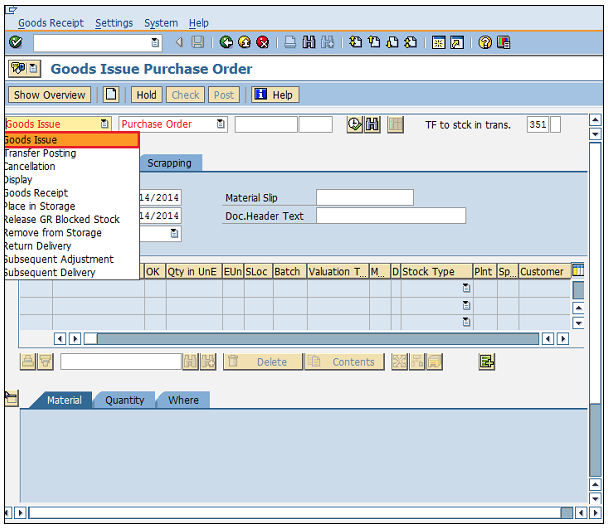
Goods issue means moving a stock out of inventory that may be due to several reasons like withdrawing of material for sampling or returning the goods back to the vendor. A goods issue results in a decrease in quantity in the warehouse. Follow the steps given below to post a goods issue.
Logistics ⇒ Materials Management ⇒ Inventory Management ⇒ Goods Movement ⇒ Goods Movement (MIGO)
TCode: MIGO
Step 1 − On the SAP Menu screen, select Goods Movement (MIGO) by following the above path.

Step 2 − Select goods issue from the drop-down.
Goods issue can be posted against various documents.
Select the required document from the drop-down.
For example, in this case, we are selecting purchase order.
Select the movement type according to the requirement.
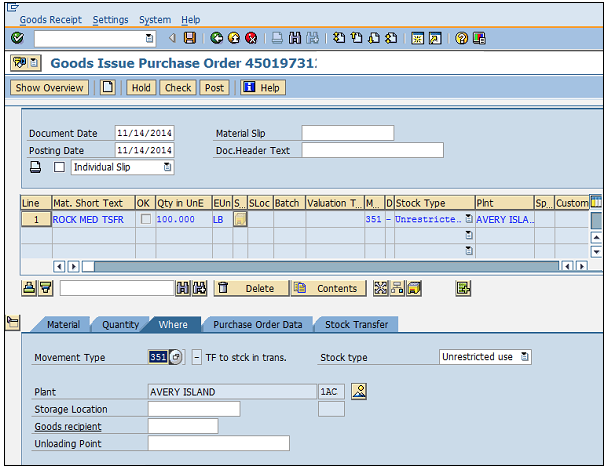
Step 3 − It will fetch all the details from the selected reference document such as material, quantity, plant, etc.
Select the check tab to check the document.
Then click on Save.
A material document number will be generated.
Goods Issue is now posted against a purchase document.
Every organization acquires goods or services to complete its business needs. Once goods are procured from a vendor and placed in company’s premises through goods receipt, we need to pay to the vendor for the acquired goods and services. The amount to be paid along with the details of the material is provided by the vendor in the form of a document that is known as the invoice. Before paying to the vendor, we need to verify the invoice. This process of verifying the invoice before making a payment is known as invoice verification. The key points to note about invoice verification are as follows −
Invoice verification marks the end of procurement, after purchase order and goods receipt.
Invoice posting updates all the related documents in financials and accounting.
Blocked invoice that vary from actual invoice can be processed through invoice verification.
One normally comes across the following terms in invoice verification −
Posting of invoice is done after having received the goods from the vendor and after having completed the goods receipt. The invoice received from a vendor is verified against cost, quantity, and quality by the ordering party, and then the invoice is posted against that purchase order.
This is the phase where the vendor (seller) is paid from the company and reconciliation of the invoice and PO is accomplished. Follow the steps given below to post an invoice.
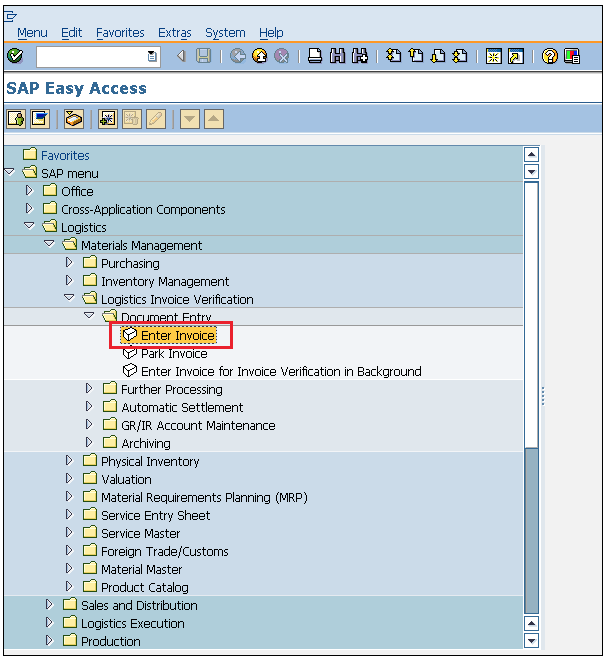
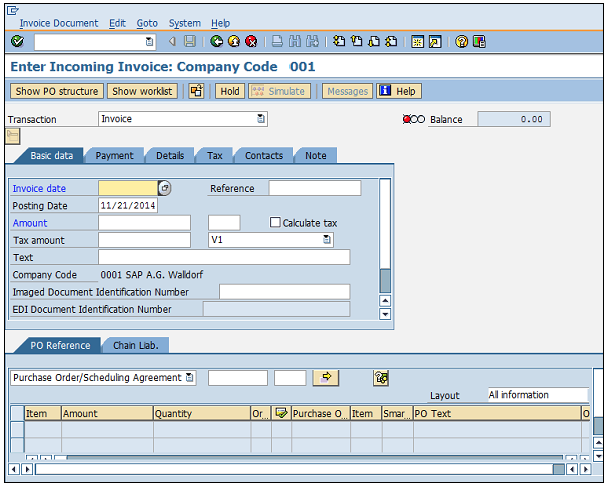
Logistics ⇒ Materials Management ⇒ Logistic Invoice Verification ⇒ Document Entry ⇒ Enter Invoice
TCode: MIRO
Step 1 − On the SAP Menu screen, select Enter Invoice by following the above path.
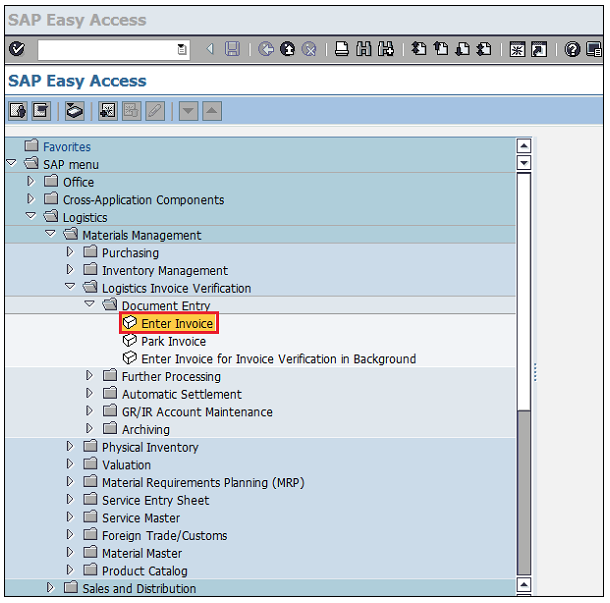
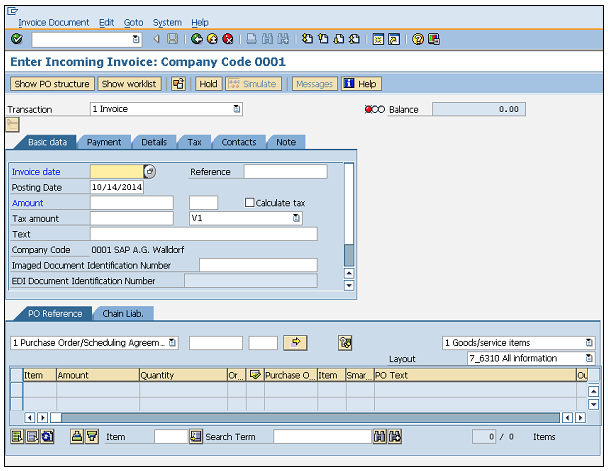
Step 2 − Fill in all the necessary details such as invoice posting date, amount that is paid to the vendor along with the quantity for which the amount is paid.
Click on Save.
Invoice is now posted for the goods receipt.
Sometimes the accounting department may not be able to pay a vendor as per the invoice raised. This may happen in the following scenario. You try to post an invoice, however the system expects certain default value against the purchase order or the goods receipt and the posted invoice differs from the default value. This may lead to invoice blocking. Invoice blocking is caused due to −
Variance in amount at item level
Variance in quantity at item level
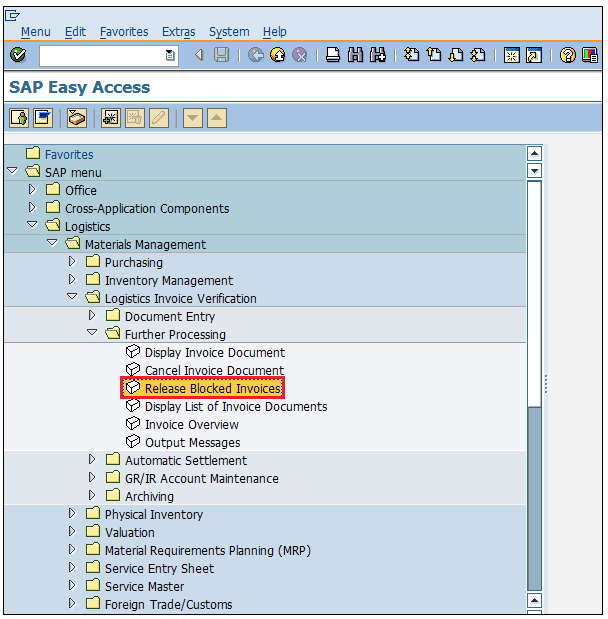
It is difficult to analyze small variances in invoice. So, tolerance limits are set up in the system and if the variance in the invoice is within the tolerance limit, then the system accepts the invoice. If the variance exceeds the tolerance limit, then it may lead to invoice blocking. In such cases, we need to manually unblock or release the blocked invoice if it has to be processed. Follow the steps given below to unblock an invoice.
Logistics ⇒ Materials Management ⇒ Logistic Invoice verification ⇒ Further Processing ⇒ Release Blocked Invoice
TCode: MRBR
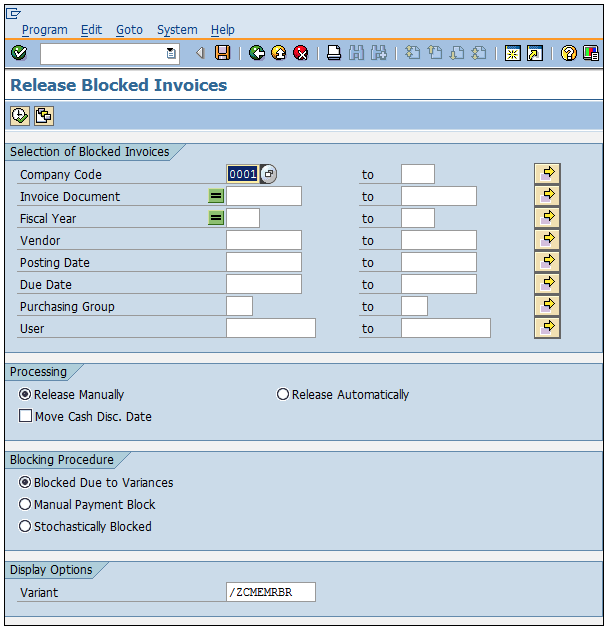
Step 1 − On the SAP Menu screen, select Release Blocked Invoices by following the above path.
Step 2 − Provide necessary details such as company code, invoice document number, vendor, posting date, and purchasing group.
Then click the execute button.
The blocked invoice will be released.
Evaluated Receipt Settlement (ERS) is an easy method of settling goods receipt automatically. If the ordering party has agreed with the vendor on all financial terms and condition, then it need not verify the invoice. Invoice will be posted automatically from the information present in the purchase order and the goods receipt. Given below are the advantages of having an ERS −
Purchase orders can be settled and closed quickly.
It reduces human efforts, as there is no need to verify the invoice.
Amount and quantity variances in invoice can be avoided with the help of ERS.
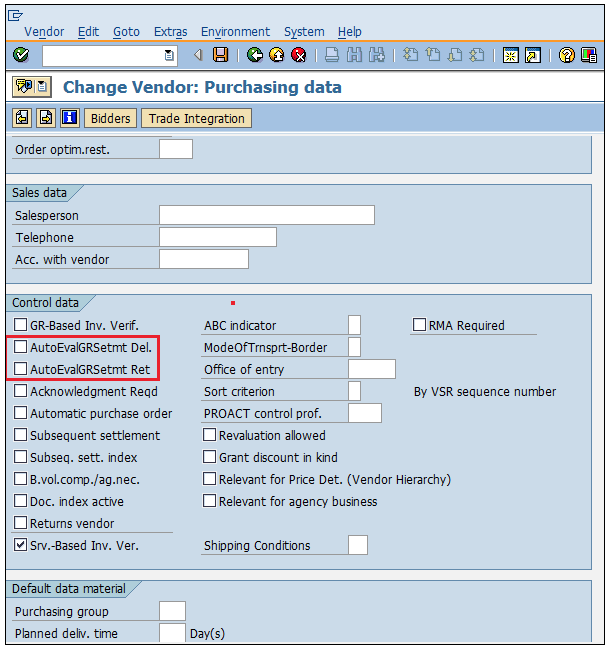
To implement ERS, some mandatory settings are to be done in the vendor master.
Go to XK02 (Change mode of vendor master).
Select Control data tab.
Check the AutoEvalGRSetmt Del. and AutoEvalGRSetmt Ret box.
Click on Save. Now the particular vendor is enabled for ERS.
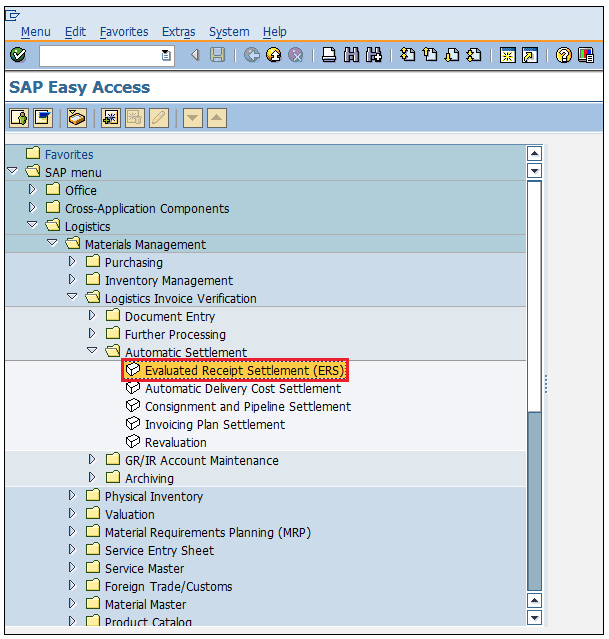
Follow the steps given below to create an ERS.
Logistics ⇒ Materials Management ⇒ Logistic Invoice verification ⇒ Automatic Settlement ⇒ Evaluated Receipt Settlement (ERS)
TCode: MRRL
Step 1 − On the SAP Menu screen, select Evaluated Receipt Settlement (ERS) by following the above path.
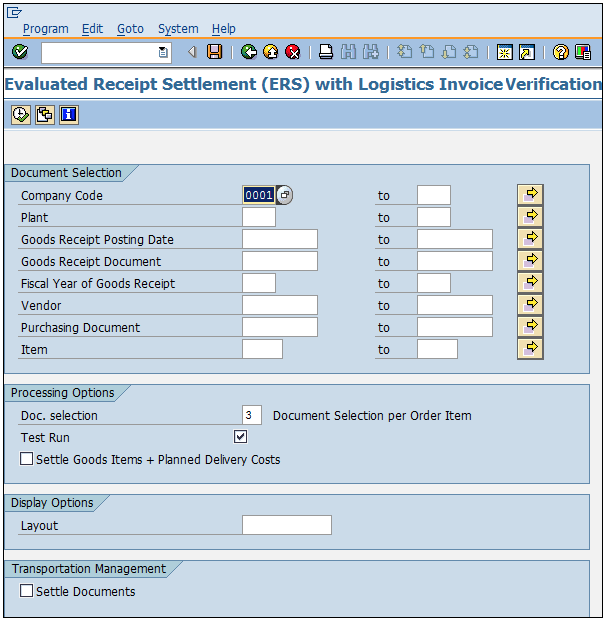
Step 2 − Fill in all the necessary details such as company code, plant, goods receipt document number and date, vendor, and purchasing document.
Click on Save.
ERS will be created for the corresponding purchase order and goods receipt.
paragraph