| Module | Module Name | Links | Links | Blake's Links |
| PM | Plant Mantenance | tutorials point | Blake | |
| MM | Material Management | tutorials point Overview | Guru99 | Blake: 1-10 | 11-20 | 21-25 |
| SD | Sales and Distribution | tutorials point Tutorial | Guru99 | Blake |
| PP | Production Planning | tutorials point Tutorial | Guru99 | Blake | 1-7 |
| External Links | ||||
| NewLanguage.html | FICO Module: Blake's 1-28 29-56 57-66 67-83 : Tutorials Point | |||
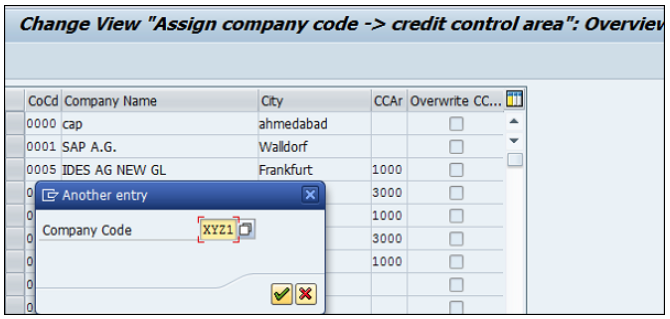
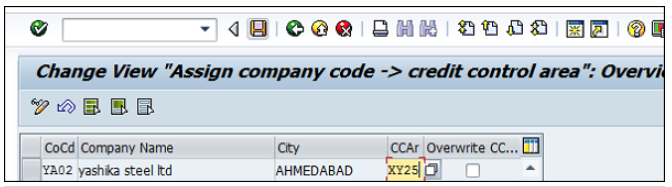
| Pymnt Iss | Download Info | ABAP Module: Blake's 1-18 19-36 37-52 : Tutorials Point | ||
| 1 | Home | FICO_Doc Tutorials Point | 29 | Block a Customer | FICO_Doc Tutorials Point | 57 | Month End Closing | FICO_Doc Tutorials Point | ||
| 2 | Overview | FICO_Doc Tutorials Point | 30 | Delete a Customer | FICO_Doc Tutorials Point | 58 | Dunning | FICO_Doc Tutorials Point | ||
| 3 | Submodules | FICO_Doc Tutorials Point | 31 | Customer Account Group | FICO_Doc Tutorials Point | 59 | Exchange Rates | FICO_Doc Tutorials Point | ||
| 4 | Company Basics | FICO_Doc Tutorials Point | 32 | One-Time Customer Master | FICO_Doc Tutorials Point | 60 | Tables in Module | FICO_Doc Tutorials Point | ||
| 5 | Define Business Area | FICO_Doc Tutorials Point | 33 | Post a Sales Invoice | FICO_Doc Tutorials Point | 61 | AR Invoice Processes | FICO_Doc Tutorials Point | ||
| 6 | Define Functional Area | FICO_Doc Tutorials Point | 34 | Document Reversal | FICO_Doc Tutorials Point | 62 | AR Account Analysis | FICO_Doc Tutorials Point | ||
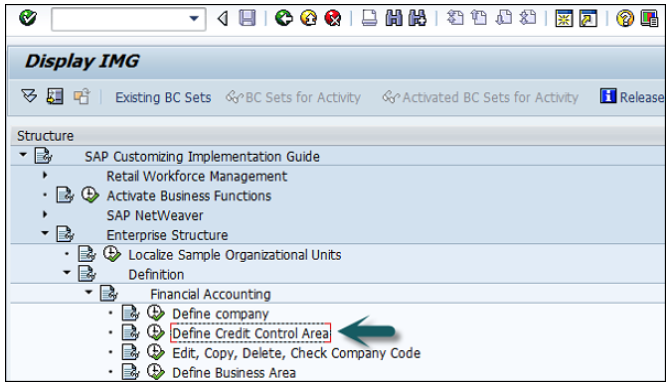
| 7 | Define Credit Control | FICO_Doc Tutorials Point | 35 | Sales Returns | FICO_Doc Tutorials Point | 63 | AR Reporting | FICO_Doc Tutorials Point | ||
| 8 | General Ledger | FICO_Doc Tutorials Point | 36 | Post Incoming Payment | FICO_Doc Tutorials Point | 64 | AA Overview | FICO_Doc Tutorials Point | ||
| 9 | COA Group (Chart of Accts) | FICO_Doc Tutorials Point | 37 | Foreign Currency Invoice | FICO_Doc Tutorials Point | 65 | AA Asset Explorer | FICO_Doc Tutorials Point | ||
| 10 | Retained Earnings Account | FICO_Doc Tutorials Point | 38 | Incoming Partial Payments | FICO_Doc Tutorials Point | 66 | Cash Management | FICO_Doc Tutorials Point | ||
| 11 | G/L Account | FICO_Doc Tutorials Point | 39 | Reset AR Cleared Items | FICO_Doc Tutorials Point | |||||
| 12 | Block G/L Account | FICO_Doc Tutorials Point | 40 | Credit Control | FICO_Doc Tutorials Point | 67 | CO Overview | FICO_Doc Tutorials Point | ||
| 13 | Deleting G/L Accounts | FICO_Doc Tutorials Point | 41 | Accounts Payable | FICO_Doc Tutorials Point | 68 | CO Submodules | FICO_Doc Tutorials Point | ||
| 14 | Financial Statement Version | FICO_Doc Tutorials Point | 42 | Create a Vendor | FICO_Doc Tutorials Point | 69 | CO Cost Center | FICO_Doc Tutorials Point | ||
| 15 | Journal Entry Posting | FICO_Doc Tutorials Point | 43 | Create Vendor Account Group | FICO_Doc Tutorials Point | 70 | CO Create Cost Center | FICO_Doc Tutorials Point | ||
| 16 | Fiscal Year Variant | FICO_Doc Tutorials Point | 44 | Display Changed Fields | FICO_Doc Tutorials Point | 71 | CO Post to a Cost Center | FICO_Doc Tutorials Point | ||
| 17 | Posting Period Variant | FICO_Doc Tutorials Point | 45 | Block a Vendor | FICO_Doc Tutorials Point | 72 | CO Internal Orders | FICO_Doc Tutorials Point | ||
| 18 | Field Status Variant | FICO_Doc Tutorials Point | 46 | Delete a Vendor | FICO_Doc Tutorials Point | 73 | CO Settlement of IO | FICO_Doc Tutorials Point | ||
| 19 | Field Status Group | FICO_Doc Tutorials Point | 47 | One-Time Vendor | FICO_Doc Tutorials Point | 74 | CO Profit Center | FICO_Doc Tutorials Point | ||
| 20 | Define Posting Keys | FICO_Doc Tutorials Point | 48 | Post Purchase Invoice | FICO_Doc Tutorials Point | 75 | CO Posting to Profit Center | FICO_Doc Tutorials Point | ||
| 21 | Define Document Type | FICO_Doc Tutorials Point | 49 | Purchase Returns | FICO_Doc Tutorials Point | 76 | CO Profit Center Standard Heirarchy | FICO_Doc Tutorials Point | ||
| 22 | Document Number Ranges | FICO_Doc Tutorials Point | 50 | Post Outgoing Vendor Payment | FICO_Doc Tutorials Point | 77 | CO Assigning Cost to Profit Centers | FICO_Doc Tutorials Point | ||
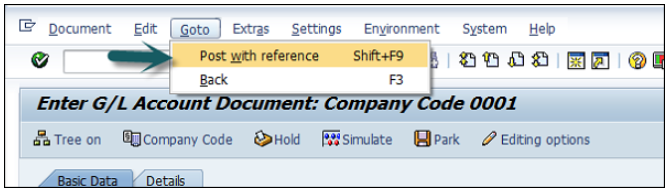
| 23 | Post with Reference | FICO_Doc Tutorials Point | 51 | Foreign Currency Invoice | FICO_Doc Tutorials Point | 78 | CO Assigning Materials to Profit Centers | FICO_Doc Tutorials Point | ||
| 24 | Hold a G/L Document Posting | FICO_Doc Tutorials Point | 52 | Withholding Tax in vendor invoice | FICO_Doc Tutorials Point | 79 | CO Tables in Module | FICO_Doc Tutorials Point | ||
| 25 | Park a G/L Document Posting | FICO_Doc Tutorials Point | 53 | Outgoing Partial Payments | FICO_Doc Tutorials Point | 80 | CO Product Costing | FICO_Doc Tutorials Point | ||
| 26 | G/L Reporting | FICO_Doc Tutorials Point | 54 | Reset AP Cleared Items | FICO_Doc Tutorials Point | 81 | CO Profitability Analysis | FICO_Doc Tutorials Point | ||
| 27 | Accounts Receivable | FICO_Doc Tutorials Point | 55 | Automatic Payment Run | FICO_Doc Tutorials Point | 82 | CO Planning Methods | FICO_Doc Tutorials Point | ||
| 28 | Customer Master Data | FICO_Doc Tutorials Point | 56 | Posting Rounding Differences | FICO_Doc Tutorials Point | 83 | FI - Integration | FICO_Doc Tutorials Point |
This is an introductory tutorial that covers the basics of SAP FICO and how to deal with its various modules and sub-modules.
This tutorial will be extremely useful for professionals who aspire to learn the ropes of SAP FICO and implement it in practice.
It is especially going to help consultants who are mainly responsible for implementing Financial Accounting and Cost Accounting with SAP ERP Financials.
It is an elementary tutorial and you can easily understand the concepts explained here with a basic knowledge of how a business deals its Financials.
However, it will help if you have some prior exposure to accounting and how to deal with financial data.
SAP FI comprises of the following sub-components −
SAP FI module enables you to manage financial accounting data within an international framework of multiple companies, currencies, and languages.
SAP FI module mainly deals with the following financial components −
SAP FI consultants are mainly responsible for implementing Financial Accounting and Cost Accounting with SAP ERP Financials.
Common T-codes that are used to maintain G/L accounting −
Common SAP AR T-codes −
Common SAP AR Tables −
Common SAP AP T-codes −
Common SAP AP Tables −
Common T-codes used for Asset Accounting −
Example − When a company purchases an item that can be considered as an asset, the details will be passed to Asset accounting module from the SAP MM module.
You can create and process any type of bank transactions using the Bank accounting component.
Common Bank Accounting module tables that are used for this are −
Common T-codes with bank accounting −
It helps an organization to manage travel expenses in an efficient manner, as it provides integration with all the other modules of SAP.
Common Travel Management T-codes −
Common Travel Management tables −
Common tables that store Funds management data −
Common SAP Funds Management T-codes −
Common tables in FI Legal Consolidation module −
Note − FI-Legal Consolidation module was supported in older versions of SAP ERP implementation.
This work is performed by SAP Business Process Consolidation BPC and SEM-BCS now.
A company is defined as the smallest unit for which financial statements can be created in accordance with commercial legal regulations.
In SAP FI, a company can comprise of multiple codes, however it acts as a single unit for which financial statements are available. All the company codes must use the same chart of accounts list and fiscal year, however each code can have a different local currency.
A chart of accounts list consists of all the chart of accounts that can be used and each code must have one chart of account.
A fiscal year normally consists of twelve months’ time period where company creates the financial statements.
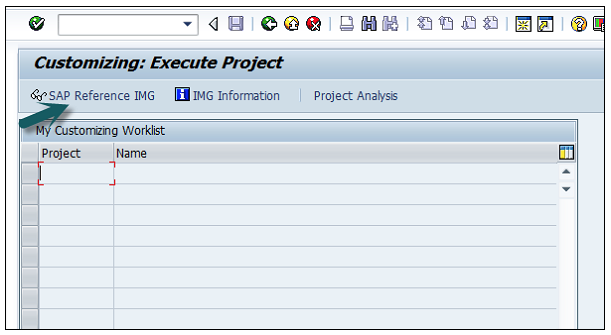
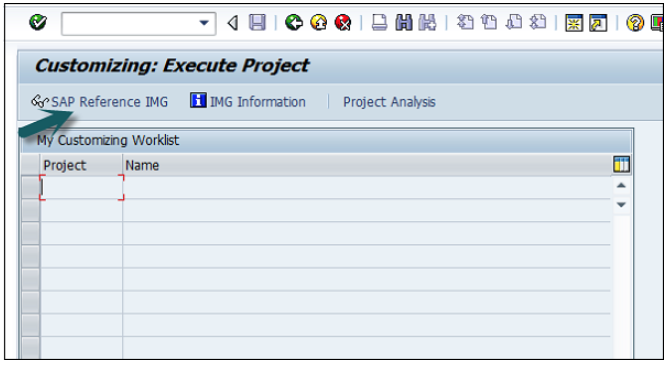
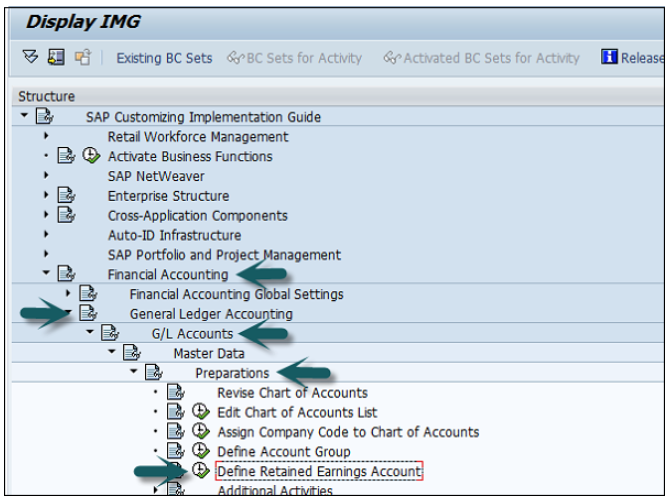
Use T-code SPRO → click on SAP Reference IMG → New window will open.
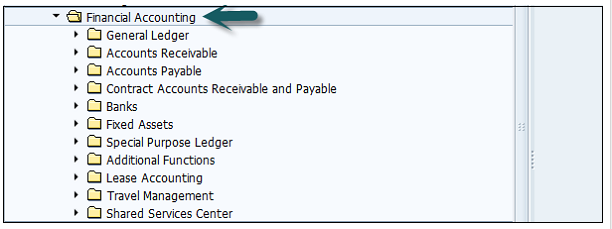
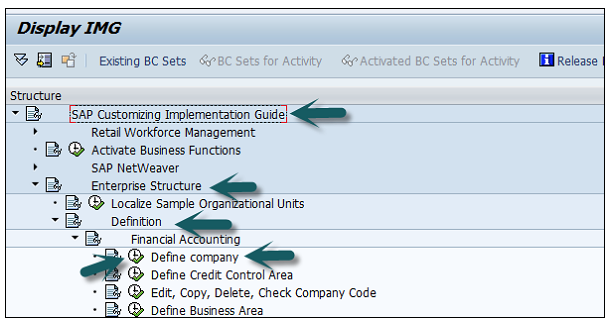
Expand SAP Customizing implementation guide → Enterprise Structure → Definition → Finance Accounting → Define Company → click on Execute (see the pointer in the screenshot).
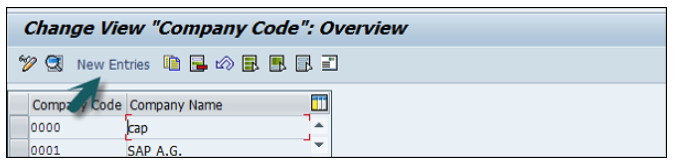
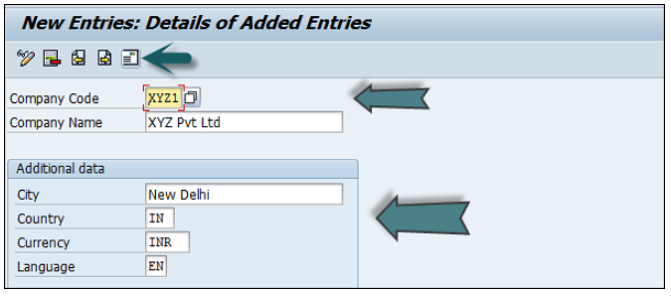
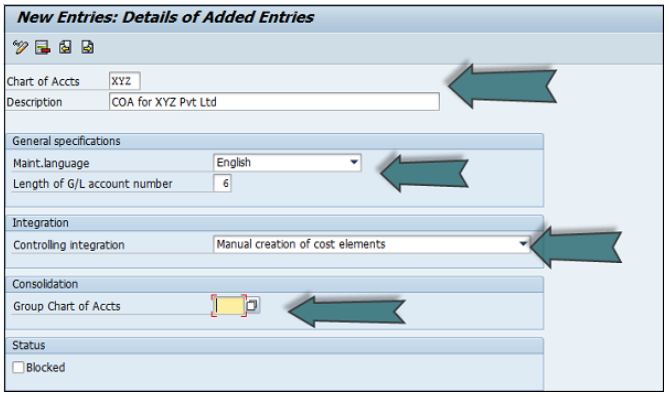
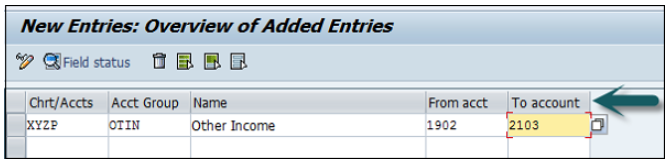
A new window will open → click on New Entries → New Entries: Details of added entry
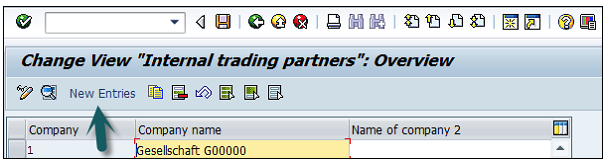
You need to provide the following details to create a new company −
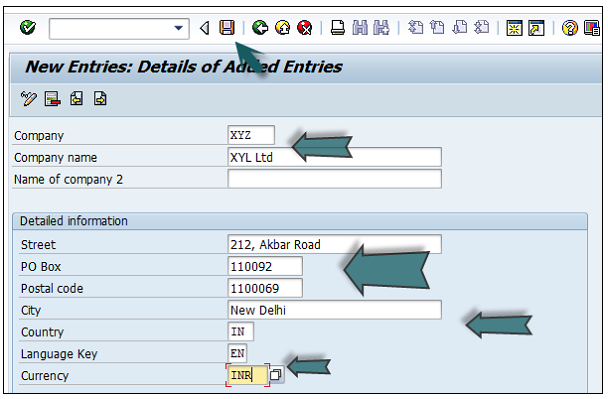
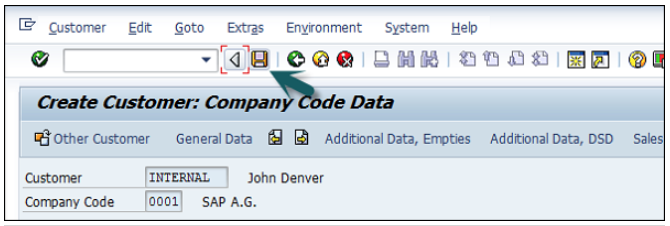
The next step is to save the company details → CTRL+S or as shown in the above screenshot.
In SAP FI, a company can comprise of multiple codes, however it acts as a single unit for which financial statements are available. Company code is the smallest unit in an organization for which financial statements (profit-loss statement, etc.) can be generated.
Let us discuss how to create, edit, and delete a company code. Take a look at the following screenshot.
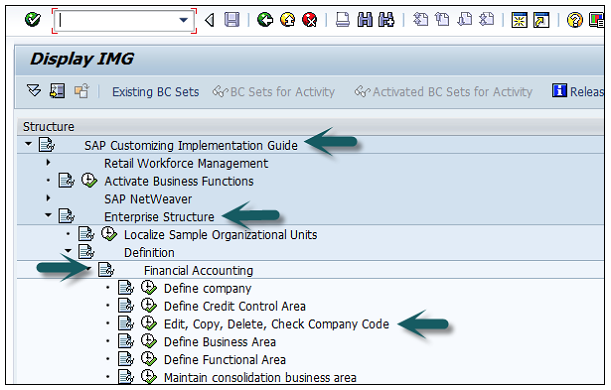
Expand Enterprise Structure as mentioned in the previous topic → Definition → Financial Accounting → Edit, Copy, Delete, check company code → Execute using click on the watch image → New window will open → You can create a new company code by selecting both the options.
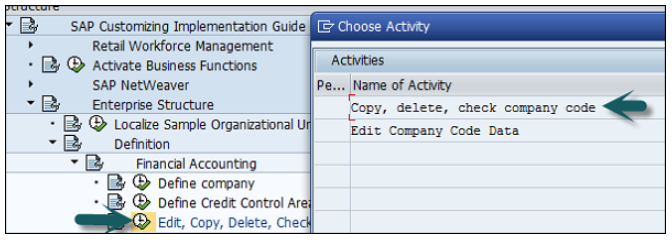
Select Edit, Copy, Delete, and Check Company Code. It allows you to copy all the configurations and tables automatically.
If you select Edit company code, you will get the following window → click on New Entries and update the code details.
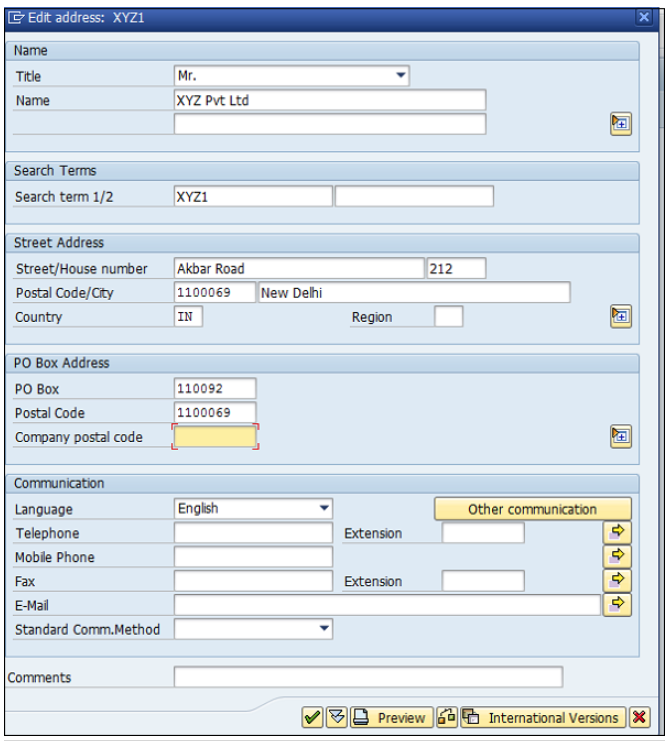
You can click on the Address button and update the following fields. Once the Address field is updated, click the Save button.
There is a big company XYZ which runs multiple businesses. Let us assume it has three different domains like manufacturing, marketing, and sales.
Now you have two options −
First is to create different company codes.
And the other better option is to create each of these business lines into the business areas.
The benefits of using Business Areas in this case are as follows −
You can use these business areas if other company codes require the same areas.
It is easy to configure if you use a Business Area, as you just need to attach to the company code and the other details in that business area will get attached automatically.
By using Business Areas in controlling, you can create Profit and Loss statement, Balance Sheet, etc. for business areas. Hence it is used for management accounting in a few companies.
Note − Business areas are used more in Controlling as compared to Finance Accounting.
Expand Enterprise Structure as mentioned in the previous topic → Definition → Financial Accounting → Define Business Area → Execute → Go to New Entries.
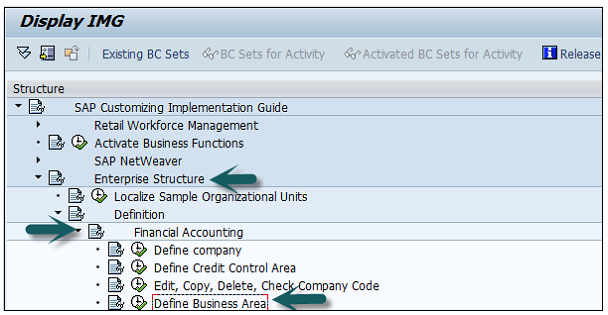
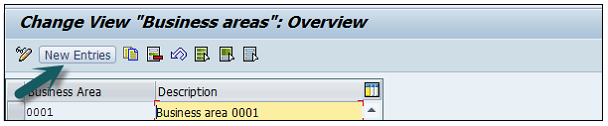
Enter the 4 digit Business Area code and save the configuration.

Function Areas in finance accounting are used to define the expenses in a company according to individual function units.
The most common Functional Areas are −
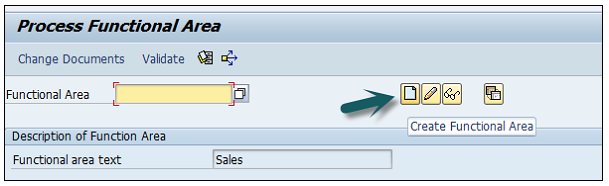
You can define a Functional Area using the T-code FM_FUNCTION (Earlier it was OKBD, but this is obsolete). It will open a new window.
Click on Create Functional Area as shown below and a new window will open.
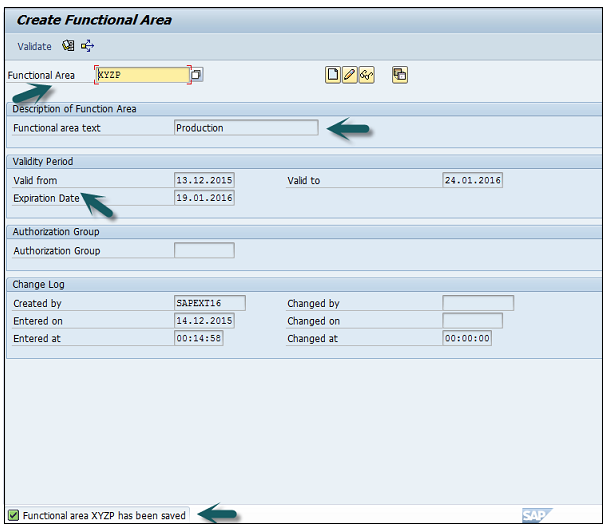
Enter the following details −
Once all the details are provided, click the Save button at the top.
Once you click Save, you will see a message at the bottom that a new functional area has been created.
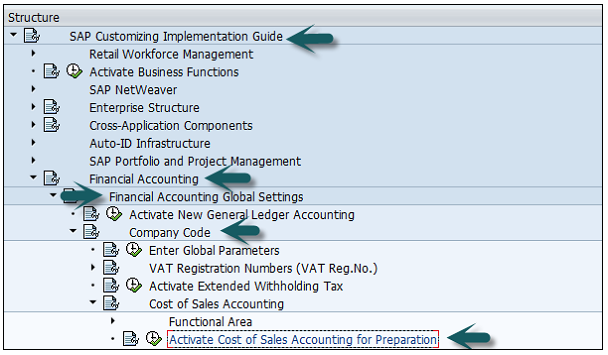
Go to SPRO → SAP Reference IMG → Financial Accounting → FI Global Settings → Company Code → Cost of Sales Accounting → Activate cost of sales accounting for preparation.
The FI chart of accounts represents the list of GL accounts that are used to meet the daily needs and the operating country’s legal requirement in a company.
The master chart of accounts must be assigned to each company code.
Chart of accounts (COA) can be divided into the following types −
Operating Chart of Accounts − It contains all the General Ledger accounts that are used to meet the daily needs in a company. The operating chart of accounts has to be assigned to a company code.
Country Chart of Accounts − It contains a list of all General Ledger accounts that are required to meet the operating country’s legal requirements. You can also assign a company chart of account to the company code.
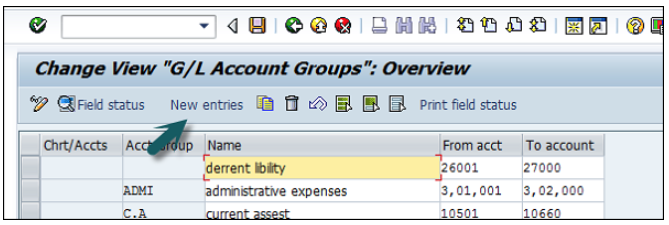
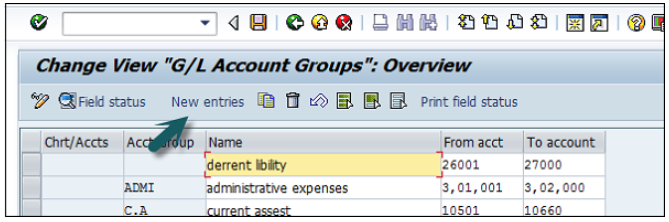
Chart of Accounts Group − This COA group contains a list of all the G/L accounts that are used by the entire company.
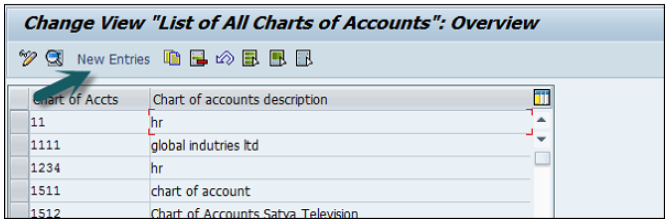
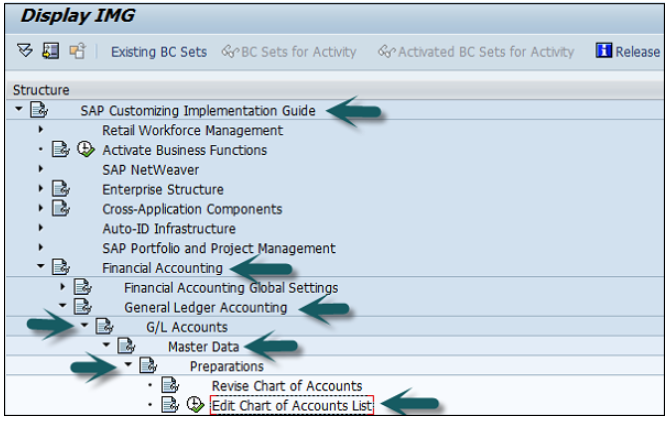
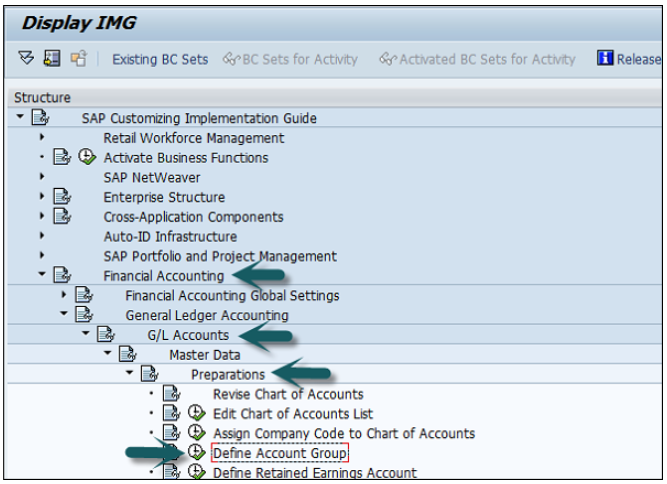
You can create a new Chart of Accounts by using the T-code OB 13 or by going to Finance Accounting → G/L accounts.
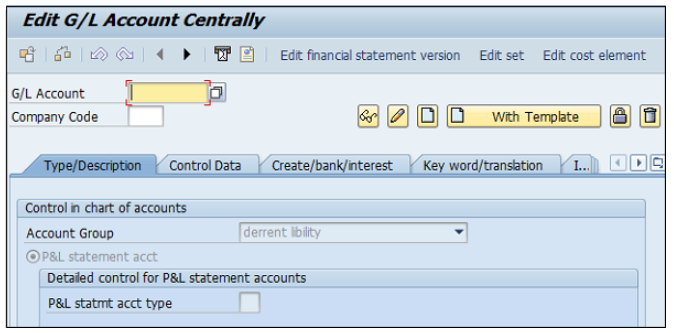
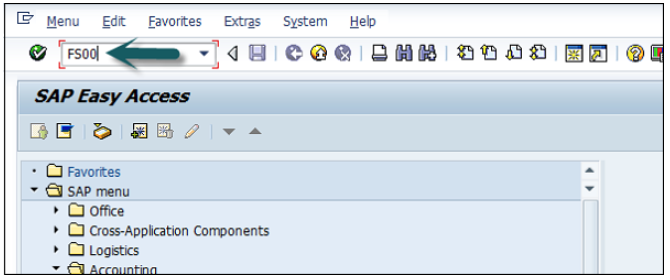
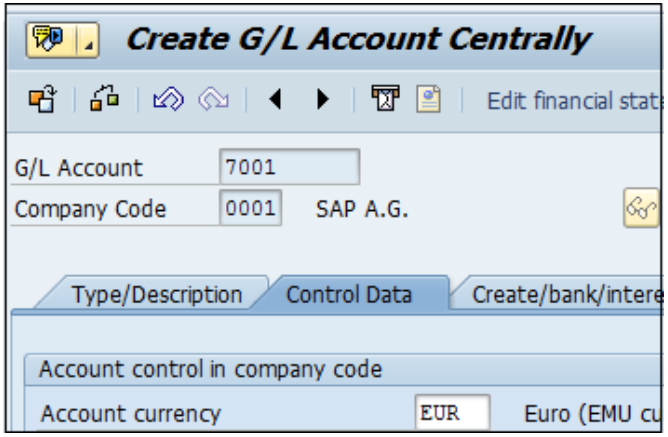
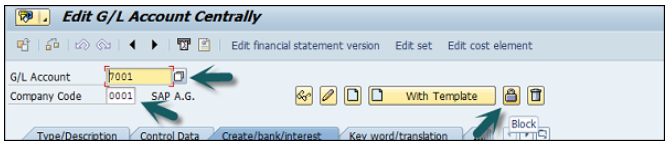
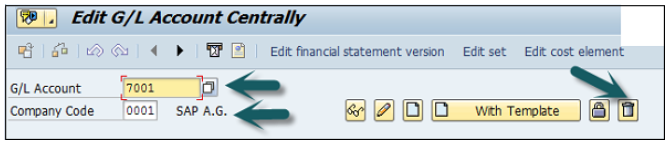
You can use the T-code FS00 to centrally define a G/L account. Refer the following screenshot.
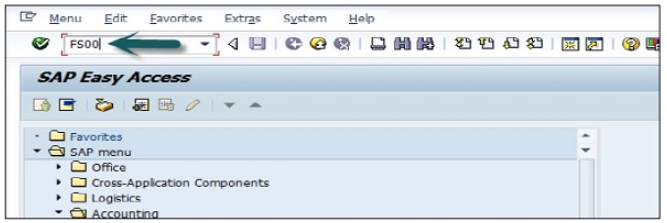
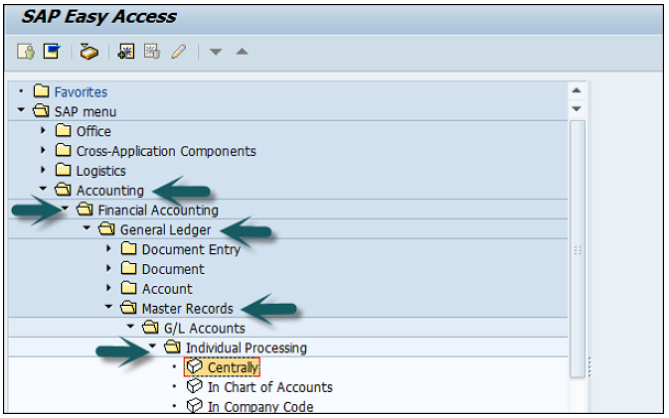
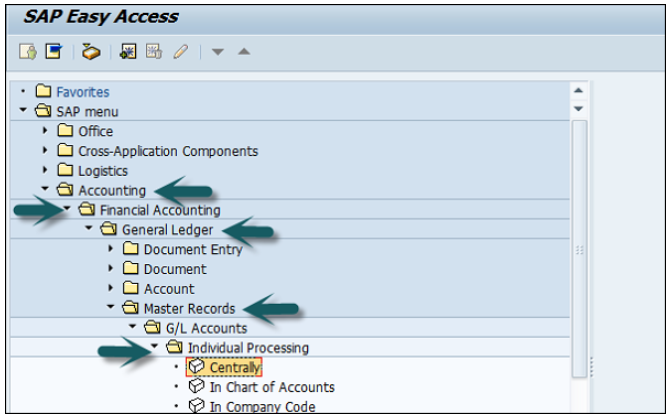
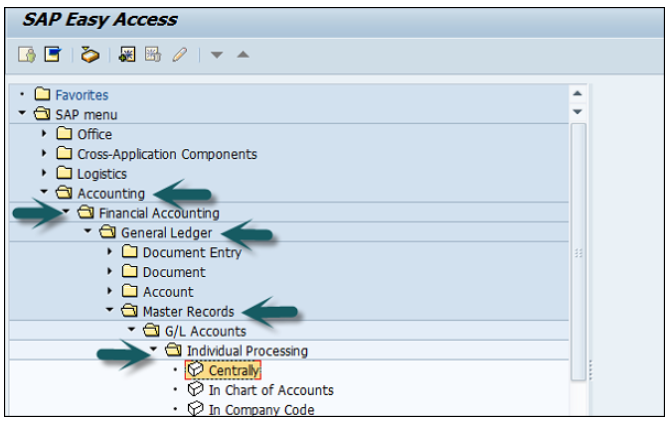
You can also use the following path −
In SAP R/3, go to Accounting → Finance Accounting → General Ledger → Master Records → G/L accounts → Individual Processing → Centrally.
In the field G/L Account, enter the account number of G/L account and the company code key and click the Create icon as shown in the following screenshot −
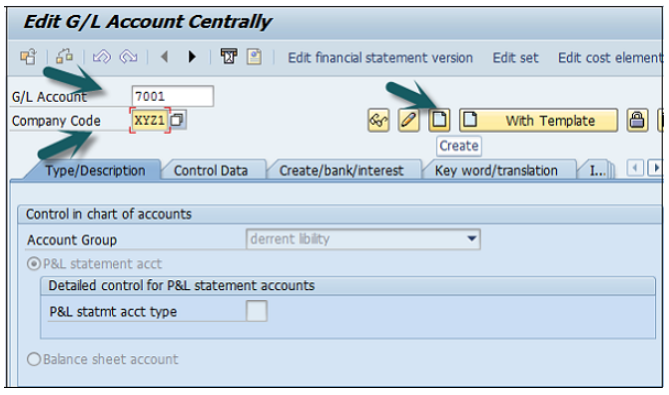
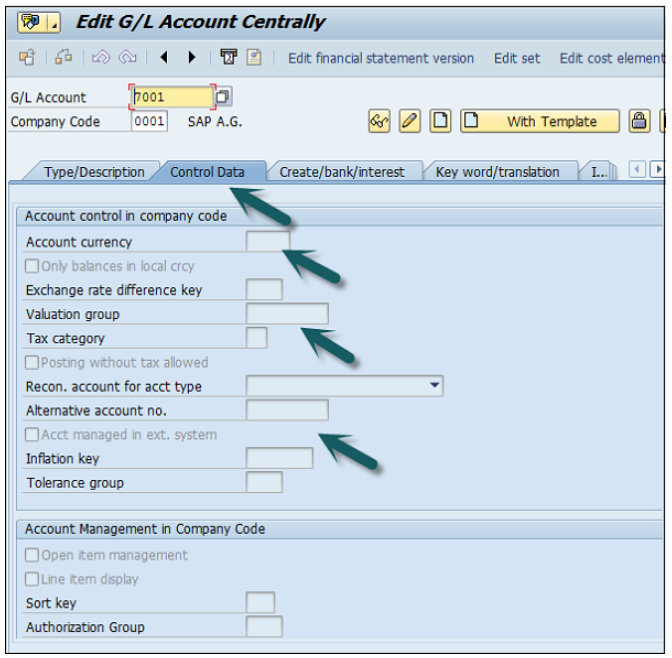
The next step is to enter the details in the Charts of Account.
Account Group determines the group for which the G/L account must be created, for example, Administrative Expenses, etc.
If the G/L account is to be used for P&L Statement Account, then select this option, otherwise use Balance Sheet Account.
Under description, provide a short text or G/L account long text.
Click Create / bank interest and provide data in the following fields −
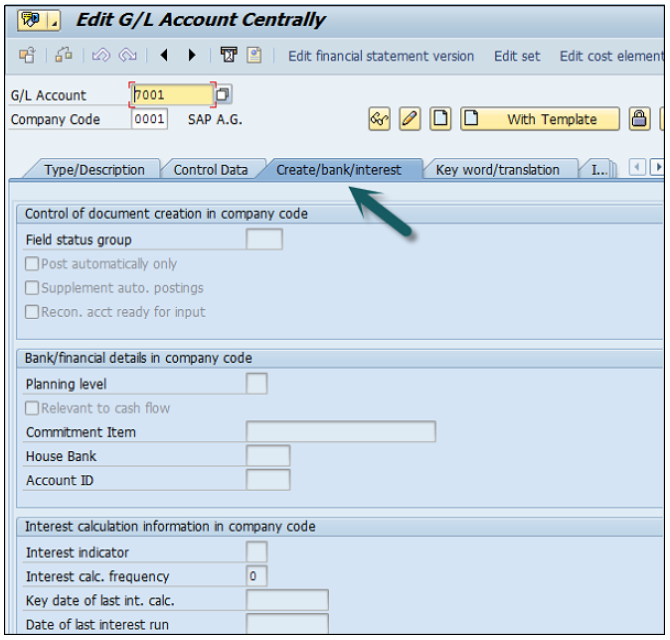
Once the details are entered, click the Save button to create a G/L account.
After you complete the payroll run, the next step is to post payroll run to G/L accounts. Posting to G/L account from Payroll run includes the following −
During each Payroll run, payroll contains different posting types for wage to relevant GL accounts. While posting to GL account following points should be considered −
In Payroll, different Wage types- Overtime wage, standard salary and other expenses should be posted to correct GL account.
Other wages like contribution to insurance, tax payment and other pay types should be posted as credit for employee Payroll.
In payroll run, you have other wage types like contribution to health insurance should be posted as double posting to accounts- includes debited as an expense, and credited as a payable in GL account.
Other Wage type in Payroll run like accruals, other insurance types, etc. should also be posted to two accounts- debited as an expense and credited as a provision in GL posting.


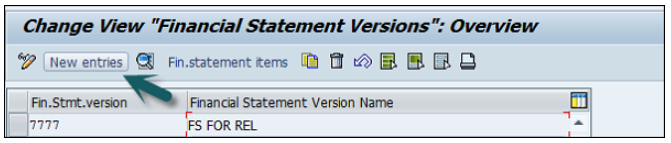
Financial statement versions are used to create the financial statements, to run account balance reports and for General Ledger accounting planning.
You can also define multiple financial statement versions to generate financial statements in different formats.
Follow the steps given below to create financial statement versions −
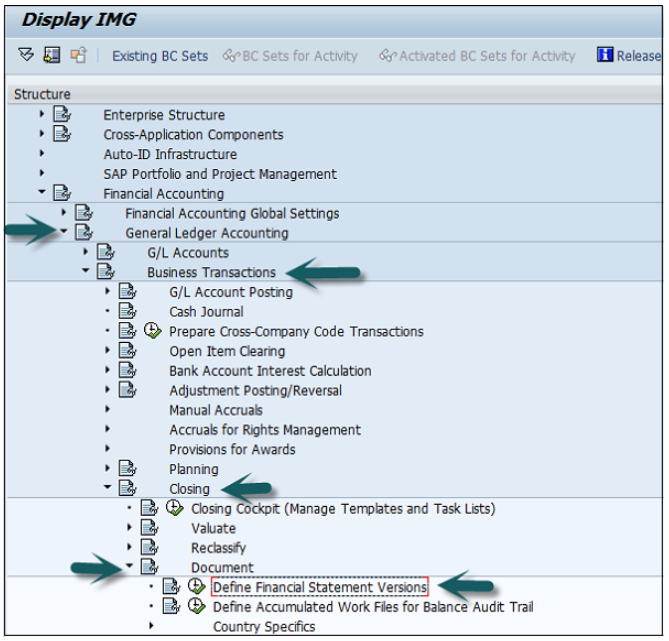
T-code SPRO → SAP Reference IMG → Financial Accounting → General Ledger Accounting → Business Transactions → Closing → Document → Define Financial Statement Versions → Execute.
Click the button New Entries as shown below −
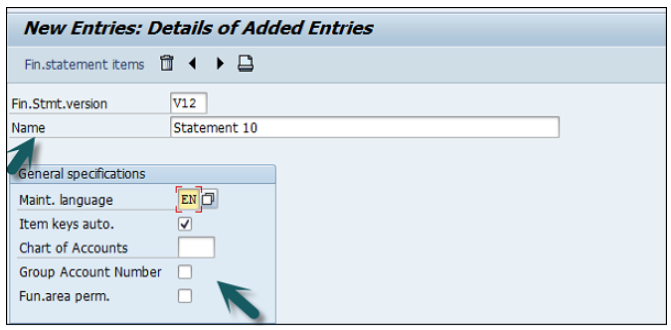
Provide the following details −
Enter the Fin. Stmt. Version.
Enter the Description of the financial statement version.
Maint. Language − Enter the language key in which you display texts, enter texts, and print statement.
Item Keys auto − It tells keys of financial statement items are assigned manually or automatically when the financial statement versions are defined.
Charts of Accounts − All accounts from this chart of accounts COA can be assigned when you define the financial statement. If you do not specify a chart of accounts, accounts from several charts of accounts can be assigned when you define the financial statement.
Group Account Number − Enter this Indicator that specifies that the group account numbers should be assigned instead of the account numbers when you define the financial statement version.
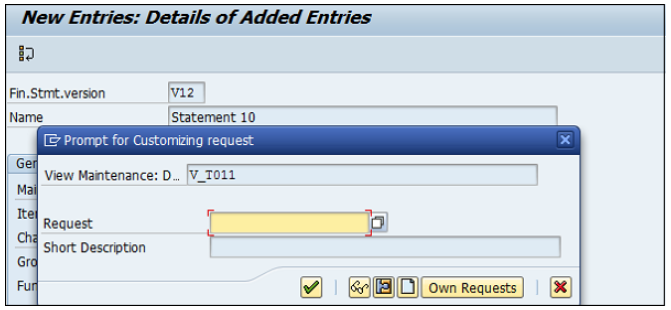
Fun. Area Parameter − This indicator is used to make it possible to assign functional areas or accounts in the financial statement version. Once the above fields are defined, you can click on the save configuration and to generate change request number. To edit this Financial Statement version, click on Fin. Statement items → you can maintain nodes in version.
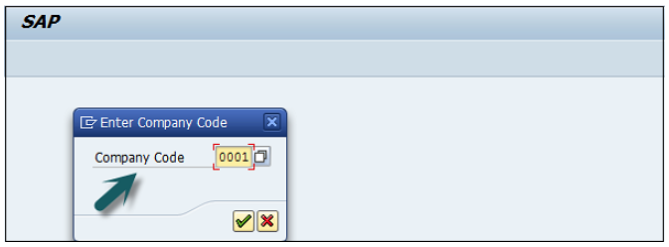
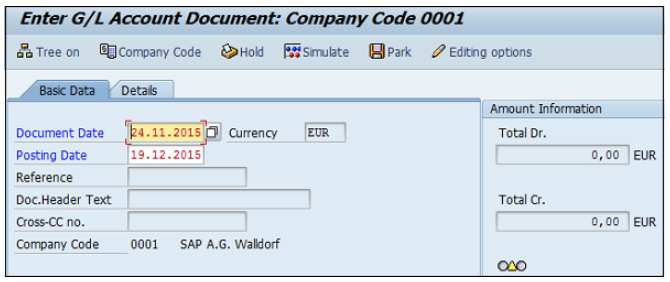
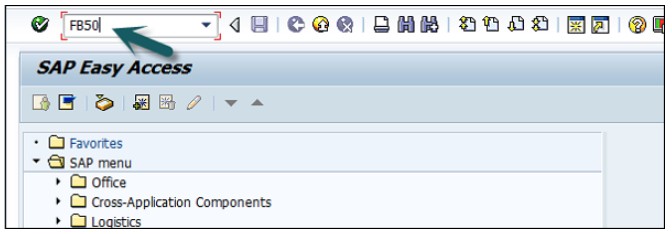
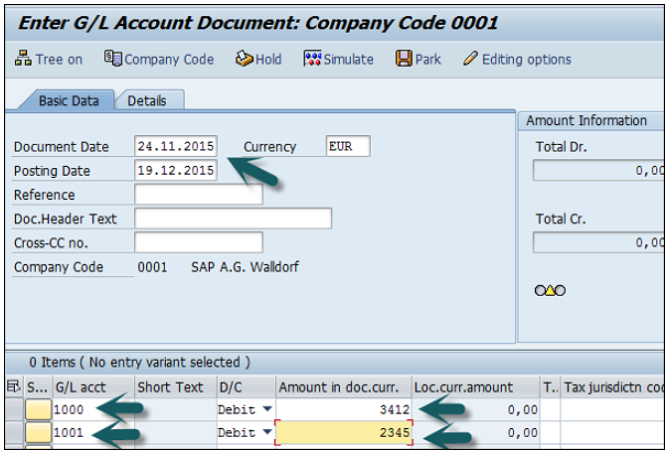
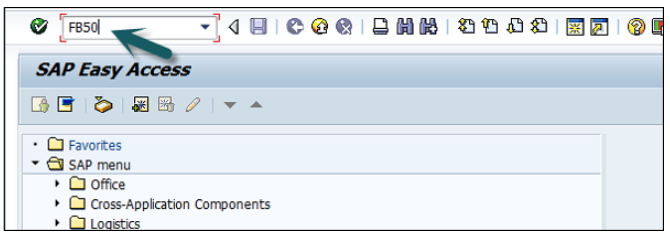
Use T-code FB50 → Provide the Company code.
Enter the document date as shown below −
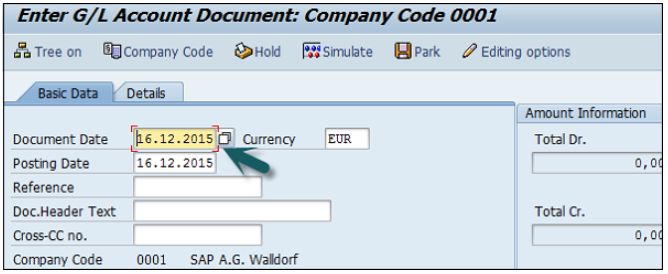
The next step is to provide the following details −
G/L Account − Enter the account to be credited.
Short Text − Description of amount.
Amount in Doc Currency − Enter the amount to be credited.
Similarly, for the Debit, provide data in the following fields −
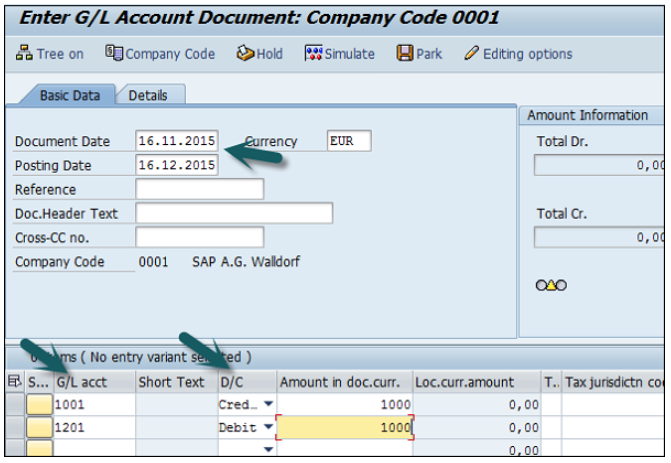
Click the Save button and you will get the document number to be posted for the company code.
Fiscal year variant contains the number of posting periods in a fiscal year and the number of special periods. You can define up to 16 posting periods in a fiscal year in the controlling component CO.
You need to specify the fiscal year variant for each company code. When you create a controlling area, you also need to specify the fiscal year variant.
The fiscal year variants of the company code and controlling area may only differ in the number of special periods used. You need to ensure that the fiscal year variants match. In other words, they may not have a time conflict.
Go to SPRO → SAP Reference IMG → Financial Accounting → Financial Accounting Global Setting → Fiscal Years → Maintain Fiscal year variant → Execute.
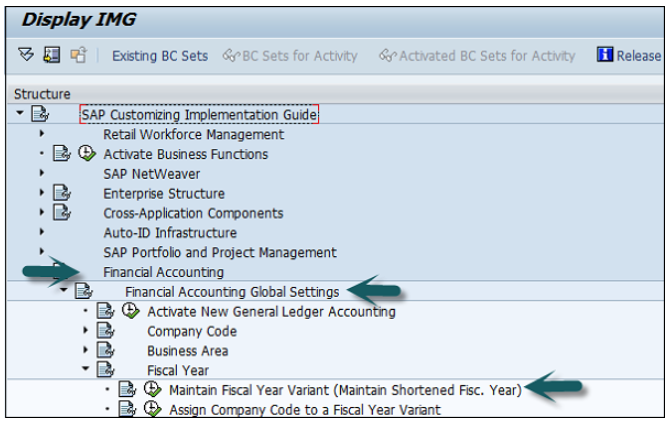
It will open the following window.
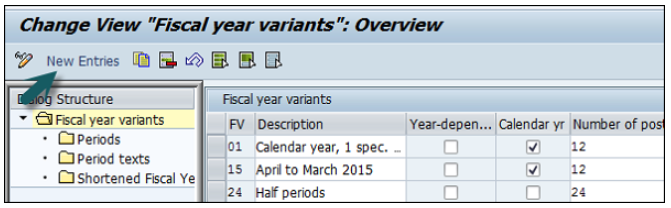
Click New Entries and it will open a new window as shown below.
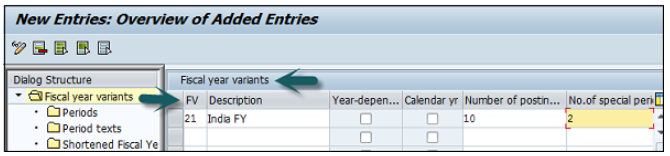
Provide the following details −
FV − Enter 2-digit Fiscal year.
Description − Enter a description of the Fiscal year variant.
Year Dependent − If the start and the end date of the fiscal year changes between year, then check this box.
Calendar Year − If the fiscal year is same as the calendar year Jan-Dec, then check this option.
Number of Postings − Enter the number of posting periods for a Fiscal year.
Number of special postings − Enter the number of special posting periods for a fiscal year.
The next step is to save the details. Enter the customizing request number that a new fiscal year variant is created.
You can maintain the posting period by using the Period option under the Fiscal year variant.
SAP FI Posting period variant is used to maintain accounting periods that are open for posting and all closed period are balanced.
This is used for opening and closing period in the fiscal year for posting purpose.
You can assign these posting periods to one or more company codes.
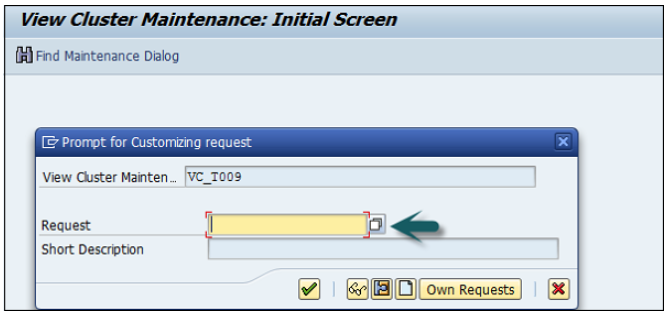
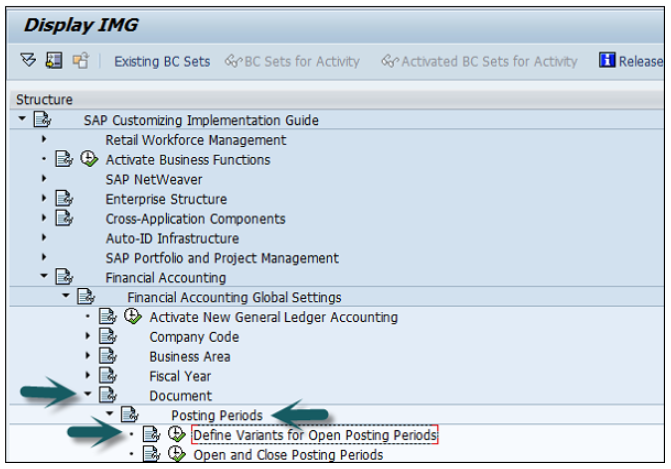
Go to SPRO → SAP Reference IMG → Financial Accounting → Financial Accounting Global Setting → Document → Posting Periods → Define Variant for open Posting Periods → Execute.
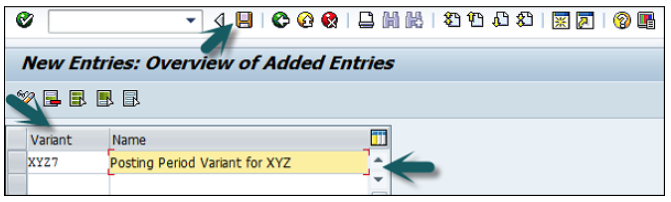
It will open a new window. Now, click New Entries.
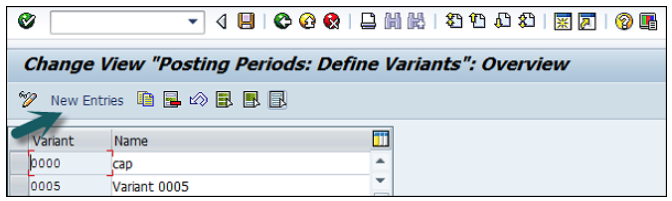
It will open another window, as shown below. Enter the 4-digit Posting Period Variant and name of the field. Click the Save icon to save this variant.
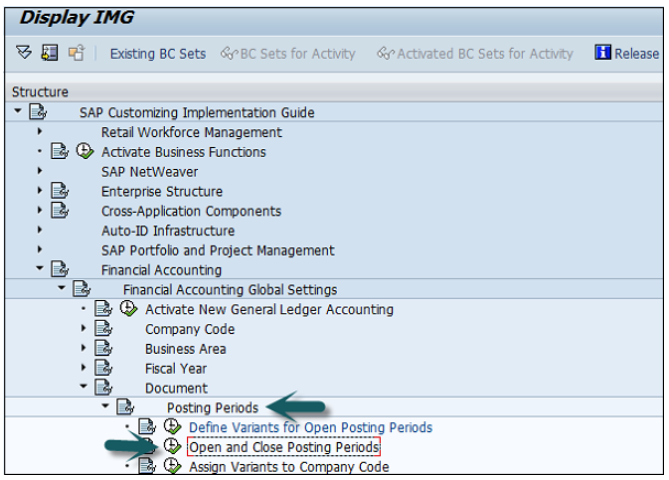
Go to SPRO → SAP Reference IMG → Financial Accounting → Financial Accounting Global Setting → Document → Posting Periods → Open and Close Posting Periods → Execute.
Click the button New Entries, as shown in the following screenshot.
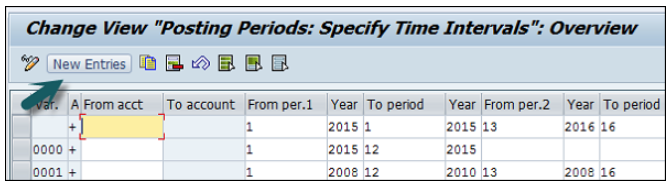
Now, you need to provide the following details −
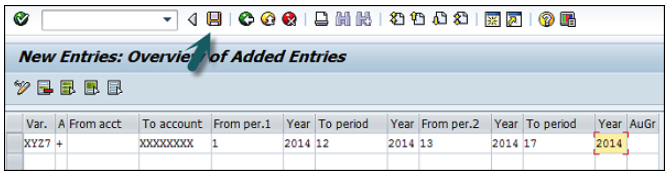
Once all the details are provided, click the Save button to save the open and closing posting periods.
Field Status Variant is used to define the fields which are used for input like cost center, profit center, plant, etc., which are entry fields, and hidden fields.
Field status Variant is a tool which is provided by SAP to assign the same set of properties to more than one object.
Example − We define fiscal year variant and it can be assigned to more than one company code.
If a field status variant is assigned to more than one company code, the same set of screen field will be displayed while posting those company fields.
Field status variant will have field status groups.
Field status group is maintained in GL account and it defines the fields while posting to the GL.
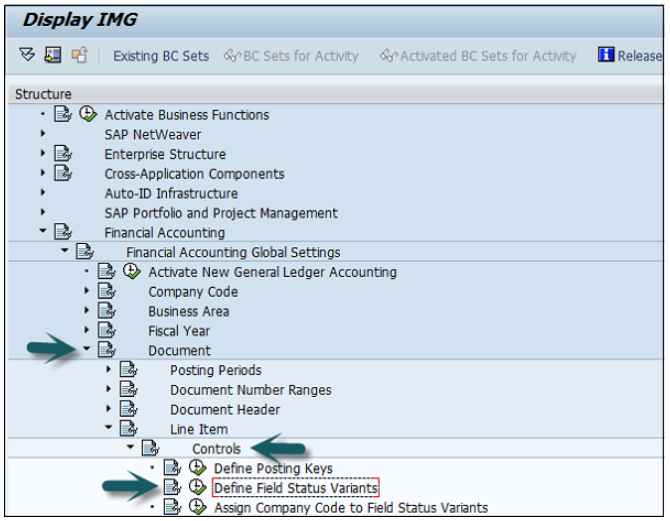
Go to SPRO → SAP Reference IMG → Financial Accounting → Financial Accounting Global Setting → Document → Line Item → Controls → Define Field Status Variant → Execute.
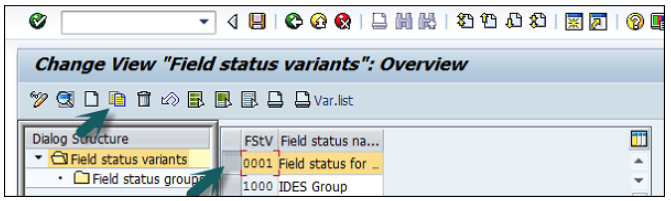
It will open a new window.
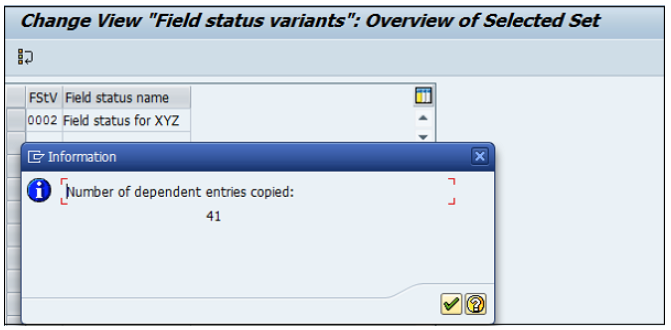
Select field status variants 0001 by clicking the box before 0001→ click the Copy icon as shown below.
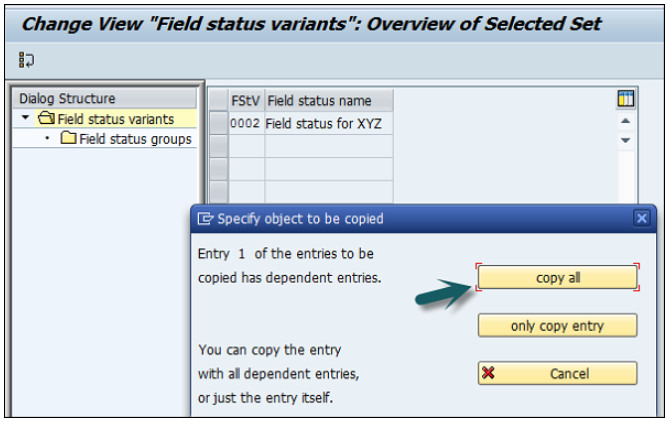
You will get a confirming message, something like: "Number of dependent entries copied: 41".
Click the Save button.
All these field status groups are clubbed to a field status variant and the Field status variant is assigned to a company code.
With this, field’s status groups from fields status variant can only be assigned when a General Ledger account is created for a company code.
Suppress − The field is hidden on the screen.
Optional − The field is available on the screen, you can keep it blank or fill it.
Require − The field is available on the screen, and you have to fill it.
Display − The field is available on the screen, but it's grayed out, you cannot fill anything in here.
Different Account Types in SAP FI −
| Posting Key | Description | Debit/Credit |
|---|---|---|
| 70 | Debit Asset | Debit |
| 75 | Credit Asset | Credit |
| Posting Key | Description | Debit/Credit |
|---|---|---|
| 89 | Stock Inward Movement | Material Debit |
| 99 | Stock outward Movement | Material Credit |
There are various Account type posting keys available in SAP FI.
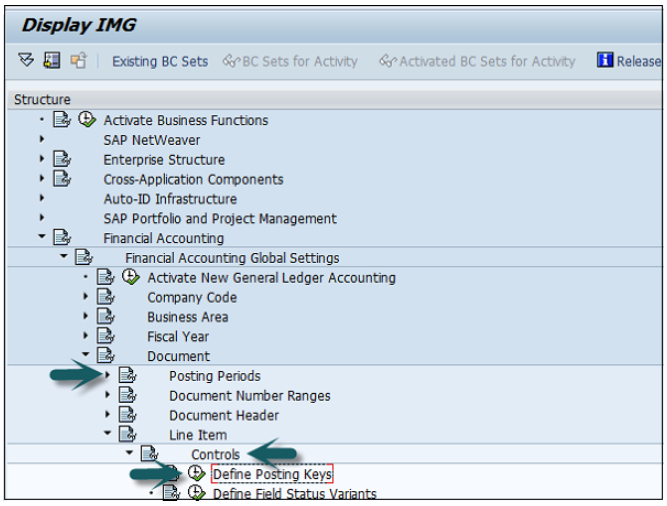
Go to SPRO → SAP Reference IMG → Financial Accounting → Financial Accounting Global Setting → Document → Line Item → Controls → Define Posting Keys → Execute.
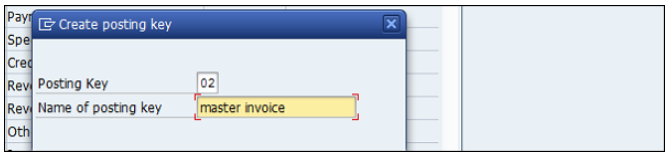
Click the Create icon.

Enter the 2-digit numeric code (Example ‘02’) and the name of the posting key and press the Enter key.
Now you need to provide the following details −
Debit/Credit Indicator − Select Debit or Credit.
Account Type − Select the Appropriate account type.
Other Attributes − Select other appropriate attributes.
Reversal Posting Key − Update the reversal posting key.
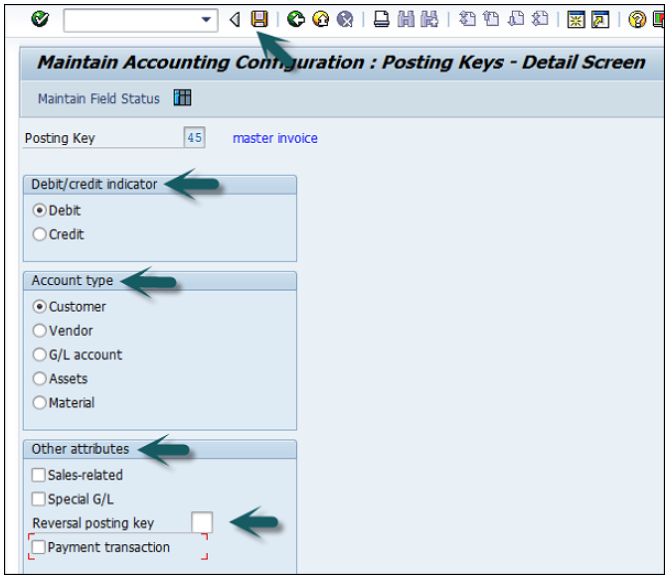
The next step is to click the Save icon to successfully configure the posting key.
Common Document Type Keys are as follows −
| Document Type | Document Type Description |
|---|---|
| AA | Asset Posting |
| AN | Net Asset Posting |
| DR | Customer Invoice |
| DZ | Customer Payment |
| KA | Vendor Document |
| KG | Vendor Credit Memo |
Go to SPRO → SAP Reference IMG → Financial Accounting → Financial Accounting Global Setting → Document → Document Header → Define Document Types → Execute.

It will open a new window. Click New Entries and provide the following details −
Document Type − Unique 2-digit code.
Number Range − Number Range Code.
Reverse Document Type − Reverse Document Type Key Code.
Number Range Information − Number ranges are maintained for document types.
Account Types allowed − Asset, Customer, Material, Vendor, and G/L Account.
Control Data − Control data for document type.
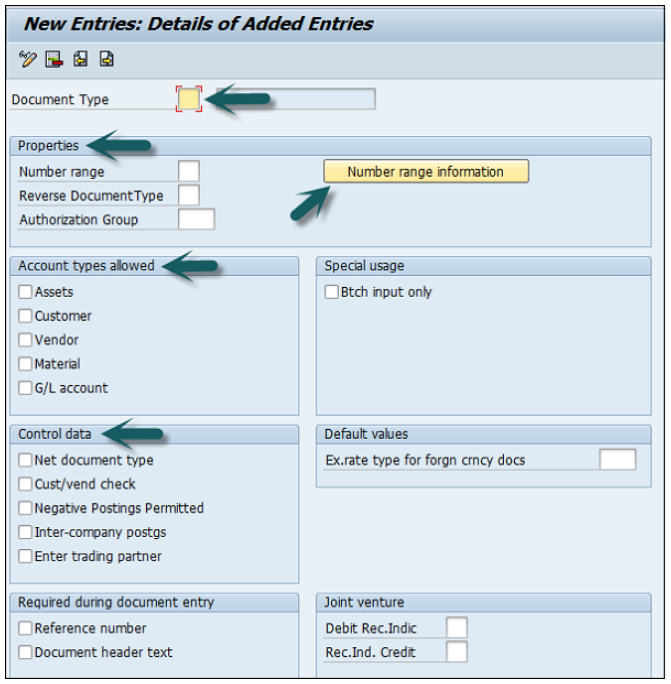
Once you enter the above data, click the Save icon.
Enter the description of document and save.
It will save the configuration of the document type.
You can assign one or more document types to number range.
The number range is applicable to document type as mentioned in the document posting and entry.
You can define document number ranges in SAP FI in two way.
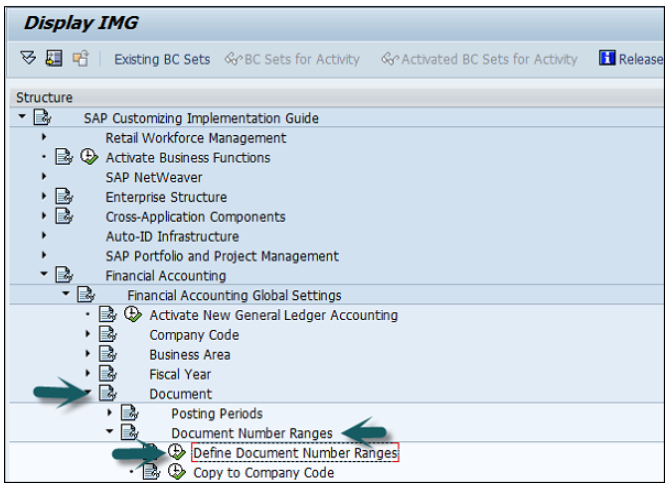
You can either use the T-code FBN1 or go to SPRO → SAP Reference IMG → Financial Accounting → Financial Accounting Global Setting → Document → Define Document Number Ranges → Execute.
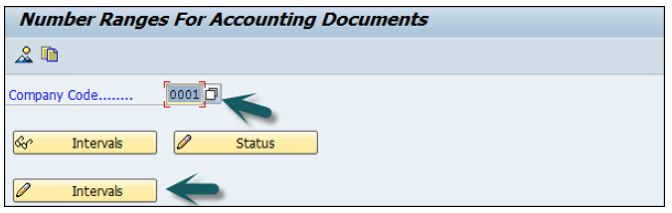
A new window will open. Enter the company code and click Change Intervals as shown below.
It will open another window. Click Insert Interval.
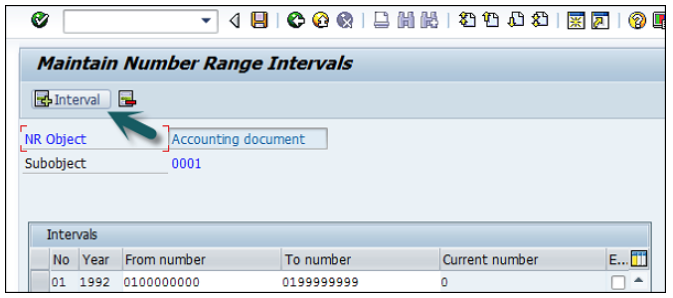
Enter the following details −
No − Number range code.
Year − Enter Year.
From Number − From number.
To Number − To Number.
Current Number − (By default it will be 0).
Ext − (Internal or External)
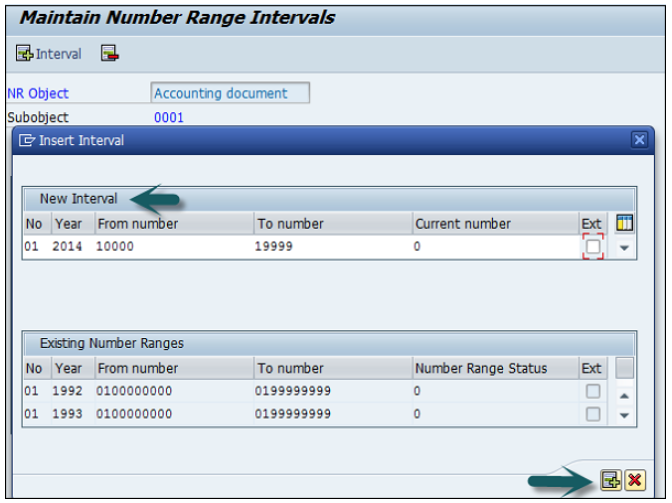
After providing all these details, click Save to save the changes.
You can also hold posting of a G/L document or temporarily save the document in the following conditions −
To hold a G/L document posting, you can use the T-code FB50, and enter the following details −
The next step is to click the Hold (F5) button at the top → Enter the temporary document number and click Hold document.

SAP FI also provides an option with Limited Authorization Amount for Posting.
An Accountant has an authority to post documents to a maximum amount $2000. Now he has to feed a document with an amount of $5000 for which he does not have the authority.
SAP FI provides a Park Facility for the document which allows the user to save the document but the amount is not posted in the G/L accounts.
This allows to review the document later reviewed by a higher authority Personnel who has appropriate posting amount authorization. Once approved, the document is posted in the G/L accounts.
To hold a G/L document posting, you can use the T-code FB50, and enter the following details −

The next step is to press the Hold (F5) button at the top → Enter the temporary document number and click Park document.

The most common ones are −
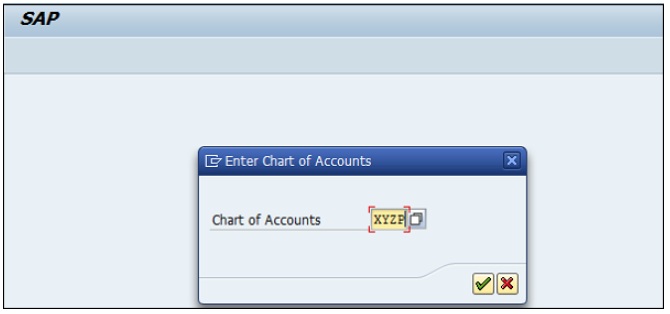
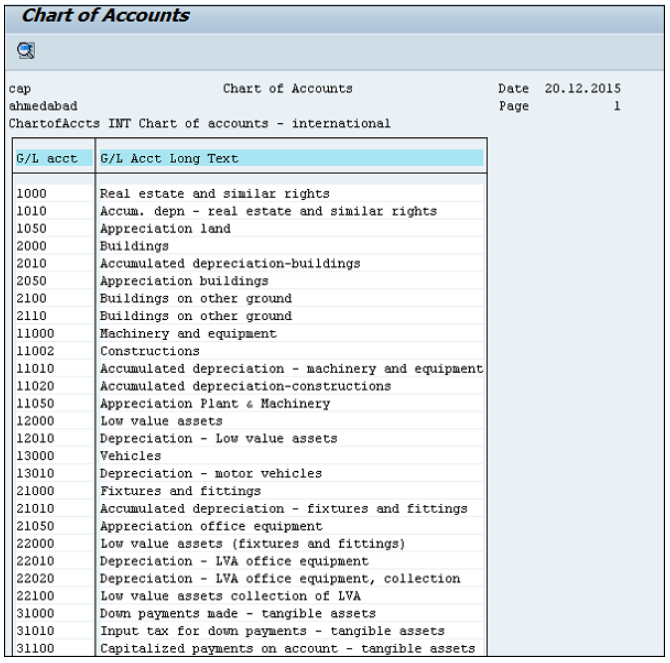
A new window will open. Enter the Chart of Accounts key → Execute (F8).
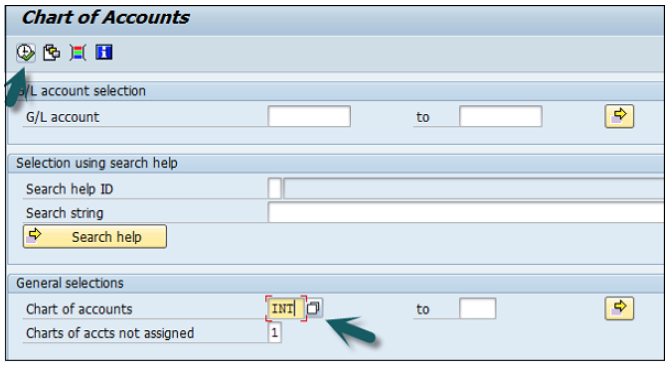
This will open a list of all G/L Chart of Accounts with respect to the key mentioned.
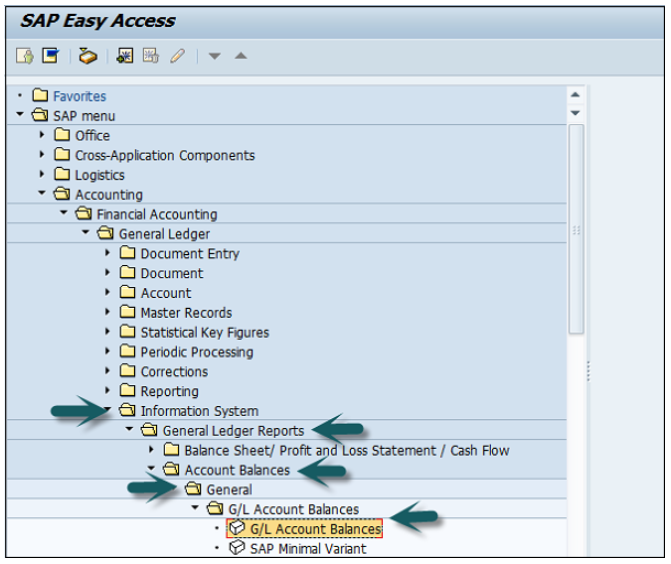
Enter the input parameters like company code to generate G/L Account Balances report → Execute.
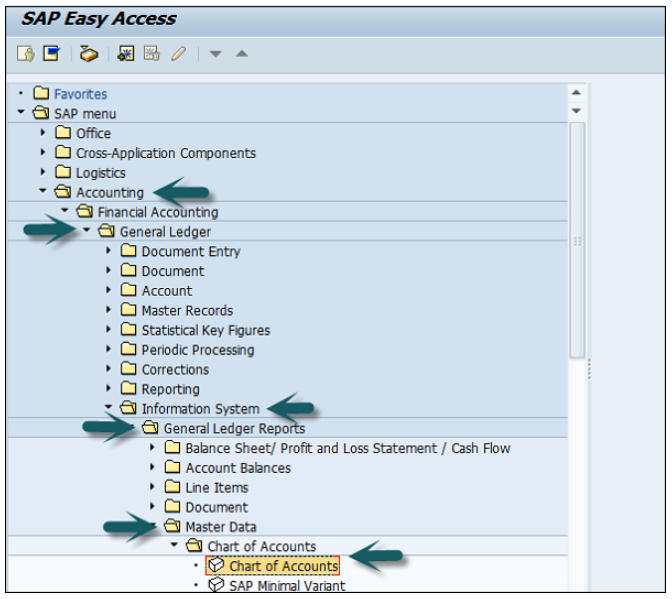
Use the T-code S_ALR_87012328 or go to the path given below −
Accounting → Finance Accounting → General Ledger → Information System → General Ledger Reports → Master Data → G/L Account List → G/L Account List.
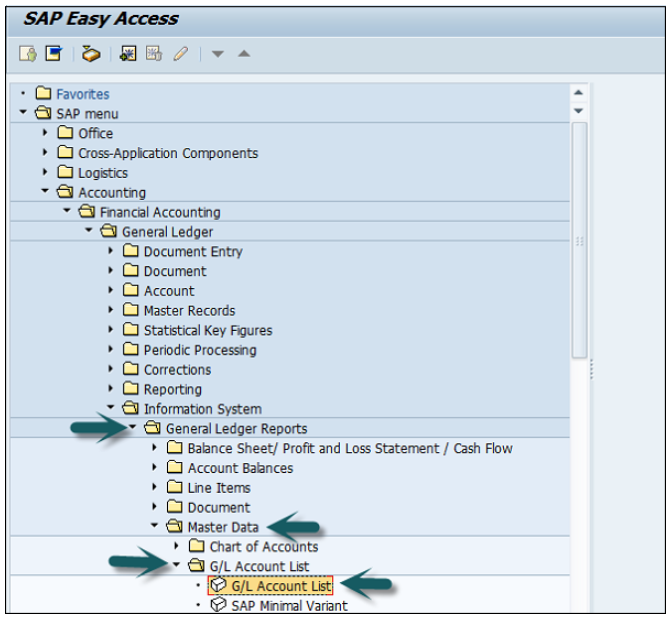
Enter Input parameters such as Company Code, Chart of Accounts, etc. to apply filter to G/L Account List → Execute.

Use the T-code S_ALR_ 87012301 or go to the path shown in the following screenshot.
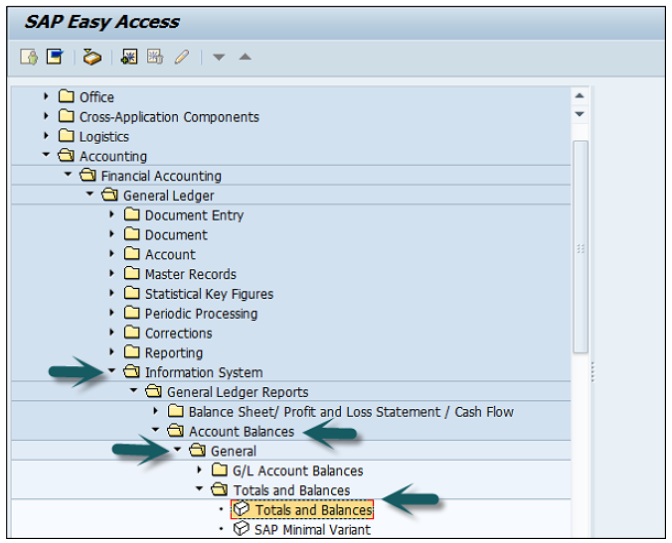
Enter the report input parameters such as company code, COA, etc. and click Execute.
A report will be generated based on input parameters.
SAP FI Accounts Receivable component records and manages accounting data of all customers. It is also an integral part of sales management.
All postings in Accounts Receivable are also recorded directly in the General Ledger. Different G/L accounts are updated depending on the transaction involved (for example, receivables, down payments, and bills of exchange). The system contains a range of tools that you can use to monitor open items such as account analyses, alarm reports, due date lists, and a flexible dunning program.
The correspondence linked to these tools can be individually formulated to suit your requirements. This is also the case for payment notices, balance confirmations, account statements, and interest calculations. Incoming payments can be assigned to due receivables using user-friendly screen functions or by electronic means such as EDI.
The payment program can automatically carry out direct debiting and down-payments.
We have a range of tools available for documenting the transactions that occur in Accounts Receivable, including balance lists, journals, balance audit trails, and other standard reports. When drawing up financial statements, the items in foreign currency are revalued, customers who are also vendors are listed, and the balances on the accounts are sorted by their remaining life.
Accounts Receivable is not merely one of the branches of accounting that forms the basis of adequate and orderly accounting. It also provides the data required for effective credit management (as a result of its close integration with the Sales and Distribution component) as well as important information for the optimization of liquidity planning.
You must create a master record for each account that you require. The master record contains data that controls how business transactions are recorded and processed by the system. It also includes all the information about a customer that you need to be able to conduct business with him.
Customer master data is used by both the accounts and sales department in an organization. By maintaining customer master data centrally, it can be accessed throughout your organization and avoid the need to enter the same information twice. You can also avoid inconsistencies in master data by maintaining it centrally.
Example − There is a change in address of one of your customers, so you only have to enter this change once in the system, and your accounting and sales departments will always have up-to-date information.
Use the T-code FD01 or go to Accounting → Finance Accounting → Accounts Receivable → Master Records → Maintain Centrally → Create.
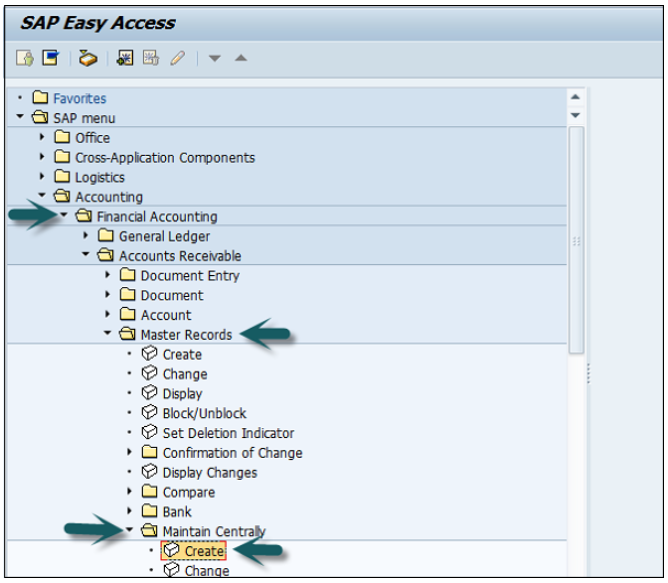
A new window will open. Enter the following details −
Select an account group.
Depending on the type of number assignment (internal or external) used for the account group, you also enter an account number.
If you wish to maintain the company code data or the sales data as well as the general data, also enter −
A company code for maintaining the FI data (accounting data).
A sales area for maintaining sales data.
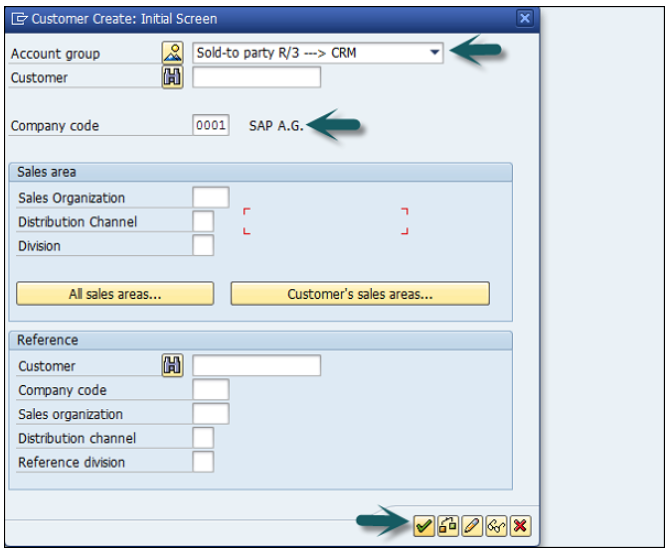
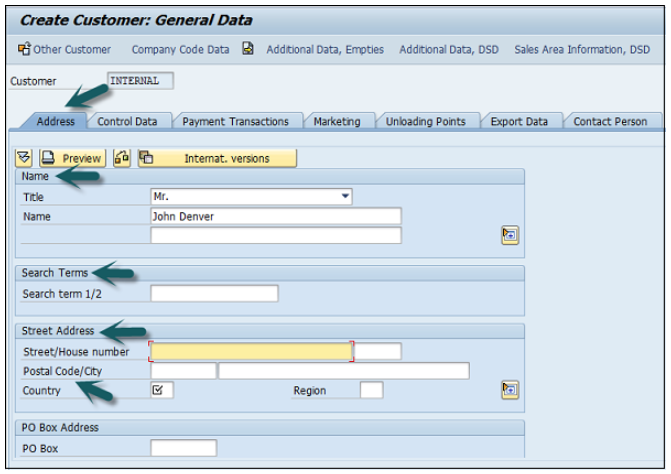
Once you click Continue, a new screen appears with customer data. Enter the following customer data and click Save.
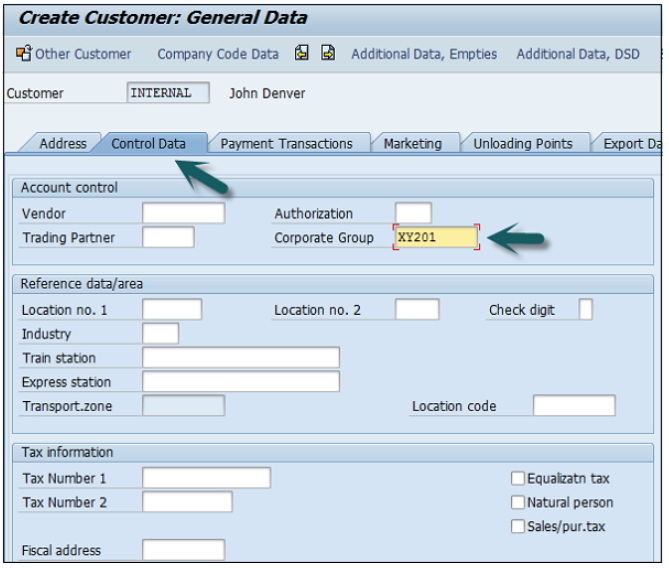
Click the Control Data tab and enter Corporate Group etc. if the customer belongs to a corporate group.
Click the second option Company Code data and go to Account Management.
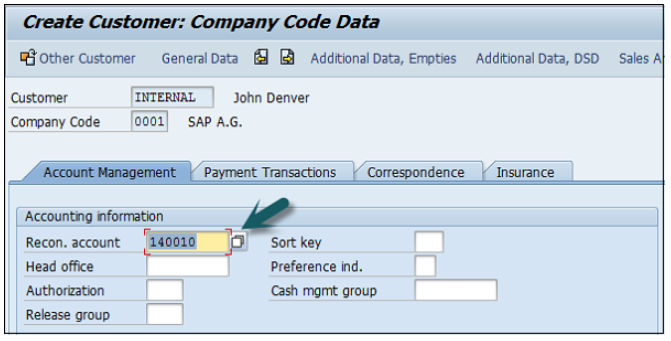
Enter Recon. Account number from the list provided. Go to Payment Transactions, enter terms of payment, tolerance group, etc.
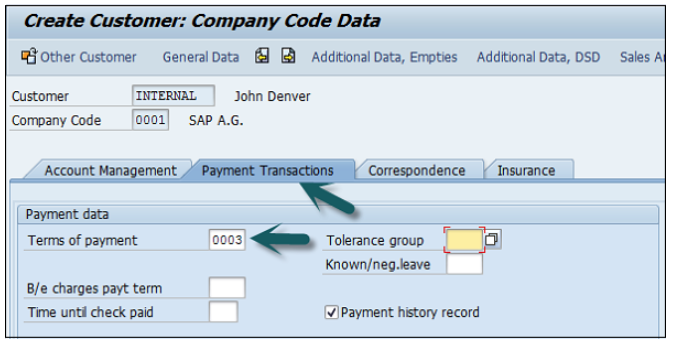
Once you are done with all the details, click the Save icon at the top.