SoapUI API/Webservices Testing Part 2
- Internal Links:
- External Links:
00:00 | SOAP UI - How To Create a Soap Project, Test Suite, Test Case
- he first displays the following from Notepad on his desktop
SOAP UI
How To Create a Soap Project, Test Suite, Test Case
- - - - - - - - - - - - - - - - - - - - - - - - - -
00:11 | he now displays SoapUI on his desktop
- he clicks the word Project in the Project panel
- a submenu is displayed, and he points out the second and third menu items in the submenu
- New SOAP Project
- New REST Project
00:31 | he wants to start a new SOAP project
- so he selects "New SOAP Project" from the submenu
- he says, inside the project we can create multiple test cases.
you need a WSDL document
00:44 | first thing is you need a WSDL document
- back to Notepad
- he adds text to the document in Notepad
SOAP UI
How To Create a Soap Project, Test Suite, Test Case
- - - - - - - - - - - - - - - - - - - - - - - - - -
WSDL: Web Service Description Language
- Go to Top
- the WSDL document is usally in XML format
SOAP UI
How To Create a Soap Project, Test Suite, Test Case
- - - - - - - - - - - - - - - - - - - - - - - - - -
WSDL: Web Service Description Language

http://www.dneonline.com/calculator.asmx?wsdl
About the URL's file extension which is .asmx
- notice that the URL's file extension is .asmx, which is an ASP.NET file
- also note the question mark after the file extension, and the letters wsdl as:
What is an ASMX file?
- A file with .asmx extensions is an ASP.NET Web Service file that provides communication between two objects over the internet using the Simple Object Access Protocol (SOAP).
- It is deployed as a service on the Windows-based Web Server to process incoming request and return the response.
What is ASP.NET?
- .NET is a developer platform made up of tools, programming languages, and libraries for building many different types of applications
- ASP.NET extends the .NET developer platform with tools and libraries specifically for building web apps.
Comparing that document (calculator.asmx?wsdl) between my browser and the one displayed in the Video.
01:14 | contents of the file in XML format
- Go to Top
- the screen shot below displays the contents of my browser after selecting that URL
- reserve
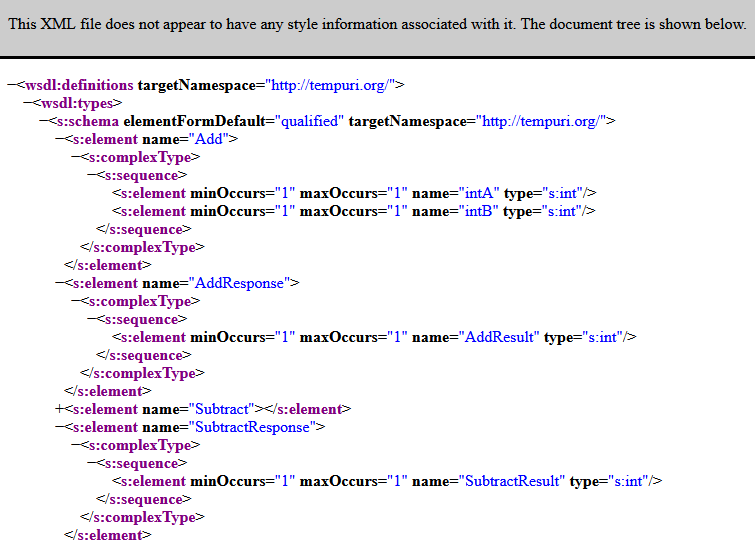
01:15 | The wsdl:definitions from the video has much more data in it than what the URL displays.
- Go to Top
- three complete lines in the video and just one expression from the URL
- the screen shot below displays the contents from the browser from the video
- Note the top few lines that are not displayed from the link.

01:22 | I think he's calling the data from the browser "SOAP resources"
- Go to Top
- this will be the input into the project
- 01:38 | we will use this document to create a new project
01:42 | Back to the SoapUI, he selects Project from the Project pane.
- Go to Top
- the submenu is displayed
- he selects the "New SOAP Project" menu item from the submenu
01:53 | Another way to start a SOAP Project
- by selecting "File" from the Top Menu Bar
- a submenu is displayed with the menu item "New SOAP Project"
- that menu item has a tool tip that displays:
- "Create a new WSDL/SOAP based Web Service Project in this workspace"
- Also note the Workspace Properties window towards the bottom of the Projects pane.
- the property "Name" has the value of "Projects"
- and the property "File" has it's value as the folder: C:\Users\admin\default-soapui-w...
- "Description" and "Project Root" are empty
Creating a new SOAP Project
01:58 | You can also create a new SOAP project by clicking the SOAP icon in the Toolbar
- Go to Top
- by using any of these three methods, the New SOAP Project dialog box will be displayed.
- clicking the word "Project" in the Project pane will display the submenu where you select "New SOAP Project"
- selecting the word "File" from the top menu bar will display the submenu where you select "New SOAP Project"
- selecting the "SOAP" button from the top menu bar will display the New SOAP Project dialog box
- reserve
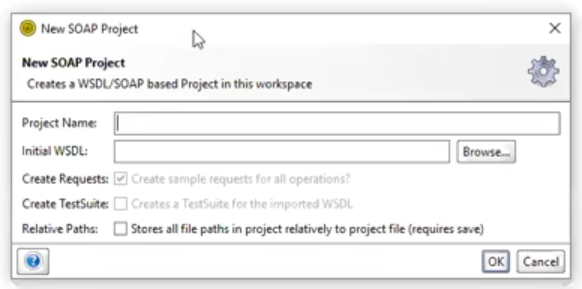
02:05 | the "New SOAP Project" dialog box is displayed
- Go to Top
- 02:30 | for "Project Name:" he enters "Calculator_SOAP"
- 02:41 | for "Initial WSDL:" he enters the URL we discussed above:
- http://www.dneonline.com/calculator.asmx?wsdl
- If the file in on one of your folders, you can fetch it with the "Browse" button, which will display the "Open" File dialog box.
- he demonstrates this by fetching a "calculator.xml" file from one of his folders.
- however he goes back to the original URL: http://www.dneonline.com/calculator.asmx?wsdl
- 03:34 he clicks the "OK" button in the "New SOAP Project" dialog box
03:34 | a Progress dialog box is displayed
- Go to Top
- displaying "Loading Definition" and a text box underneith displaying: "Loading http://www.dneonline.com/calculator.asmx?wsdl"
- 03:37 | Once it is done it updates the Project panel with a tree widget for the calculator to add, divide, multiply, and subtract.
- the "Interface Properties" fields below the Project panel, are loaded with values.
03:44 | He says a new project has been created named "Calculator_SOAP" under the "Projects" folder on top of the tree widget in the Projects panel.
- Go to Top
- Note that the property box changed, when he clicked the project name "Calculator_SOAP" from the tree in the Projects panel.
Back to the browser display the xml inside the calculator.asmx file
04:13 | he talks about installing the wsdl extension
- Go to Top
- he clicks the "Browse WSDL" button from the right side of a tool button bar, who's tool tip displays "Browse WSDL has access to this site"
- reserve
SOAP UI
How To Create a Soap Project, Test Suite, Test Case
- - - - - - - - - - - - - - - - - - - - - - - - - -
WSDL: Web Service Description Language

http://www.dneonline.com/calculator.asmx?wsdl

Wizdler
About the Wizdler Extension
04:17 | he's talking about Wizdler
- Go to Top
- he searches for Wizdler thru Google
- Google Search: Wizdler
- Google Search: wizdler firefox
- I installed the version for Firefox.
- The "Browse WSDL..." button shows up on the right side of the URL text box,
- only when the proper type of document is displayed in the browser.
- So far it works fine.
- He is looking for the Wizdler extension for the Chrome browser
- there is one for the Firefox browser
- what is Wizdler - Parses the WSDL files and generates SOAP messages for you.
- Recognizes WSDL information on the page to show you the available services and operations.
- Click the operation to generate the SOAP requests and view the response.
- By clicking the service, you can download WSDL and external XSD files in single ZIP file.
Adding the Wizdler Extension
04:31 | he adds the "WSDL for Google Chrome" extension to his browser
- Go to Top
- 04:53 | after the document is opened in your browser, he clicks on the Wizdler or WSDL button that was attached to his browser's toolbar when he installed Wizdler
- a small window near the button opens displaying info about the file
- I already added the extension to my Firefox browser

Opening a project in the Project panel
05:13 | he goes back to the SoapUI window
- Go to Top
- he clicks the plus sign (+) in front of "Calculator_SOAP" on the Projects panel
- the two versions of the calculator are displayed with their functions in a tree view
- "CalculatorSoap" and "CalculatorSoap12" with identical functions, Add, Divide, Multiply, & Subtract
Two projects open, he wants to delete one of them from the Project panel
05:24 | He wants to remove one of the versions named "CalculatorSoap12"
- Go to Top
- He selects "CalculatorSoap12" from the tree view widget
- a submenu is displayed, the last menu item is labled "Remove"
- he clicks the Remove menu item from the submenu
- a dialog box titled "Remove Interface" and displaying:
- Remove interface [CalculatorSoap12] from project [CalculatorSoap]?
- there are two buttons, "Yes" and "No"
- he clicks the "Yes" button
05:27 | CalculatorSoap12 disappears from the tree.
- Go to Top
- Now only the CalculatorSoap is visible with it's functions Add, Divide, Multiply, and Subtract in the tree.
- he is saying that "Calculator_SOAP" is the project
- he is saying that "CalculatorSoap" is the WSDL
- which contain the four xxxxxx xxxxxx
- he clicks the plus sign (+) in front of each of the four functions, Add, Divide, etc
- and the tree drops down and displays "Request 1" under each of the four functions.
- he now clicks the minus sign (-) in front of each of the four functions, Add, Divide, etc
- and the "Request 1" leaves under each of the four functions disappear
- and the minus signs (-) turn into plus signs (+)
06:08 | he displays notepad again with some new lines
- Go to Top
SOAP UI
How To Create a Soap Project, Test Suite, Test Case
- - - - - - - - - - - - - - - - - - - - - - - - - -
WSDL: Web Service Description Language

http://www.dneonline.com/calculator.asmx?wsdl

Wizdler

1) Create SOAP Project using WSDL
2) Create Test suite & Test cases
3) Added contains assertion
4) Execute tests in sequence & parallel
5) Documentation
06:10 | Number 1 is now done.
- Go to Top
- he says we have to create Test suite & Test cases based on the project's WSDL
06:19 | he goes back to the SoapUI window
- Go to Top
- he clicks the plus sign (+) in front of Add and the Request 1 item drops down as a leaf.
The Request and Receive panels
06:23 | he selects Request 1 and a large window opens with two panes
- Go to Top
- the pane on the left has code in it
- the pane on the right is empty, but that is where we get our response
The code below is displayed in the Request pane on the left
- Go to Top
- the code was suppose to display the angle brackets, but the browser doesn't like that so I used parentheses
(soapenv:Envelope xmlns:soapenv="http://sc ...)
   (soapenv:Header/)
   (soapenv:Body)
      (tem:Add)
         (tem:intA)?(/tem:intA)
         (tem:intB)?(/tem:intB)
      (/tem:Add)
   (/soapenv:Body)
(soapenv:Envelope)
06:23 | The Property Box at the bottom is displaying the Request Properties
- Go to Top
- Name: Request 1
- Description:
- Message Size: 291
- Encoding: UTF-8
- Endpoint: http://www.dneonline.com/calc...
- there are other properties
- Go to Top
- Above the two panes is a long text box containing a URL
- http://www.dneonline.com/calculator.asmx
06:42 | he is reminding us that this is an "Add" request
- Go to Top
- when you pass a value for intA as 10
- and the value of 20 for intB as displayed below
- Note that the values are placed where the question mark (?) use to be.
(soapenv:Envelope xmlns:soapenv="http://sc ...)
   (soapenv:Header/)
   (soapenv:Body)
      (tem:Add)
         (tem:intA)10(/tem:intA)
         (tem:intB)20(/tem:intB)
      (/tem:Add)
   (/soapenv:Body)
(soapenv:Envelope)
Running the Request
06:49 | He clicks the "Run" button to run the request
- Go to Top
- it gives us a response in the right pane
- in the line that has the text: (AddResult)30(/AddResult)
- you can see the answer is 30
- below is the response displayed in the right pane
- the left pane is the Request pane and the right pane is the Response pane
(soap:Envelope xmlns:soap="http://schemas.xmls ...)
   (soap:Body)
      (AddResponse xmlns="http://tempuri.org/ ...)
         (AddResult)30(/AddResult)
      (/AddResponse)
   (/soap:Body)
(soap:Envelope)
06:58 | the response comes as XML format
- Go to Top
- He closed the entire "Request 1" window which consisted of
- the url in the text box and the Request and Response panes
- the Close button [X] is located in the "Request 1" window's title bar on the far right side.
07:07 | he says: these are not our test cases, these are simply Requests types
- Go to Top
- there is no way the WSDL can run these request (Add, Multiply, etc) on their own
- he says we need to create our own test suites and test cases
- he points to "2) Create Test suite & Test cases" as displayed below.
1) Create SOAP Project using WSDL
2) Create Test suite & Test cases
3) Added contains assertion
4) Execute tests in sequence & parallel
5) Documentation
Generating TestCases
07:27 | back to SoapUI
- Go to Top
- he right-clicks "CalculatorSoap" from the Projects panel
- a submenu is displayed and another window is displayed
- he closed the second window and tried right-clicking again to display the submenu
- one of the menu items from the submenu is "Generate TestSuite"
- he selects the "Generate TestSuite" menu item from the submenu.
- 07:44 | the "Generate TestSuite" dialog box is displayed
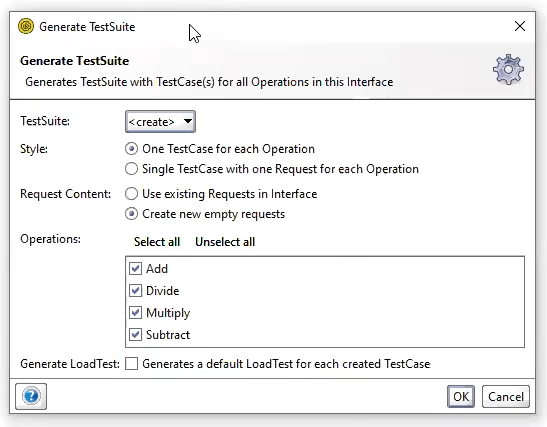
07:49 | within the "Generate TestSuite" dialog box,
- Go to Top
- he is looking at the "TestSuite:" drop-down menu, currently displaying (create)
- since it looks like it's the only option, we will use it.
07:52 | there are two choices for "Style:"
- Go to Top
- [O] One TestCase for each Operation
- [O] Single TestCase with one Request for each Operation
08:04 | if this is selected: One TestCase for each Operation
- Since we have four functions, he calls them operations, Add, Multiply, Divide, and Subtract
- This will create one testcase for each operation, therefore creating 4 testcases.
08:25 | if this is selected: Single TestCase with one Request for each Operation
- this means that all operations are considered as one TestCase
08:51 | he selects: One TestCase for each Operation
- this will create one testcase for each operation, therefore creating 4 testcases.
- other options include:
- taking the default for "Request Content:" as "Create new empty request"
- and leaving all four "Operations" as selected
- and leaving "Generate Load Test" blank
- he clicks the "Generate TestSuite" dialog box's "OK" button
08:55 | a small dialog box is displayed titled: "Generate TestSuite"
- Go to Top
- in this dialog box it wants you to enter a TestSuite name
- by default it is displaying "CalculatorSoap TestSuite" as the TestSuite name
- 09:25 | he changes the name to "CalculatorTestSuite"
- 09:34 | he then clicks the "Generate TestSuite" dialog box's "OK" button
TestCases Created
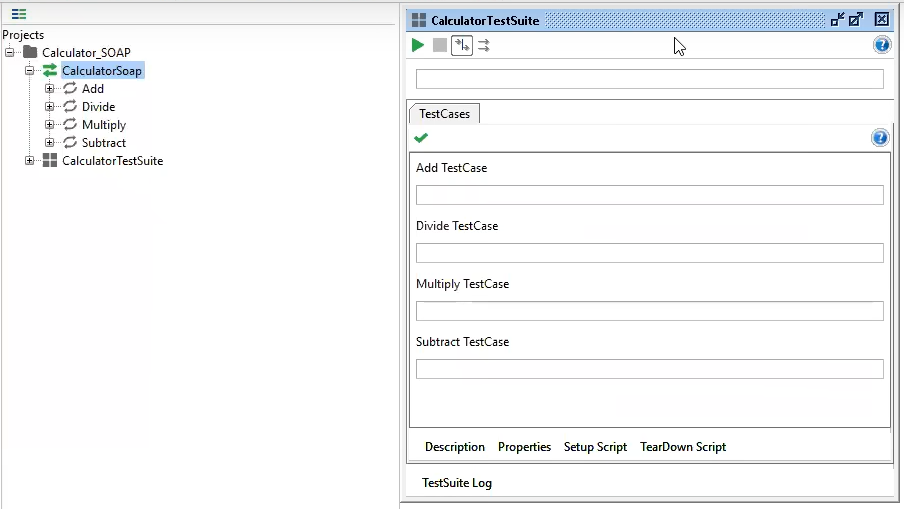
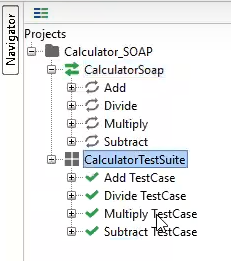
09:36 | Several things just happened
- Go to Top
- another branch from "CalculatorSoap" named "CalculatorTestSuite" appeared in the tree view on the Projects panel
- and a new window popped up titled "CalculatorSoap"
- with one tab and four text boxes
- here's a screen shot below
09:38 | he closes the "CalculatorTestSuite" dialog box that is displayed above
- Go to Top
- however the new leaf titled "CalculatorTestSuite" is still visible in the tree view in the Projects panel
09:41 | he clicks the plus or expand button (+) in front of "CalculatorTestSuite" in the tree view
- Go to Top
- and four new branches are displayed labled
- Add TestCase
- Divide TestCase
- Multiply TestCase
- Subtract TestCase
- Here's a screen shot
10:06 | back to the document in Notepad
- Go to Top
- he says this "2) Create Test suite & Test cases" is now completed
- he created one TestSuite named "CalculatorTestSuite"
- with four TestCases, Add TestCase, Divide TestCase, Multiply TestCase, and Subtract TestCase
- by using WSDL
1) Create SOAP Project using WSDL
2) Create Test suite & Test cases
3) Added contains assertion
4) Execute tests in sequence & parallel
5) Documentation
10:12 | back to the SoapUI window
- Go to Top
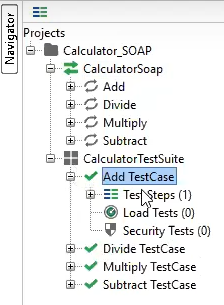
- now he clicks the Expand (+) button in front of Add TestCase
- three branches are exposed
- Test Steps (1)
- Load Tests (0)
- Security Tests (0)
- as shown in the screen shot below
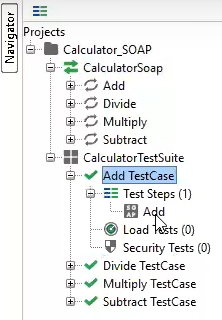
10:34 | he clicks the Expand button for Test Steps(1)
- Go to Top
- one new branch is exposed titled "Add" as shown in the screen shot below
Testing the Add TestCase, requesting and responding
10:40 | about the "Add" leaf on the tree view
- Go to Top
- When you single click on "Add", it's "TestRequest Properties" are revealed in the Project panel.
- When you double click on "Add", the window with the "Request" and "Response" panes are displayed
- with the URL as http://www.dneonline.com/calculator.asmx in the text above the two panes
- with the following text in the Request pane on the left
(soapenv:Envelope xmlns:soapenv="http://sc ...)
   (soapenv:Header/)
   (soapenv:Body)
      (tem:Add)
         (tem:intA)?(/tem:intA)
         (tem:intB)?(/tem:intB)
      (/tem:Add)
   (/soapenv:Body)
(soapenv:Envelope)
11:29 | we need to pass some input to get a response
- Go to Top
- again, he will type some numbers over the two question marks
- intA question mark will become a 10
- intB question mark will become a 20
- so it will look like this:
(soapenv:Envelope xmlns:soapenv="http://sc ...)
   (soapenv:Header/)
   (soapenv:Body)
      (tem:Add)
         (tem:intA)10(/tem:intA)
         (tem:intB)20(/tem:intB)
      (/tem:Add)
   (/soapenv:Body)
(soapenv:Envelope)
Running the TestCase for Add
11:42 | he clicks the green "Run" button
- Go to Top
- the following text is displayed in the Response pane on the right
- you can find the answer of 30 on the fourth line
- (AddResult)30(/AddResult)
(soap:Envelope xmlns:soap="http://schemas.xmls ...)
   (soap:Body)
      (AddResponse xmlns="http://tempuri.org/ ...)
         (AddResult)30(/AddResult)
      (/AddResponse)
   (/soap:Body)
(soap:Envelope)
Opening the Subtract TestCase
12:09 | he is showing off the Subtract Test Step
- Go to Top
- screenshot of the Projects panel with Subtract TestCase fully expanded
- and a screenshot of the text inside the Request panel
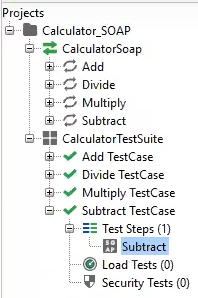
- screenshot below of the text inside the Request panel
(soapenv:Envelope xmlns:soapenv="http://sc ...)
   (soapenv:Header/)
   (soapenv:Body)
      (tem:Subtract)
         (tem:intA)?(/tem:intA)
         (tem:intB)?(/tem:intB)
      (/tem:Subtract)
   (/soapenv:Body)
(soapenv:Envelope)
Testing the Subtract TestCase
12:12 | editing the text from ? to numbers in the Request panel
- Go to Top
- example: 100 - 50 = 50
- 12:12 | changing intA from ? to 100
- 12:15 | changing intB from ? to 50
- 12:17 | he runs the test case by clicking the green Run button just under the title bar for Subtract
- 12:18 | the Respnce pane is filled in, as shown below.
(soap:Envelope xmlns:soap="http://schemas.xmls ...)
   (soap:Body)
      (SubtractResponse xmlns="http://tempuri.org/ ...)
         (SubtractResult)30(/SubtractResult)
      (/SubtractResponse)
   (/soap:Body)
(soap:Envelope)
00:00 | reserve reserve
- Go to Top
- reserve
- reserve
00:00 | reserve reserve
- Go to Top
- reserve
- reserve
Reserve
- Go to Top
- reserve
- reserve-grey
- reserve-red
- reserve-grey2
YouTube Videos